

Issue
Cause and solution

Cause and solution
Cause and solution
Cause and solution
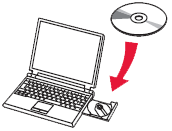
If the installation does not start even after the Setup CD-ROM is inserted into your computer's disc drive:
Start the installation following the procedure below.
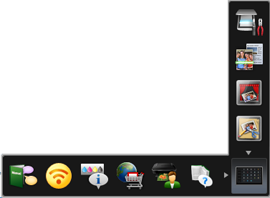
1. Select items from the [ Start ] menu as shown below.
2. Double-click the 
If the contents of the CD-ROM are displayed, double-click MSETUP4.EXE.
Caution
- Remove the CD-ROM from your computer, then insert it again.
- Restart your computer.
If the CD-ROM icon is not yet displayed, try different discs and see if they are displayed. If other discs are displayed, there is a problem with the Setup CD-ROM. In this case, contact the service center.
Cause and solution
If you are unable to proceed beyond the Printer Connection screen:
If you are unable to proceed beyond the [ Printer Connection ] screen, make sure that the USB cable is securely plugged into the USB port of the machine and is connected to the computer, and then follow the procedure below to reinstall the MP Drivers.
Caution
Cause and solution
1. Click [ Cancel ].
2. Click [ Start Over ] on the [ Installation Failure ] screen.
3. Click [ Exit ] on the "PIXMA XXX" screen (where "XXX" is your model name), then remove the CD-ROM.
4. Turn the machine off.
5. Restart the computer.
6. Make sure that you have no application software running.
7. Insert the CD-ROM again, then install the MP Drivers.
Cause and solution
In other cases:
Reinstall the MP Drivers.
If the MP Drivers were not installed correctly, uninstall the MP Drivers, restart your computer, and then reinstall the MP Drivers.
If you reinstall the MP Drivers, install the MP Drivers on the Setup CD-ROM.
Caution
Caution

You will be prompted to connect it during the installation using the Setup CD-ROM.
Windows
Caution
Screens are based on Windows 7 operating system Home Premium. Actual screens may differ depending on the OS version.
1. Insert the CD-ROM into the computer.
Caution
If the USB cable is already connected, unplug it. If a message appears on the computer, click Cancel.
2. Click Run Msetup4.exe on the AutoPlay screen, then click Yes or Continue on the User Account Control dialog box.
If the User Account Control dialog box reappears in following steps, click Yes or Continue.
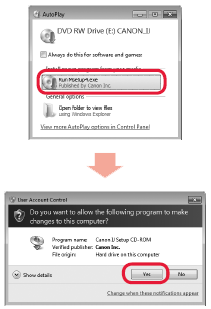
Caution
If the CD-ROM does not autorun:
Double-click (My) Computer ⋗ CDROM icon ⋗ MSETUP4.EXE.
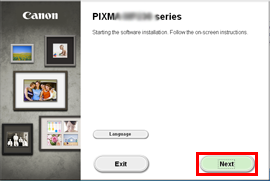
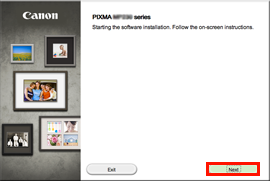
3. Click [Next].
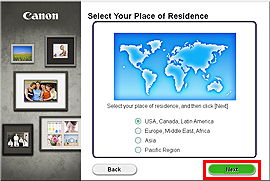
4. Select your place of residence, then click Next.
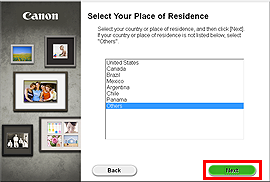
5. Select a country or region, then click Next.
Caution
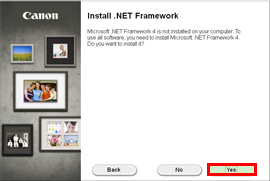
When the .NET Framework screen appears, click [Yes].
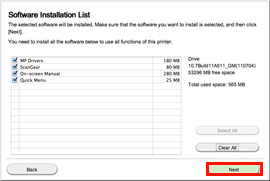
6. Click [Next].
Caution
Easy-WebPrint EX is Web print software that is installed on the computer when installing the supplied software. Internet Explorer 7 or later (Windows) is required to use this software. An Internet connection is required for installation.
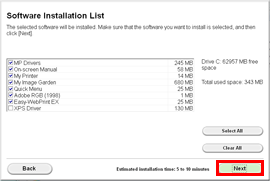
Follow any on-screen instructions to proceed with the software installation.
- Important Information for the Installation

When the Printer Connection screen appears, connect the printer to the computer with a USB cable.
After connecting the cable, TURN ON THE PRINTER.
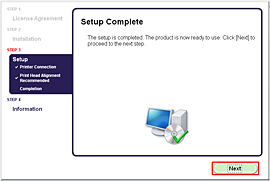
7. Click [Next].
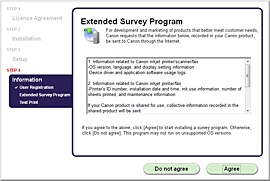
If you can agree to Extended Survey Program, click Agree.
If you click Do not agree, the Extended Survey Program will not be installed.
(This has no effect on the printer's functionality.)
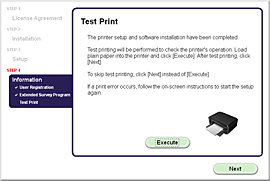
Test printing will be performed to check the printer's operation.
Load plain paper into the printer and click [Execute].
After test printing, click [Next].
To skip test printing, click [Next] instead of [Execute].
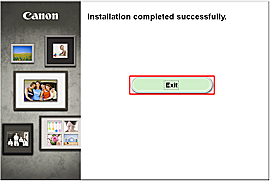
8. Click [Exit] to complete the installation.
Remove the Setup CD-ROM and keep it in a safe place.
9. Quick Menu starts.
Caution
In Windows 7 and Windows Vista SP1 or later, the XPS Printer Driver can be installed additionally.In order to perform the installation, select [XPS Driver] in the step 6 of [Windows].
Macintosh
Caution
Screens are based on Mac OS X v.10.7. Actual screens may differ depending on the OS version.
1. Insert the CD-ROM into the computer.
Caution
If the USB cable is already connected, unplug it. If a message appears on the computer, click Cancel.
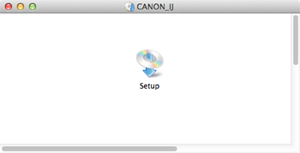
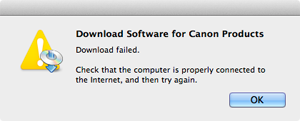
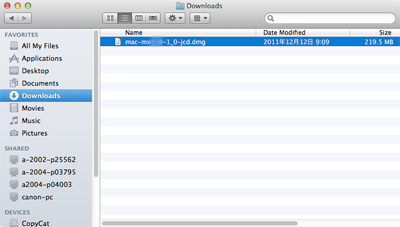
2. Double-click the [Setup] icon in the CD-ROM folder, then click [Download] in the subsequent window.
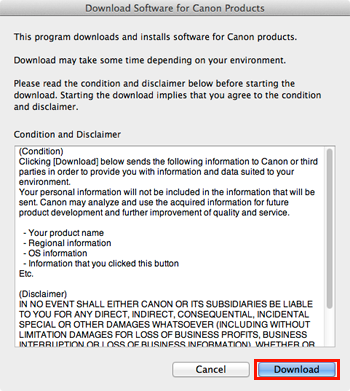
Caution

- If you click [No], you will return to the screen displayed while downloading.
- If you click [Yes], the download is cancelled. In this case, the files under the download are deleted.
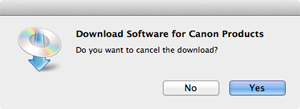
Click [OK], and you will go back to the screen for downloading in the procedure 2.
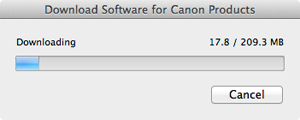
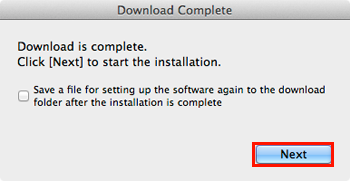
3. When the download is complete, the screen below is displayed. Click [Next].
Caution
Select "Save a file for setting up the software again to the download folder after the installation is complete," and the file will be saved to the download folder.
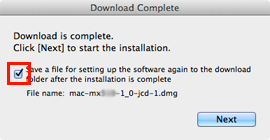
You can perform the setup later using this file.
4. In the subsequent screen, enter the administrator name and password. Then click [OK].

5. Click [Next].
6. Select your place of residence, then click Next.
7. Select a country or region, then click Next.
8. Click [Next].
Follow any on-screen instructions to proceed with the software installation.
- Important Information for the Installation
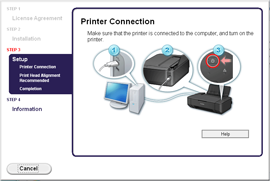
When the Printer Connection screen appears, connect the printer to the computer with a USB cable.
After connecting the cable, TURN ON THE PRINTER.
9. Click [Next].
If you can agree to Extended Survey Program, click Agree.
If you click Do not agree, the Extended Survey Program will not be installed.
(This has no effect on the printer's functionality.)
Test printing will be performed to check the printer's operation.
Load plain paper into the printer and click [Execute].
After test printing, click [Next].
To skip test printing, click [Next] instead of [Execute].
10. Click [Exit] to complete the installation.
Remove the Setup CD-ROM and keep it in a safe place.
11. Quick Menu starts.

Cause and solution

Cause and solution
Cause and solution
Cannot Install the Printer Driver
Reinstall the printer driver.
If you reinstall the printer driver, install the printer driver on the Setup CD-ROM.
Caution
- Remove the CD-ROM from your computer, then insert it again.
- Restart your computer.
If the CD-ROM icon is not yet displayed, try different discs and see if they are displayed. If other discs are displayed, there is a problem with the Setup CD-ROM. In this case, contact the service center.
Caution
You will be prompted to connect it during the installation using the Setup CD-ROM.
Windows
Caution
Screens are based on Windows 7 operating system Home Premium. Actual screens may differ depending on the OS version.
1. Insert the CD-ROM into the computer.
Caution
If the USB cable is already connected, unplug it. If a message appears on the computer, click Cancel.
2. Click Run Msetup4.exe on the AutoPlay screen, then click Yes or Continue on the User Account Control dialog box.
If the User Account Control dialog box reappears in following steps, click Yes or Continue.
Caution
If the CD-ROM does not autorun:
Double-click (My) Computer ⋗ CDROM icon ⋗ MSETUP4.EXE.
3. Click [Next].
4. Select your place of residence, then click Next.
5. Select a country or region, then click Next.
Caution
When the .NET Framework screen appears, click [Yes].
6. Click [Next].
Caution
Easy-WebPrint EX is Web print software that is installed on the computer when installing the supplied software. Internet Explorer 7 or later (Windows) is required to use this software. An Internet connection is required for installation.
Follow any on-screen instructions to proceed with the software installation.
- Important Information for the Installation
When the Printer Connection screen appears, connect the printer to the computer with a USB cable.
After connecting the cable, TURN ON THE PRINTER.
7. Click [Next].
If you can agree to Extended Survey Program, click Agree.
If you click Do not agree, the Extended Survey Program will not be installed.
(This has no effect on the printer's functionality.)
Test printing will be performed to check the printer's operation.
Load plain paper into the printer and click [Execute].
After test printing, click [Next].
To skip test printing, click [Next] instead of [Execute].
8. Click [Exit] to complete the installation.
Remove the Setup CD-ROM and keep it in a safe place.
9. Quick Menu starts.
Caution
In Windows 7 and Windows Vista SP1 or later, the XPS Printer Driver can be installed additionally.In order to perform the installation, select [XPS Driver] in the step 6 of [Windows].
Macintosh
Caution
Screens are based on Mac OS X v.10.7. Actual screens may differ depending on the OS version.
1. Insert the CD-ROM into the computer.
Caution
If the USB cable is already connected, unplug it. If a message appears on the computer, click Cancel.
2. Double-click the [Setup] icon in the CD-ROM folder, then click [Download] in the subsequent window.
Caution
- If you click [No], you will return to the screen displayed while downloading.
- If you click [Yes], the download is cancelled. In this case, the files under the download are deleted.
Click [OK], and you will go back to the screen for downloading in the procedure 2.
3. When the download is complete, the screen below is displayed. Click [Next].
Caution
Select "Save a file for setting up the software again to the download folder after the installation is complete," and the file will be saved to the download folder.
You can perform the setup later using this file.
4. In the subsequent screen, enter the administrator name and password. Then click [OK].
5. Click [Next].
6. Select your place of residence, then click Next.
7. Select a country or region, then click Next.
8. Click [Next].
Follow any on-screen instructions to proceed with the software installation.
- Important Information for the Installation
When the Printer Connection screen appears, connect the printer to the computer with a USB cable.
After connecting the cable, TURN ON THE PRINTER.
9. Click [Next].
If you can agree to Extended Survey Program, click Agree.
If you click Do not agree, the Extended Survey Program will not be installed.
(This has no effect on the printer's functionality.)
Test printing will be performed to check the printer's operation.
Load plain paper into the printer and click [Execute].
After test printing, click [Next].
To skip test printing, click [Next] instead of [Execute].
10. Click [Exit] to complete the installation.
Remove the Setup CD-ROM and keep it in a safe place.
11. Quick Menu starts.