

Solution
Standard installation is when you select an existing printer port manually.
You can also install a network printer or set up a shared printer by following the procedure below.
Caution
If you are using a printer connected to a network using TCP/IP protocol, you can automatically search for a port to install the printer driver. For instructions, see [Dynamic Installation].
1. Insert the Software CD-ROM into the CD-ROM drive ⋗ wait for the installation process to start.


If nothing happens, double-click the [My Computer] icon ⋗ the CD-ROM drive icon ⋗ the [MInst.exe] icon to start the installation process.

If the [AutoPlay] dialog box appears, click [Run MInst.exe].
If Windows Explorer opens, double-click the [MInst.exe] icon.
If nothing happens, on the [ 
If you cannot find the [MInst.exe] icon on your CD-ROM:
1-1. Double-click the following folders: [PCL] or [UFRII] ⋗ [uk_eng] ⋗ [32BIT].
1-2. Double-click the [Setup.exe] icon to start the installation process ⋗ proceed to step 4.
Caution
Depending on the software or the operating system you are using, a screen for selecting the language to be used for the installer may be displayed before installing.
2. On the CD-ROM Setup screen, click [Installation].
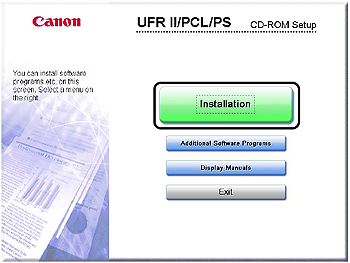
3. Select the Printer Driver from the list ⋗ click [Install].

If you select multiple drivers to be installed, the drivers are installed in sequence.
Caution
4. Click [Next].
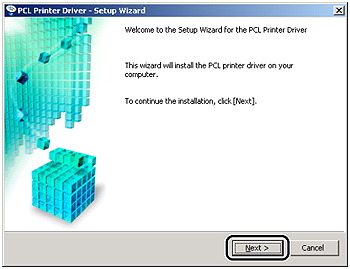
5. Read the license agreement carefully. If you agree to the terms, click [Yes].
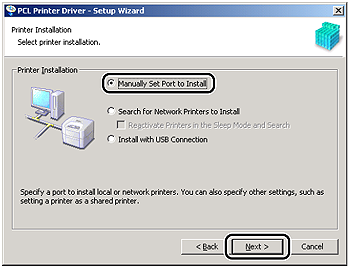
6. Select [Manually Set Port to Install] ⋗ click [Next].
Caution
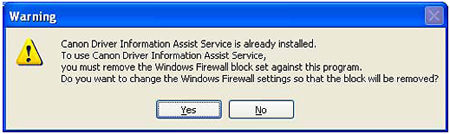
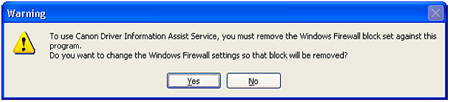
If you have installed Canon Driver Information Assist Service and are using an operating system equipped with Windows Firewall, when the following message box is displayed, click [Yes] or [No].
- If you select [Yes], Windows Firewall will be configured to unblock the connection for Canon Driver Information Assist Service, so that you can set up the printer configuration automatically or use the Job Accounting feature.
- If you select [No], you cannot use Canon Driver Information Assist Service.
7. Click [Next].
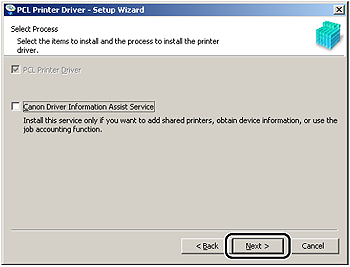
If the required drivers have already been installed using the installer, the following screen is displayed. Select an option under [Process to Install Printer Driver] ⋗ click [Next].
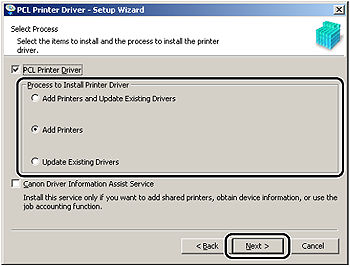
[Process to Install Printer Driver]
- [Add Printers and Update Existing Drivers]: You can install a new driver and update existing drivers simultaneously.
- [Add Printers]: You can add a new driver without affecting existing drivers.
- [Update Existing Drivers]: You can update the existing drivers already installed without having to add a new one. To do this, see [Updating the Existing Printer Drivers].
If you want to install the Canon Driver Information Assist Service together with the printer driver, also select [Canon Driver Information Assist Service].
Caution
- If you select [Yes], Windows Firewall will be configured to unblock the connection for Canon Driver Information Assist Service, so that you can set up the printer configuration automatically or use the Job Accounting feature.
- If you select [No], you cannot use Canon Driver Information Assist Service.
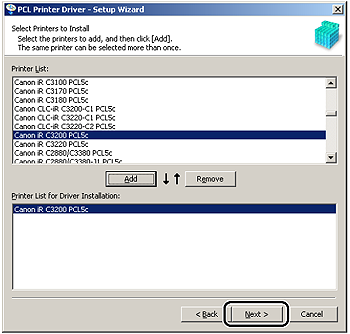
8. Select the printer driver(s) you want to install from [Printer List] ⋗ click [Add].
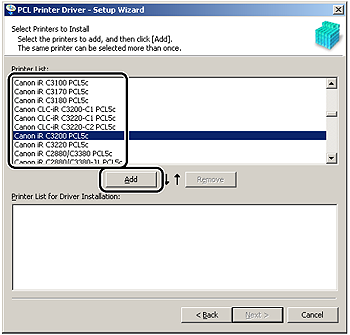
The printer driver(s) you selected is added to [Printer List for Driver Installation].
Caution
9. Check that the printer driver(s) you want to install is selected in [Printer List for Driver Installation] ⋗ click [Next].
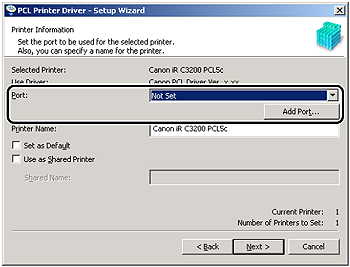
10. Select a port.
Caution
If more than one printer driver is selected, this dialog box will reappear to enable selection of different ports for other printer drivers.

10-A-1. Select the printer port you want to use from [Port].
10-B-1. Click [Add Port].
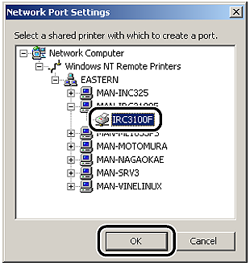
10-B-2. Select [Network] from [Add Port] dialog box ⋗ click [OK].
10-B-3. Select the network printer ⋗ click [OK].
10-C-1. Click [Add Port].
10-C-2. Select the printer port you want to add from [Add Port] dialog box ⋗ click [OK].
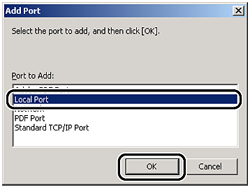
Ports displayed in the [Add Port] dialog box vary depending on the operating system you are using.
10-C-3. Specify the settings for the port you want to add in the dialog box displayed ⋗ click [OK]. The dialog box that is displayed varies according to the port being added.
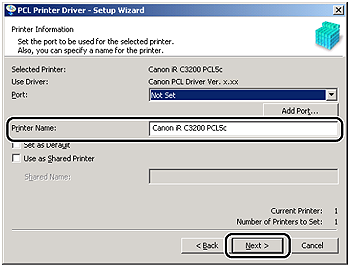
11. Enter a printer name in [Printer Name] if necessary ⋗ select [Set as Default] if you want to set the printer as the default printer ⋗ click [Next].
Caution
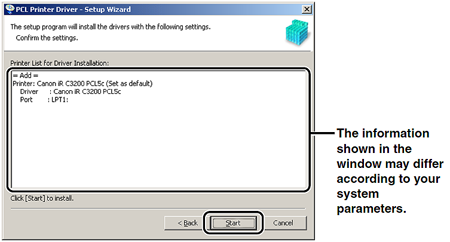
12. Verify the installation settings ⋗ click [Start].
13. After the files are copied, click [Next].
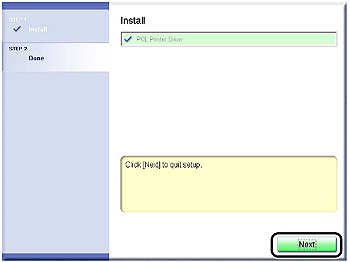
Depending on the printer model you are installing, this screen may not be displayed. If so, proceed to step 14.
14. Click [Restart] or [Exit] to finish the installation.
The printer icon is displayed in the [Printers] folder. The driver is now installed.