

Solution
Preparations for Using the DriverInstalling the Driver
Registering a Printer
Setting the Options of the Device
Preparations for Using the Driver
Before using the driver and printing, there are preparations that need to be done beforehand.
Carry out preparations and settings in the following order.
1. Obtain an installer by one of the following methods.
- Download it from the Canon website (http://www.canon.com/)
- Supplied CD-ROM
2. Install the driver to the operating system.
3. Register the printer you want to use to the operating system.
4. Set the device options as necessary.
Caution
Installing the Driver
This section explains the procedure for installing the driver to the operating system.
Install the driver and register the printer to use.

Confirm that the following conditions are satisfied. Complete the preparation operations.
 System Requirements (Driver)
1. Open the driver installer folder → select [MF_Printer_Installer.pkg] or [Canon_Driver.pkg].
2. Read the Software License Agreement → click [Continue].
If a dialog box asking you to confirm that you agree to the Software License Agreement is displayed, click [Agree].
3. Click [Install].
If a dialog box for entering a user name and/or password is displayed, enter the name and password of a computer administrator and continue according to the instructions in the dialog box.
4. Click [Close].
Register the printer.
Registering a Printer
Register the printer you are going to use.
Select a registration method according to the method by which the computer and printer are connected.
You can register a printer connected by LPD (Line Printer Daemon) in the operating system.

Confirm that the following conditions are satisfied. Complete the preparation operations.
System Requirements (Driver)For driver names corresponding to printers, refer to the Readme file.
If you do not know the IP address, check with the network administrator or check the network settings. For details, refer to the manual of the device.
Caution
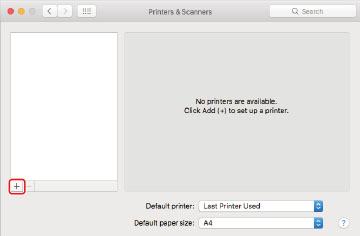
1. Display the [System Preferences] dialog box of the operating system → click [Printers & Scanners].
2. Click [+] at the bottom of the displayed dialog box.
If a pull-down menu is displayed after you click [+], select [Add Printer or Scanner].
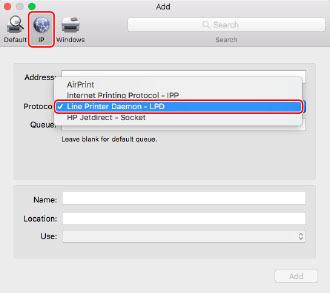
3. Select [IP] in the toolbar → select [Line Printer Daemon – LPD] from [Protocol].
4. Enter the printer's IP address in [Address] → select [Select Software] from [Use].
If the driver corresponding to the printer is displayed in [Use], proceed to step 6.
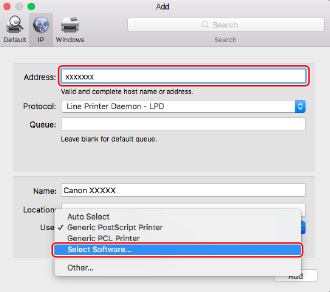
Caution
5. Select the driver corresponding to the printer from the list in the [Printer Software] dialog box → click [OK].
6. Change [Name] for the printer as necessary → click [Add].
7. Check that the registered printer and model are displayed in the dialog box.

Set the device options as necessary.
You can register a printer connected by Bonjour to the operating system.
Confirm that the following conditions are satisfied. Complete the preparation operations.
System Requirements (Driver)For driver names corresponding to printers, refer to the Readme file.
1. Display the [System Preferences] dialog box of the operating system → click [Printers & Scanners].
2. Click [+] at the bottom of the displayed dialog box.
If a pull-down menu is displayed after you click [+], select [Add Printer or Scanner].

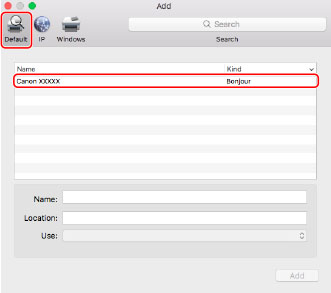
3. Select [Default] in the toolbar → select a printer from the list.
Select a printer displayed as "Bonjour" in [Kind].
If the corresponding driver is already registered in [Use] in the displayed dialog box, proceed to step 7.
4. Select [Select Software] from [Use].
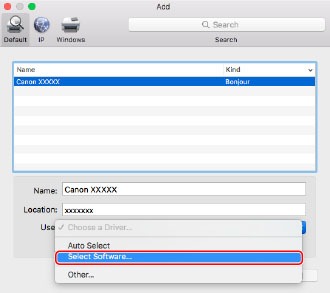
5. Select the driver corresponding to the printer from the list in the [Printer Software] dialog box → click [OK].
6. Change [Name] for the printer as necessary → click [Add].
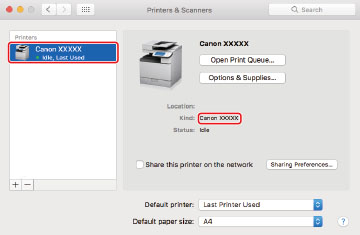
7. Check that the registered printer and model are displayed in the dialog box.
Set the device options as necessary.
Setting the Options of the Device
You can set the options (paper supply drawers, finisher, etc.) installed in the device.
When using the device for the first time or changing the options of the device, the options must be set
in order to be able to use the functions of the device.
Confirm that the following conditions are satisfied. Complete the preparation operations.
For driver names corresponding to devices, refer to the Readme file.
1. Display the [System Preferences] dialog box of the operating system → click
[Printers & Scanners].
2. Select the device → click [Options & Supplies].
3. Click [Options].
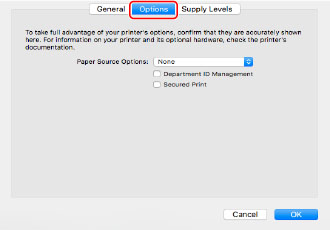
4. In the displayed dialog box, check the options of the device → click [OK].
Caution