

Issue
Cannot Receive a Fax, Cannot Print a Fax
Cause and solution
Cause and solution
•Cannot Receive a Fax, Cannot Print a Fax
Cause and solution
Check 1: Is the power turned on?
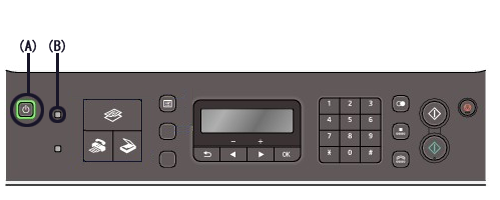
A : ON button (POWER lamp)
B : FAX Memory lamp
Caution
If a power failure occurs or you unplug the power cord, all faxes stored in the machine's memory are deleted.
Cause and solution
Check 2: Is the machine's memory full?
Print the received faxes stored in machine's memory or save them on the USB flash drive, delete them from the machine's memory, and have the sender resend the faxes.
If the sending faxes is not complete or the machine was not able to print the received faxes, these faxes are stored in machine's memory.
If an error occurred during a fax transmission, the document is not stored in machine's memory.
In the following cases, the machine is not able to print the received fax and will automatically store the fax in its memory.
Caution
Some of page sizes are not available depending on the country or region of purchase.
Caution
If you unplug the power cord of the machine, all faxes stored in machine's memory are deleted.
You can print or delete the faxes stored in machine's memory. You can also save the received faxes stored in machine's memory on the USB flash drive.
-⋗ [ Printing a Document in Machine's Memory ]
-⋗ [Deleting a Document in Machine's Memory ]
-⋗ [Saving a Document in Machine's Memory to USB Flash Drive ]
Caution
Printing a Document in Machine's Memory
You can print a specified document in machine's memory or print all the documents in its memory at a time.
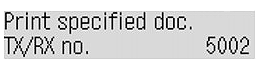
When printing a specified document, you specify it by its transaction number. If you do not know the transaction number for your target document, print the list of documents first.
Caution
The memory list shows the transaction number of the unsent or unprinted fax (TX/RX NO.), transaction mode, recipient's number, and the date and time of the transaction.
Print the list of the documents following the procedure below.
1. Make sure that the machine is turned on.
2. Load paper.
Refer to [ Loading Plain Paper / Photo Paper ].
3. Press the FAX button.
The Fax standby screen is displayed.
4. Press the Menu button.
The Fax settings screen is displayed.
5. Use the 

Caution
If no document is stored in machine's memory, No documents in memory is displayed on the LCD.
6. Use the
The list of documents stored in machine's memory is printed.
Caution
A transaction number from "0001" to "4999" indicates a document being sent. A transaction number from "5001" to "9999" indicates a document being received.
Specify the document and print it following the procedure below.
1. Make sure that the machine is turned on.
2. Load paper.
Refer to [ Loading Plain Paper / Photo Paper ].
3. Press the FAX button.
The Fax standby screen is displayed.
4. Press the Menu button.
The Fax settings screen is displayed.
5. Use the
6. Use the
The document selection screen is displayed.
Caution
No mark: Indicates a black and white document.
*: Indicates a color document.
#: Indicates the document during transmission.
&: Indicates the document sent with sequential broadcasting.
7. Use the
8. Use the
Only the first page of the document will be printed.
The document is still stored in machine's memory.
All pages of the document will be printed.
The screen to confirm whether to delete the printed document in machine's memory is displayed.
If you select Yes using the
Caution
Print all the documents in machine's memory following the procedure below.
1. Make sure that the machine is turned on.
2. Load paper.
Refer to [ Loading Plain Paper / Photo Paper ].
3. Press the FAX button.
The Fax standby screen is displayed.
4. Press the Menu button.
The Fax settings screen is displayed.
5. Use the
6. Use the
7. Use the
All the documents in machine's memory will be printed.
Each time a document is printed, the screen to confirm whether to delete the printed document in machine's memory is displayed.
If you select Yes using the
Deleting a Document in Machine's Memory
You can delete a specified document in machine's memory or delete all the documents in its memory at a time.
Caution
When deleting a specified document, you specify it by its transaction number. If you do not know the transaction number for your target document, print the list of documents first.
-⋗ [ Printing a List of the Document in Machine's Memory ]
Specify the document and delete it following the procedure below.
1. Make sure that the machine is turned on.
2. Press the FAX button.
The Fax standby screen is displayed.
3. Press the Menu button.
The Fax settings screen is displayed.
4. Use the
5. Use the
The document selection screen is displayed.

Caution
No mark: Indicates a black and white document.
*: Indicates a color document.
#: Indicates the document during transmission.
&: Indicates the document sent with sequential broadcasting.
6. Use the
7. Use the
The specified document will be deleted from machine's memory.
Caution
Delete all the documents in machine's memory following the procedure below.
Caution
This function is not available while the machine is receiving a fax.
1. Make sure that the machine is turned on.
2. Press the FAX button.
The Fax standby screen is displayed.
3. Press the Menu button.
The Fax settings screen is displayed.
4. Use the
5. Use the
6. Use the
All the documents in machine's memory will be deleted.
Saving a Document in Machine's Memory to USB Flash Drive
You can save the received faxes stored in machine's memory to the USB flash drive as PDF files using the Operation Panel of the machine.
You can save a specified document in machine's memory to the USB flash drive or save all the documents in its memory to the USB flash drive at a time.
Caution
Caution
-⋗ [ Printing a List of the Document in Machine's Memory ]
For details on how to delete the fax in machine's memory, see [ Deleting a Document in Machine's Memory ].
Specify the received document and save it on the USB flash drive following the procedure below.
1. Make sure that the machine is turned on.
2. Insert the USB flash drive into the Direct Print Port.
Caution
Refer to [ Inserting the USB Flash Drive ] for how to insert the USB flash drive into the Direct Print Port.
3. Press the FAX button.
The Fax standby screen is displayed.
4. Press the Menu button.
The Fax settings screen is displayed.
5. Use the
6. Use the
The document selection screen is displayed.

Caution
No mark: Indicates a black and white document.
*: Indicates a color document.
#: Indicates the document during transmission.
&: Indicates the document sent with sequential broadcasting.
7. Use the
The specified document is saved on the USB flash drive.
Caution
Save all the documents in machine's memory to the USB flash drive following the procedure below.
1. Make sure that the machine is turned on.
2. Insert the USB flash drive into the Direct Print Port.
Caution
Refer to [ Inserting the USB Flash Drive ] for how to insert the USB flash drive into the Direct Print Port.
3. Press the FAX button.
The Fax standby screen is displayed.
4. Press the Menu button.
The Fax settings screen is displayed.
5. Use the
6. Use the
7. Use the
All the documents in machine's memory will be saved to the USB flash drive.
Caution
-Folder name: CANON_SC\FAXDOC\0001
-File name (file extension: PDF): Running numbers, starting from FAX_0001
-File date: The date and time of saving as set in the machine. For information on how to set the date and time, refer to [ Setting the Date and Time ].
You can import faxes saved on a USB flash drive to the computer.
After saving faxes, connect the USB flash drive to the computer, then import the data.
Cause and solution
Check 3: Does an error occur during reception?
-⋗ [ An Error Message Is Displayed on the LCD ]
-⋗ [ A Message for Faxing Is Displayed on the LCD ]
Cause and solution
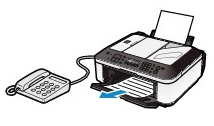
Check 4: Is the telephone line connected correctly?
Check that the telephone line is connected correctly to the Telephone Line Jack and that the telephone (or another external device such as an answering machine or a computer modem) is connected correctly to the External Device Jack.
Cause and solution
Check 5: Is a different size of paper from that specified by Page size loaded?
If a different size of paper from that specified by Page size is loaded for printing faxes, the received faxes will not be printed and will be stored in machine's memory (Memory Reception). Load the same size of paper as that specified by Page size, then press the OK button on the machine.
Cause and solution
Check 6: Is Page size set to other than A4, Letter, LTR, or Legal?
If Page size is set to other than A4, Letter, LTR, or Legal, the received fax will not be printed and will be stored in machine's memory (Memory Reception). Set Page size to A4, Letter, LTR, or Legal.
Caution
Cause and solution
Check 7: Is Media type set to other than Plain paper?
If Media type is set to other than Plain paper, the received fax will not be printed and will be stored in machine's memory (Memory Reception). Set Media type to Plain paper.
Cause and solution
Check 8: Is paper loaded?
If paper is not loaded, received faxes will be stored in machine's memory without being printed. Load paper, then press the OK button.
Loading Plain Paper / Photo Paper
Caution
If you cut plain paper into small size such as 4" x 6" / 10 x 15 cm, 4" x 8" / 101.6 x 203.2 mm, 5" x 7" / 13 x 18 cm, or 2.16" x 3.58" / 55.0 x 91.0 mm (Card size) to perform trial print, it can cause paper jams.
Caution
For details on the Canon genuine paper, see [ Media Types You Can Use ].
For the page size and paper weight you can use for this machine, see [ Media Types You Can Use ].
1. Prepare paper.
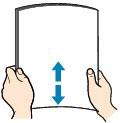
Align the edges of paper. If paper is curled, flatten it.
Caution
For details on how to flatten curled paper, refer to [ Paper Is Smudged/Printed Surface Is Scratched ].
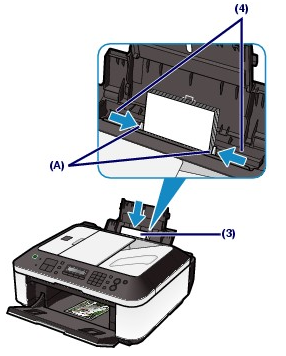
2. Load paper.
(1) Open the Paper Support, and open the support as an extension.
(2) Open the Paper Output Tray gently.
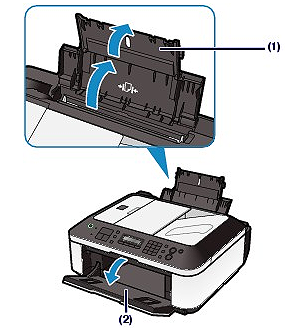
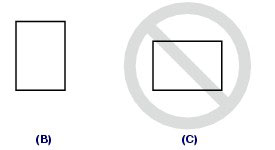
(3) Slide the Paper Guides (A) to open them, and load the paper in the center of the Rear Tray WITH THE PRINT SIDE FACING YOU.
(4) Slide the Paper Guides (A) to align them with both sides of the paper stack.
Do not slide the Paper Guides too hard. The paper may not be fed properly.
Caution
Caution
Caution
After loading paper
See [ Setting Items ].
See [ Printing from Your Computer ].
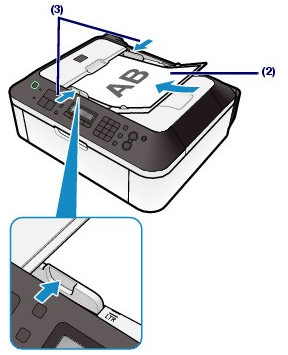
Loading Originals in the ADF
You can load documents to copy, fax, or scan in the ADF.
Caution
To scan a document at optimum quality, load it on the Platen Glass.
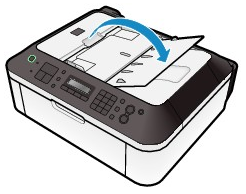
1. Make sure that any original has been removed from the Platen Glass.
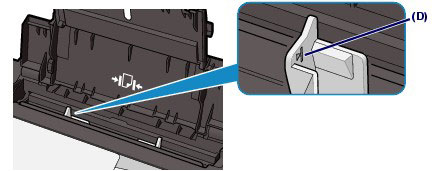
2. Load a document in the ADF.
(1) Open the Document Tray.
(2) Insert the document in the Document Tray until you hear a beep sound.
Load the document WITH THE SIDE TO SCAN FACING UP in the Document Tray.
Caution
When you set the alarm to be silent in Device user settings of Device settings, the alarm will not beep even if the document is inserted in the Document Tray.
(3) Adjust the Document Guides to match the width of the document.
Do not slide the Document Guides too hard. The document may not be fed properly.
Cause and solution
Check 9: Is the amount of remaining ink sufficient to print a fax?
If the amount of remaining ink is insufficient to print, received faxes will be stored in machine's memory without being printed. Replace the FINE Cartridge, then print the faxes in machine's memory.
-⋗ [ Document Stored in Machine's Memory ]
Caution
-⋗ [ Replace ink cartridge(s) ]
Cause and solution
Check 10: Is the machine set to the appropriate receive mode?
Check the receive mode setting and change it to a mode suited to your connection if necessary.
This section describes the preparation necessary for receiving a fax and how to receive a fax. This section also describes the operation to print documents stored in the machine's memory such as when ink or paper runs out.

(A) Prints a received fax.
See [ Receiving a Fax ].
(B) Stores a received fax in the machine's memory without printing it.
See [ Receiving a Fax Temporarily in the Machine's Memory (Memory Receiving) ].
Preparing for Receiving a Fax
Prepare for receiving a fax according to the following procedure.
1. Make sure that the power is turned on.
2. Make sure of the receive mode setting.
(1) Press the FAX button.
(2) Confirm the receive mode.
3. Load paper.
See [ Loading Plain Paper / Photo Paper ].
Here we make sure that the plain paper is loaded in the Rear Tray.
4. Specify the paper settings as necessary.
(1) Press the Settings button.
The Page size screen will appear.

(2) Use the 

You can specify A4, Letter, or Legal.
(3) Confirm that Plain paper is selected for Media type, and press the OK button.
Caution
If a media type other than Plain paper is selected, select Plain paper.

Caution
If a page size other than A4, Letter, or Legal, or a media type other than Plain paper is selected, faxes or reports cannot be printed.
See [ Receiving a Fax Temporarily in the Machine's Memory (Memory Receiving) ].
Receiving a Fax
Depending on the selected receive mode, the receive operation varies.
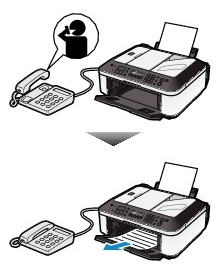
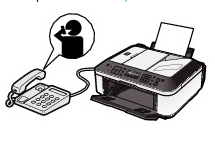
When the call is a fax:
The telephone will ring when a call incomes.

(1) Pick up the handset. If you hear the fax tone, wait for at least 5 seconds after it stops, then hang up the handset.
The machine will receive the fax.
Caution
Other options
Caution
When the answering machine is connected to the machine
- The entire message should be no longer than 15 seconds.
- In the message, tell your callers how to send a fax.
When the call is a voice call:
The telephone will ring when a call incomes.
(1) Pick up the handset, and talk on the telephone.

Caution
When the call is a fax.
The machine will receive the fax automatically.
Caution
Other options
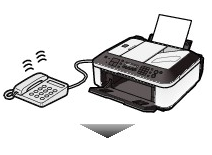
When the call is a fax:
The telephone will ring when a call incomes.

The machine will receive the fax automatically when the fax ring pattern is detected.
Caution
Other options
When the call is a voice call:
The telephone will ring when a call incomes.
When the machine does not detect the fax ring pattern, the telephone will continue ringing.
(1) Pick up the handset, and talk on the telephone.
Caution
For DRPD
For Network switch
Receiving a Fax Temporarily in the Machine's Memory (Memory Receiving)
If the machine was not able to print a received fax, the machine stores the unprinted fax temporarily in its memory (memory receiving).
When a fax is stored in the memory, the FAX Memory lamp lights and the message "Received in memory" appears on the LCD.
Caution
If the power plug is disconnected, all faxes stored in the machine's memory will be lost. The next time you turn on the power, a confirmation screen will appear. Press the OK button on the screen.
If the machine receives a fax under one of the following conditions, the machine will automatically store the received fax in its memory.
To store received documents in the machine's memory, select Do not print for Received documents in Auto print settings.
You can print the documents stored in the machine's memory from the Memory reference screen.
See [ Printing Documents in the Machine's Memory ].
If you select Print for Received documents in Auto print settings, a received fax will be printed automatically. However, if any of the following errors occurs, the received fax will not be printed. It will instead be stored in the machine's memory.
-The amount of remaining ink is insufficient to print a fax.
The fax in the machine's memory will be automatically printed when a new FINE Cartridge is installed.
Caution
Print when out of ink
-Paper has run out.
Load the paper and press the OK button. The fax in memory will be automatically printed.
-Paper of a size other than selected for Page size is loaded.
Load paper of the same size as selected for Page size, and press the OK button. The fax in memory will be automatically printed.
-A page size other than A4, Letter, or Legal is selected for Page size.
Select A4, Letter, or Legal for Page size.
See [ Preparing for Receiving a Fax ].
-A media type other than Plain paper is selected for Media type.
Select Plain paper for Media type.
See [ Preparing for Receiving a Fax ].
Press the FAX button to resume printing of the fax.
Caution
* When using ITU-T No.1 chart (Standard mode)
See [ Printing Documents in the Machine's Memory ].
Printing Documents in the Machine's Memory
You can print all documents received in the machine's memory at once or select a document for printing on the Memory reference screen. You can also save the documents on the USB flash drive.
This section describes the procedure to print all the received documents in the memory.
For details on Memory reference, refer to [ Document Stored in Machine's Memory ].
Caution
For the conditions of the faxes to be received in the memory, see [ Receiving a Fax Temporarily in the Machine's Memory (Memory Receiving) ].
1. Load paper.
See [ Loading Plain Paper / Photo Paper ].
Here we make sure that plain paper is loaded in the Rear Tray.
2. Specify the paper settings as necessary.
If a page size other than A4, Letter, or Legal, or a media type other than Plain paper is selected, faxes or reports cannot be printed. Confirm or change the paper settings.
See [ Preparing for Receiving a Fax ].
3. Display the Memory reference screen.
(1) Press the FAX button, and press the Menu button.
(2) Use the
4. Print all the received documents in the memory.
(1) Use the

Caution
(2) Use the
The machine starts printing documents in the memory one by one.

(3) To delete the printed document, use the

To keep the document in the memory, select No.
(4) Press the OK button.
Caution
The deletion confirmation screen will appear each time after one document is printed. Repeat the same procedure until all documents are printed.
Cause and solution
Check 11: Is Fax reception reject set to ON?
Select OFF for Fax reception reject in Security control under Fax settings.
Cause and solution
Check 12: Are there setting items set Reject in Caller rejection?
If you select Reject for any setting items in Caller rejection in Security control under Fax settings, the machine rejects calls for setting item selected Reject.
Cause and solution
•Machine Does Not Switch Automatically between Voice and Fax Calls
Cause and solution
Check: Is the receive mode set to Fax only mode?
If Fax only mode is selected for Receive mode set. under Fax settings, there will be no automatic switching between voice and fax calls.
Set the receive mode to TEL priority mode, DRPD*1, or Network switch*2.
If the receive mode is TEL priority mode and an answering machine is connected to the machine, check whether a proper message is played back when the answering machine answers.
*1 This setting is available only in the US and Canada.
*2 This setting may not be available depending on the country or region of purchase.
This section describes the preparation necessary for receiving a fax and how to receive a fax. This section also describes the operation to print documents stored in the machine's memory such as when ink or paper runs out.
(A) Prints a received fax.
See [ Receiving a Fax ].
(B) Stores a received fax in the machine's memory without printing it.
See [ Receiving a Fax Temporarily in the Machine's Memory (Memory Receiving) ].
Preparing for Receiving a Fax
Prepare for receiving a fax according to the following procedure.
1. Make sure that the power is turned on.
2. Make sure of the receive mode setting.
(1) Press the FAX button.
(2) Confirm the receive mode.
3. Load paper.
See [ Loading Plain Paper / Photo Paper ].
Here we make sure that the plain paper is loaded in the Rear Tray.
4. Specify the paper settings as necessary.
(1) Press the Settings button.
The Page size screen will appear.
(2) Use the
You can specify A4, Letter, or Legal.
(3) Confirm that Plain paper is selected for Media type, and press the OK button.
Caution
If a media type other than Plain paper is selected, select Plain paper.
Caution
If a page size other than A4, Letter, or Legal, or a media type other than Plain paper is selected, faxes or reports cannot be printed.
See [ Receiving a Fax Temporarily in the Machine's Memory (Memory Receiving) ].
Receiving a Fax
Depending on the selected receive mode, the receive operation varies.
When the call is a fax:
The telephone will ring when a call incomes.
(1) Pick up the handset. If you hear the fax tone, wait for at least 5 seconds after it stops, then hang up the handset.
The machine will receive the fax.
Caution
Other options
Caution
When the answering machine is connected to the machine
- The entire message should be no longer than 15 seconds.
- In the message, tell your callers how to send a fax.
When the call is a voice call:
The telephone will ring when a call incomes.
(1) Pick up the handset, and talk on the telephone.
Caution
When the call is a fax.
The machine will receive the fax automatically.
Caution
Other options
When the call is a fax:
The telephone will ring when a call incomes.
The machine will receive the fax automatically when the fax ring pattern is detected.
Caution
Other options
When the call is a voice call:
The telephone will ring when a call incomes.
When the machine does not detect the fax ring pattern, the telephone will continue ringing.
(1) Pick up the handset, and talk on the telephone.
Caution
For DRPD
For Network switch
Receiving a Fax Temporarily in the Machine's Memory (Memory Receiving)
If the machine was not able to print a received fax, the machine stores the unprinted fax temporarily in its memory (memory receiving).
When a fax is stored in the memory, the FAX Memory lamp lights and the message "Received in memory" appears on the LCD.
Caution
If the power plug is disconnected, all faxes stored in the machine's memory will be lost. The next time you turn on the power, a confirmation screen will appear. Press the OK button on the screen.
If the machine receives a fax under one of the following conditions, the machine will automatically store the received fax in its memory.
To store received documents in the machine's memory, select Do not print for Received documents in Auto print settings.
You can print the documents stored in the machine's memory from the Memory reference screen.
See [ Printing Documents in the Machine's Memory ].
If you select Print for Received documents in Auto print settings, a received fax will be printed automatically. However, if any of the following errors occurs, the received fax will not be printed. It will instead be stored in the machine's memory.
-The amount of remaining ink is insufficient to print a fax.
The fax in the machine's memory will be automatically printed when a new FINE Cartridge is installed.
Caution
Print when out of ink
-Paper has run out.
Load the paper and press the OK button. The fax in memory will be automatically printed.
-Paper of a size other than selected for Page size is loaded.
Load paper of the same size as selected for Page size, and press the OK button. The fax in memory will be automatically printed.
-A page size other than A4, Letter, or Legal is selected for Page size.
Select A4, Letter, or Legal for Page size.
See [ Preparing for Receiving a Fax ].
-A media type other than Plain paper is selected for Media type.
Select Plain paper for Media type.
See [ Preparing for Receiving a Fax ].
Press the FAX button to resume printing of the fax.
Caution
* When using ITU-T No.1 chart (Standard mode)
See [ Printing Documents in the Machine's Memory ].
Printing Documents in the Machine's Memory
You can print all documents received in the machine's memory at once or select a document for printing on the Memory reference screen. You can also save the documents on the USB flash drive.
This section describes the procedure to print all the received documents in the memory.
For details on Memory reference, refer to [ Document Stored in Machine's Memory ].
Caution
For the conditions of the faxes to be received in the memory, see [ Receiving a Fax Temporarily in the Machine's Memory (Memory Receiving) ].
1. Load paper.
See [ Loading Plain Paper / Photo Paper ].
Here we make sure that plain paper is loaded in the Rear Tray.
2. Specify the paper settings as necessary.
If a page size other than A4, Letter, or Legal, or a media type other than Plain paper is selected, faxes or reports cannot be printed. Confirm or change the paper settings.
See [ Preparing for Receiving a Fax ].
3. Display the Memory reference screen.
(1) Press the FAX button, and press the Menu button.
(2) Use the
4. Print all the received documents in the memory.
(1) Use the
Caution
(2) Use the
The machine starts printing documents in the memory one by one.
(3) To delete the printed document, use the
To keep the document in the memory, select No.
(4) Press the OK button.
Caution
The deletion confirmation screen will appear each time after one document is printed. Repeat the same procedure until all documents are printed.
Cause and solution
•Quality of Received Fax is Poor
Cause and solution
Check 1: Check the scan settings of the sender's fax machine
Ask the sender to adjust the scan settings of the fax machine.
Cause and solution
Check 2: Is ECM RX set to OFF?
Select ON for ECM RX in Adv. communication in Advanced FAX settings under Fax settings.
If ECM RX is enabled, the sender's fax machine resends the fax after correcting errors automatically.
Cause and solution
Check 3: Is the sender's original document or scanning area of the sender's fax machine dirty?
The image quality of the fax is mainly determined by the sender's fax machine. Contact the sender and ask the sender to check whether the scanning area of the fax machine is dirty.
Cause and solution
Check 4: Is ECM transmission/reception enabled although the line/connection is poor, or is the sender's fax machine compatible with ECM?
Cause and solution
Check 5: Did you confirm the paper and print quality settings?
Cause and solution
•Cannot Receive a Color Fax
Cause and solution
Check: Is ECM RX set to OFF?
If OFF is select for ECM RX in Adv. communication in Advanced FAX settings under Fax settings, the machine cannot receive color faxes. The machine will disconnect the telephone line or receive color faxes in black & white according to the setting of the sender's fax machine.
Set ECM RX to ON.
Cause and solution
•Errors Often Occur When You Receive a Fax
Cause and solution
Check 1: Check the telephone line condition or the connection
If the telephone line or connection is poor, reducing the reception start speed may correct the error.
Reduce the reception start speed on RX start speed in Adv. communication in Advanced FAX settings under Fax settings.
Cause and solution
Check 2: Is the sender's fax machine operating normally?
Contact the sender and ask the sender to check whether the fax machine is operating normally.