

Setting Secure Printing

Caution
When the setup is complete, restart the machine for the settings to take effect.
1. Press [ 
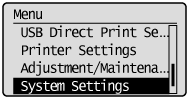
2. Select ⋖System Settings⋗ using [ 

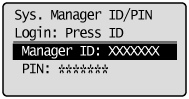
When the system manager ID and the system manager PIN are specified, use the numeric keys to enter the ID and number, and then press [ 
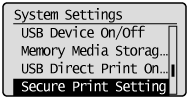
3. Select ⋖Secure Print Settings⋗ using [
4. Select ⋖On⋗ using [
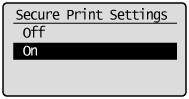
| <Off> | Secure Printing is not available. |
| <On> | Secure Printing is available. |
5. Select the setting using [
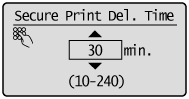
* Specify a time range for erasing a secure print job waiting for security password input.
You can specify a value between 10 minutes to 240 minutes by one minute.
6. Press [
7. Restart the machine.
Printing by Secure Printing
This section describes sending a secure print job from a computer, select the job on the operation panel, and then enter PIN to finish printing.
Caution
If the secure print job is retained in the machine's memory, other print jobs might not be printed. In this case, print the secure print job. If the machine still does not print your job, try sending the job again from the computer.
Caution
For details on displaying the printer driver, see the following in the e-Manual.
- "Printing"
- "Configuring the Default Print Settings"
Caution
To configure the printer option settings, you must log on to your computer as a member of the Administrators or Power Users group.
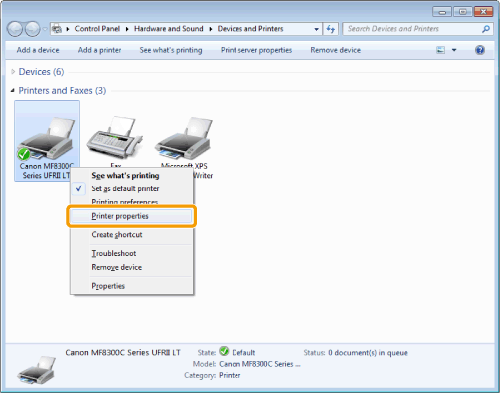
1. Open the printer folder.
From the [Start] menu, select [Settings] -⋗ [Printers].
From the [Start] (or [start]) menu, select [Printers and Faxes].
From the [start] menu, select [Control Panel] -⋗ [Printers and Other Hardware] -⋗ [Printers and Faxes].
From the [Start] menu, select [Control Panel] -⋗ [Printer].
From the [Start] menu, select [Devices and Printers].
From the [Start] menu, select [Control Panel] and then double-click [Printers].
2. Right-click the icon of the printer whose settings you want to specify -⋗ click [Printer properties] (or [Properties]).
3. Click [Device Settings] and make sure that [Allow Use of Secured Print] is selected.
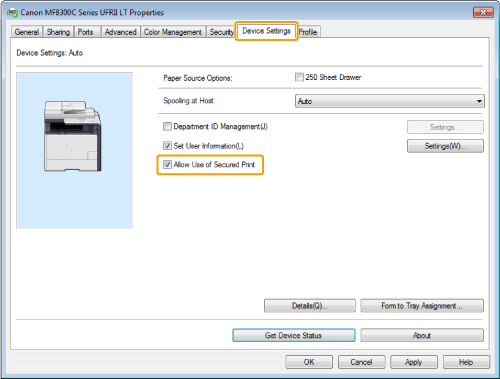
If [Allow Use of Secured Print] is deselected, select it and click [OK].
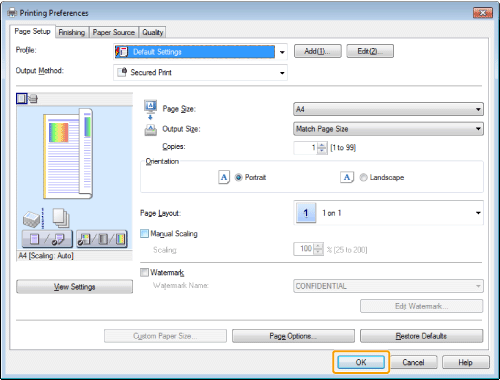
1. Click [Page Setup], [Finishing], [Paper Source], or [Quality] at the printer driver screen.
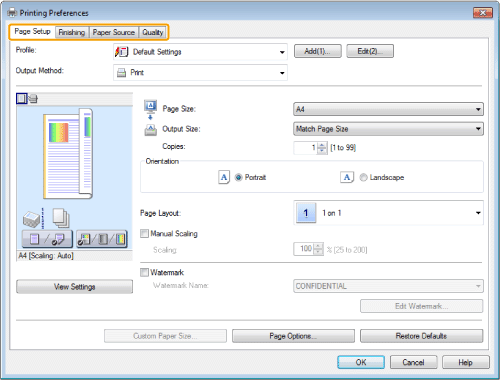
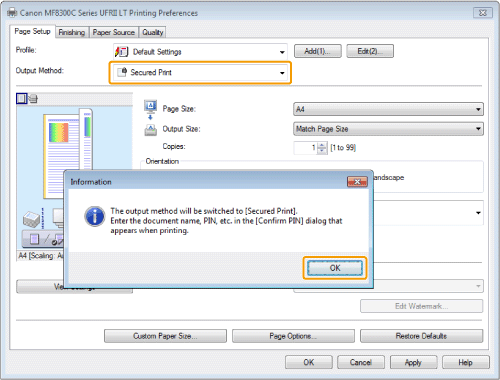
2. Select [Secured Print] from [Output Method] and click [OK].
3. Click [OK].
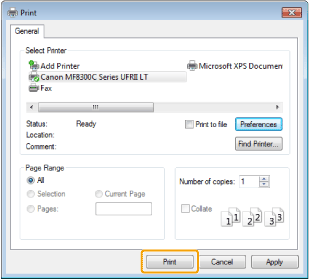
4. Click [Print] (or [OK]).
5. Specify the desired settings for the secure print job and click [OK].
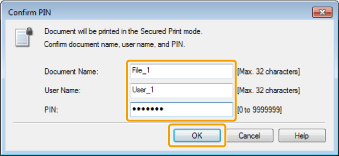
[Document Name] Enter a name up to 32 alphanumeric characters.
[User Name] Enter a name up to 32 alphanumeric characters.
[PIN] Enter a number up to 7 digits.
The secure print job is sent to the machine.
1. Press [ 
You cannot perform Secure Printing while waiting to scan (while ⋖Remote Scanner⋗ is selected for the scan type on the basic scan screen). Press [ 
2. Select a user using [
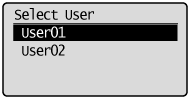
If the above screen is not displayed, go to Step 3.
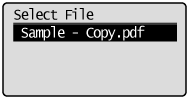
3. Select a document to print using [
4. Enter the PIN and press [OK].
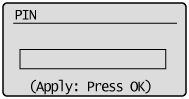
Printing starts.
5. Press [ 