

Solution
Switching the Connection Method to Wireless LAN (MF8380Cdw/MF8080Cw Only)Setting the Machine Using WPS (Push Button Mode)
Checking the Wireless LAN Setting is Completed
Switching the Connection Method to Wireless LAN (MF8380Cdw/MF8080Cw Only)
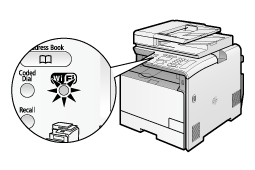
1. Press [ 
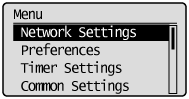
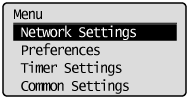
2. Select ⋖Network Settings⋗ with [ 


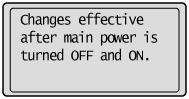
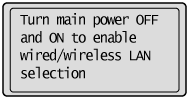
The screen below is displayed for approximately 5 seconds. (You do not need to turn the machine OFF/ON in this step.)
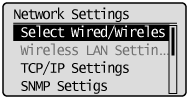
3. Select ⋖Select Wired/Wireless LAN⋗ using [
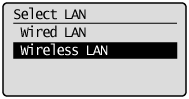
4. Select ⋖Wireless LAN⋗ using [
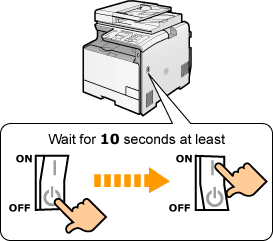
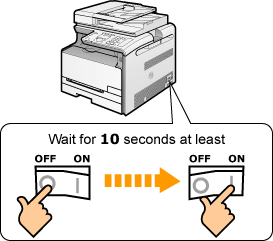
5. Turns the machine OFF/ON when the following screen disappears.
It is necessary to turn the machine OFF/ON to activate the settings.
Turn OFF the machine and wait for at least 10 seconds before turning it back ON.
MF8380Cdw
MF8080Cw/MF8010Cn
Setting the Machine Using WPS (Push Button Mode)
Press the WPS button on your wireless LAN routers and/or access points for connection.
1. Press [
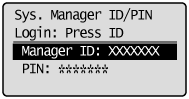
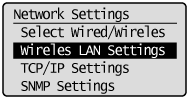
2. Select ⋖Network Settings⋗ using [ 

When the system manager ID and system manager PIN are specified, use the numeric keys to enter the ID and number, and then press [ 
3. Select ⋖Wireless LAN Settings⋗ using [
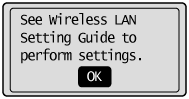
4. Press [OK].
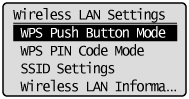
5. Select ⋖WPS Push Button Mode⋗ using [
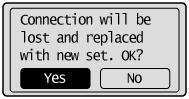
6. Select ⋖Yes⋗ using [ 
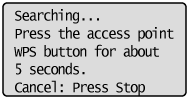
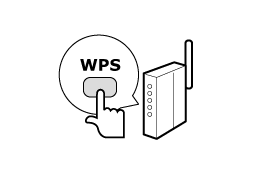
7. Within two minutes, press and hold the WPS button on the wireless LAN router or access point for approximately 5 seconds.
* If "Cannot find Access Point" appears, press [OK] to close the screen and follow the procedure again from Step 5.

8. Make sure the Wi-Fi indicator blinks.
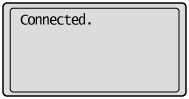
When the wireless LAN router or access point is detected, the Wi-Fi indicator blinks.

The screen below is displayed for approximately 2 seconds, and then the Wi-Fi indicator lights up.

* If an error message appears, press [OK] to close the screen and follow the procedure again from Step 5. If you cannot detect the access point after retrying, see "Onscreen Messages" in the e-Manual.
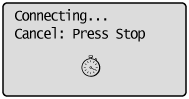
9. Wait until the machine sets the IP address automatically (approx. 2 min).
If you want to set the IP address manually, see "Setting the IP Address."
Checking the Wireless LAN Setting is Completed
1. Press [ 
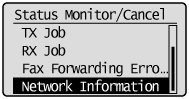
2. Select ⋖Network Information⋗ using [
3. Select your network type.

] or [ ], and then press [OK].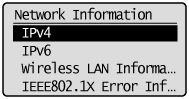
] or [ ], and then press [OK].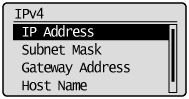
] or [ ], and then press [OK].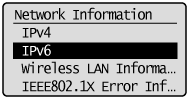
] or [ ], and then press [OK].
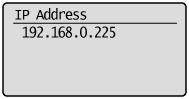
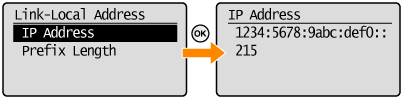
4. Take note of the IP address.
IPv4
IPv6
5. Press [
6. Start the Web browser of a computer which is connected to a network.
7. Enter "http://IP address of the machine/" in the address field and press the [ENTER] key on the keyboard.
The ⋖IP address of the machine⋗ is the address noted in step 4 above.
Example: http://192.168.0.215/

8. Check that the screen of the Remote UI is displayed.

Caution
When Remote UI is not displayed, check the following.