

Solution
Cleaning the Fixing Roller of the PrinterPerforming [Fixing Unit Cleaning 2]
Cleaning the Photosensitive Drum of the Printer
Cleaning the Fixing Roller of the Printer
* A4 plain paper is required to clean the fixing roller. Have A4 plain paper ready.
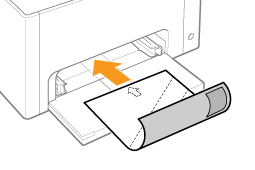
1. Load A4 plain paper in the multi-purpose tray.
For details on the procedures for loading paper, see "e-Manual" (HTML manual) in the CD-ROM supplied with the printer.
Caution
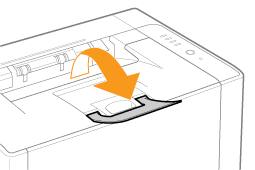
Open the auxiliary tray before cleaning.
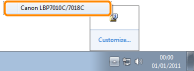
2. Click [ 
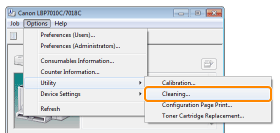
3. From the [Options] menu, select [Utility] → [Cleaning].
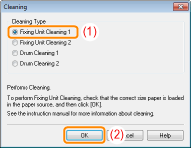
4. Select [Cleaning Type].
(1)Select [Fixing Unit Cleaning 1].
(2)Click [OK].
→The paper is fed, and the printer starts cleaning the fixing roller.
Caution
When the printed paper has smudge marks even if [Fixing Unit Cleaning 1] is performed
Cleaning time
* Cleaning the fixing roller cannot be canceled. Please wait until it is completed. (The cleaning is finished when the paper is output completely.)
Performing [Fixing Unit Cleaning 2]
* A4 plain paper is required to perform [Fixing Unit Cleaning 2]. Have A4 plain paper ready.
1. Load A4 plain paper in the multi-purpose tray.
For details on the procedures for loading paper, see "e-Manual" (HTML manual) in the CD-ROM supplied with the printer.
Caution
Open the auxiliary tray before cleaning.
2. Click [
3. From the [Options] menu, select [Utility] → [Cleaning].
4. Select [Cleaning Type].
(1)Select [Fixing Unit Cleaning 2].
(2)Click [OK]. Then, the cleaning page is printed.

5. If any paper is loaded in the multi-purpose tray, remove it.
6. Load the cleaning page in the multi-purpose tray with the printed side facing down.
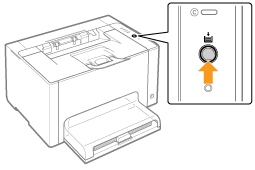
7. Press the [ 
→The cleaning page is fed into the printer, and the printer starts cleaning the fixing roller.
Caution
Cleaning time
* Cleaning the fixing roller cannot be canceled. Please wait until it is completed. (The cleaning is finished when the paper is output completely.)
Cleaning the Photosensitive Drum of the Printer
1. Click [
2. From the [Options] menu, select [Utility] → [Cleaning].
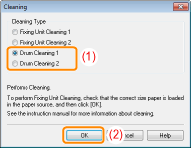
3. Select [Cleaning Type].
(1)Select [Drum Cleaning 1] or [Drum Cleaning 2] depending on the symptoms.
(2)Click [OK].
→The message ⋖Cleaning⋗ appears in the Printer Status Window, and the printer starts cleaning the photosensitive drum.
| [Drum Cleaning 1] | Select when short white streaks (lines) appear at equal distance on the images (especially in a high-humidity environment). |
| [Drum Cleaning 2] | Select when the following circumstances occur. ・Long black streaks (lines) appear on the images (especially in a low temperature environment). ・Short black streaks (lines), smudge marks, or white points appear at equal distance on the images (especially in a high temperature environment). |
Caution
Cleaning time
* Cleaning the photosensitive drum cannot be canceled. Please wait until it is completed.