You can copy your recordings only one-way: from the built-in memory to the memory card. Scenes and photos will be copied from the index screen you selected to the corresponding index screen on the memory card.
Caution
 /
/  Because there is no built-in memory, data cannot be transferred between the built-in memory and a memory card.
Copying Scenes
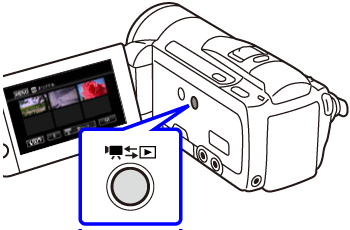
1. Press ⋖  ⋗ to switch to movie playback mode.
2. Open the index screen that contains the scenes you want to copy.
Touch [  ], selected the [
  ] tab, then select [ Original ] or [ Playlist ]* .
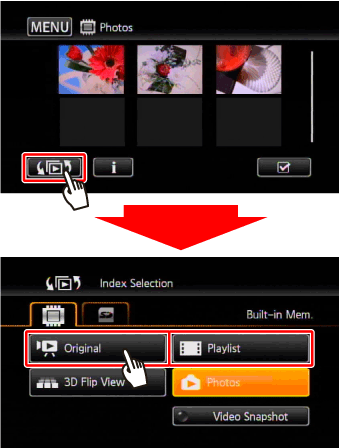
*When you copy scenes from the [Playlist] index screen (including the playlist of video snapshot scenes), you cannot select individual scenes; instead, the entire playlist will be copied. Skip directly to step 5.
Caution
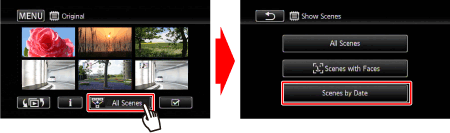
To copy scenes all the recorded on a specific date:
Select [ Scenes by Date ] on the screen that appears after touching [ All Scenes ]. The calendar will appear, so touch a shooting date that contains the scenes you want to copy.
3. Touch [  ] to open the scene selection screen.
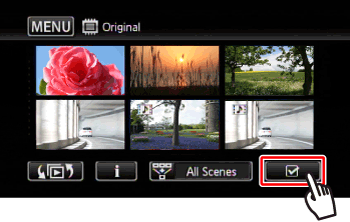
4. Touch on the individual scenes you want to copy.
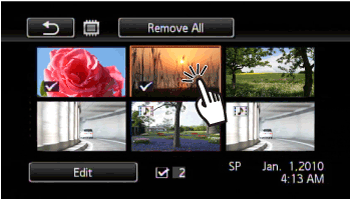
A checkmark [

] will appear on scenes selected. Touch a selected scene again to remove the checkmark.
To select all the scenes at once: Touch [Select All] instead of touching individual scenes. (Remove in advance any checkmarks from scenes you may have selected individually.)
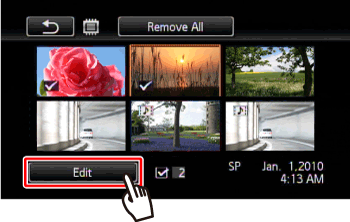
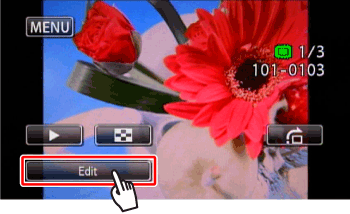
5-1. Touch [ Edit ].
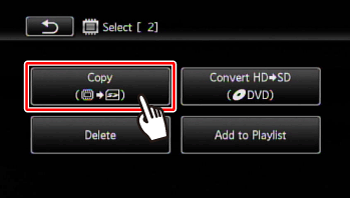
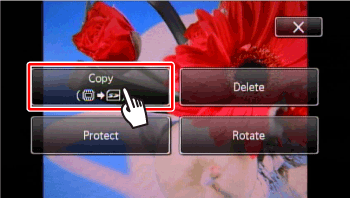
5-2. Touch [ Copy ].
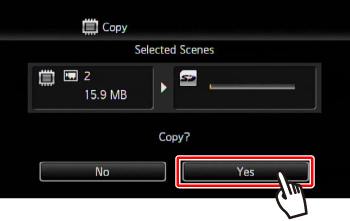
5-3. Touch [ Yes ].
5-4. Touch [ OK ].

Caution
Observe the following precautions while the ACCESS indicator is on or flashing. Failing to do so may result in permanent data loss.
- Do not open the memory card slot cover.
- Do not disconnect the power source or turn off the camcorder.
- Do not change the camcorder's operating mode.
When copying photos onto an Eye-Fi card, photos will be uploaded automatically if you are within the range of a configured network. This product is not guaranteed to support Eye-Fi card functions (including wireless transfer). In case of an issue with an Eye-Fi card, please check with the card manufacturer. Also note that an approval is required to use Eye-Fi cards in many countries or regions. Without approval, use of the card is not permitted. If it is unclear whether the card has been approved for use in the area, please check with the card manufacturer.
Caution
If the memory card slot cover is open, or the LOCK switch on the memory card is set to prevent writing, you will not be able to copy recordings to the memory card.
Scenes that were edited using the supplied software ImageMixer 3 SE and were then written back to the camcorder cannot be copied to the memory card.
If there is not enough space on the memory card, as many photos as possible will be copied before stopping the operation.
Copying a Single Photo
1. Press ⋖ ⋗ to switch to photo playback mode.
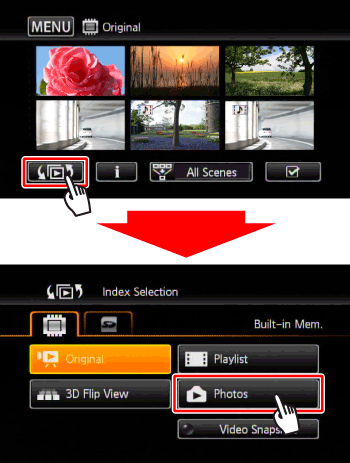
2. Open the [ Photos ] index screen.
Touch [ ], selected the [ ] tab, and then Touch [ Photos ].
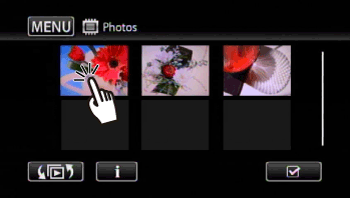
3. In single photo view, select the photo you want to copy.
4. Touch the screen to display the playback controls.

5-1. Touch [ Edit ].
5-2. Touch [ Copy ].
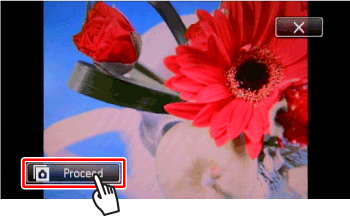
5-3. Touch [ Proceed ].
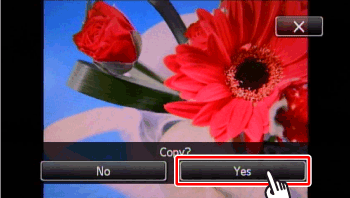
5-4. Touch [ Yes ].
Caution
Drag your finger left/right to select another photo to copy.
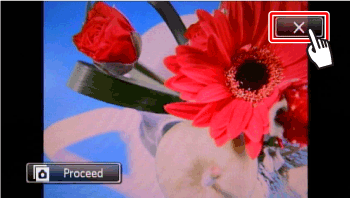
6. Touch [  ].
].
Copying Photos from the Index Screen
1. Press ⋖ ⋗ to switch to playback mode.
2. Open the [ Photos ] index screen.
Touch [ ] selected the [ ] tab, and then touch [ Photos ].
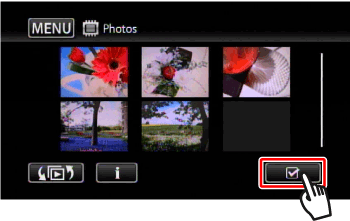
3. Touch [ ] to open the photo selection screen.
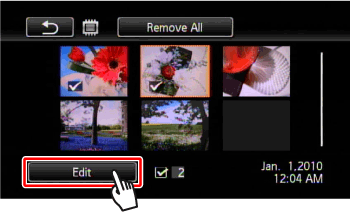
4. Touch on the individual photos you want to copy.

A checkmark [
] will appear on photos selected. Touch a selected photo again to remove the checkmark.
To select all the photos at once: Touch [Select All] instead of touching individual photos. (Remove in advance any checkmarks from photos you may have selected individually.)
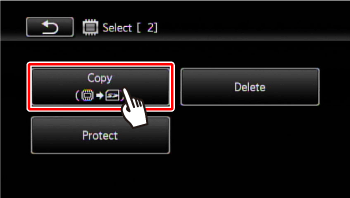
5-1. Touch [ Edit ].
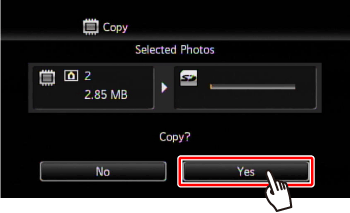
5-2. Touch [ Copy ].
5-2. Touch [ Yes ].
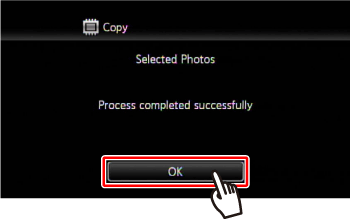
5-3. Touch [ OK ].
Caution
Observe the following precautions while the ACCESS indicator is on or flashing. Failing to do so may result in permanent data loss.
- Do not open the memory card slot cover.
- Do not disconnect the power source or turn off the camcorder.
- Do not change the camcorder's operating mode.
When copying photos onto an Eye-Fi card, photos will be uploaded automatically if you are within the range of a configured network. This product is not guaranteed to support Eye-Fi card functions (including wireless transfer). In case of an issue with an Eye-Fi card, please check with the card manufacturer. Also note that an approval is required to use Eye-Fi cards in many countries or regions. Without approval, use of the card is not permitted. If it is unclear whether the card has been approved for use in the area, please check with the card manufacturer.
Caution
If the memory card slot cover is open, or the LOCK switch on the memory card is set to prevent writing, you will not be able to copy recordings to the memory card.
Scenes that were edited using the supplied software ImageMixer 3 SE and were then written back to the camcorder cannot be copied to the memory card.
If there is not enough space on the memory card, as many photos as possible will be copied before stopping the operation.

