

Solution
If print quality does not improve by the standard cleaning of the Print Head, clean the Print Head deeply. Cleaning the Print Head deeply consumes more ink than the standard cleaning of the Print Head, so clean the Print Head deeply only when necessary.
You need to prepare: a sheet of A4 or Letter-sized plain paper
1. Make sure that the power is turned on.
2. Make sure that one or more sheets of A4 or Letter-sized plain paper are loaded in the Cassette.
3. Open the Paper Output Tray gently, and open the Output Tray Extension.
4. Clean the Print Head deeply.
(1) Press the Menu button.
(2) Use the 


The Settings screen will appear.
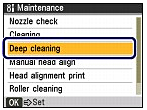
(3) Use the 
The Maintenance screen will appear.
(4) Use the 

The confirmation screen will appear.
(5) Use the
The machine starts cleaning the Print Head deeply.
Do not perform any other operations until the machine completes the deep cleaning of the Print Head. This takes about 2 minutes.
The print pattern confirmation screen will appear.
(6) Use the
The nozzle check pattern will be printed.
5. Examine the nozzle check pattern.
If a particular color is not printed properly, replace the ink tank of that color. See Replacing an Ink Tank
If the problem is not resolved, turn off the power and clean the Print Head deeply again after 24 hours. Do not disconnect the power plug when turning off the power.
If the problem is still not resolved, the Print Head may be damaged. Contact your service center.