


The machine's IPv4 address can be either assigned automatically by a dynamic IP addressing protocol, such as DHCP, or entered manually. When connecting the machine to a wired LAN, make sure that the connectors of the LAN cable are firmly inserted into the ports. You can test the network connection if necessary.
Setting an IPv4 Address
1. Press 
2. Use 


 .
.3. Select ⋖TCP/IP Settings⋗ 
4. Configure IP address settings.
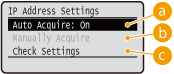
(a) ⋖Auto Acquire⋗
Select to automatically assign an IP address via DHCP protocol. When ⋖Auto Acquire: On⋗ is displayed, automatic addressing is enabled.
(b) ⋖Manually Acquire⋗
Select to configure the IP address settings by manually entering an IP address. In order to select this option, ⋖Auto Acquire⋗ must be set to ⋖Off⋗.
(c) ⋖Check Settings⋗
Select when you want to view the current IP address settings.

4-A-1. Select ⋖Auto Acquire⋗
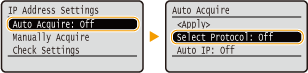
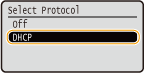
4-A-2. Select ⋖DHCP⋗, and press

NOTE:
If you do not want to use DHCP/BOOTP/RARP to assign an IP address
. If you select ⋖DHCP⋗ and press when these services are unavailable, the machine will waste time and communications resources searching the network for these services.4-A-3. Check that ⋖Auto IP⋗ is set to ⋖On⋗.
4-A-4. Select ⋖Apply⋗, and press
NOTE:
4-B-1. Check that ⋖Auto Acquire⋗ is set to ⋖Off⋗.
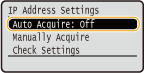
, and set both ⋖Select Protocol⋗ and ⋖Auto IP⋗ to ⋖Off⋗.4-B-2. Select ⋖Manually Acquire⋗, and press
4-B-3. Specify the IP address, subnet mask, and gateway address (or default gateway).
⋖Subnet Mask⋗ ⋖Gateway Address⋗..
5. Restart the machine.
Caution
Checking whether the settings are correct
If you changed the IP address after installing the printer driver
Testing the Network Connection
1. Press
2. Use
.3. Select ⋖TCP/IP Settings⋗
4. Enter the IPv4 address of another device on the network, and press
