

Solution
Items to PrepareCautions When Printing on DVD/CDs
Attaching/Removing the CD-R Tray
Printing from DVD/CD Label
Printing from Photo Data
Printing with CD-LabelPrint from the Computer
The CD-R Tray (supplied) allows the printing of images on DVD/CDs (printable discs).
Items to Prepare
The following items are needed to print on DVD/CDs:
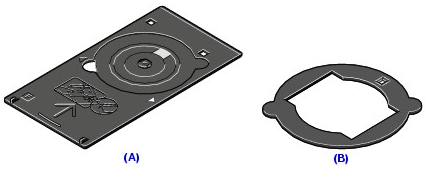
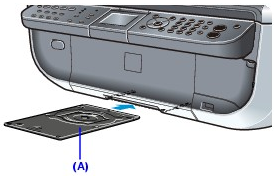
(A) CD-R Tray
"F" is on the upper side.
(B) 8 cm CD-R Adapter
Caution
You cannot print on 8 cm DVD/CDs in the copy mode, in the memory card mode, and from a PictBridge compliant device.
You need to print from the computer to print on 8 cm DVD/CDs.
Obtain a 12 cm or 8 cm DVD/CD with a label surface compatible with inkjet printing.
A "printable disc" differs from regular DVD/CDs in that its label surface has been specially processed to be printed on by an inkjet printer.
Cautions When Printing on DVD/CDs
Attaching/Removing the CD-R Tray
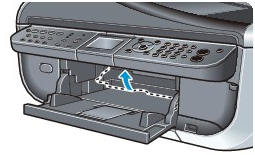
1. Open the Paper Output Tray.
1-1. Press the Open button to open the Paper Output Tray.
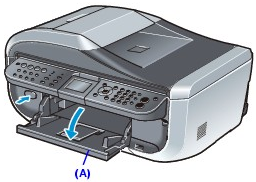
(A) Paper Output Tray
2. Open the Inner Cover.
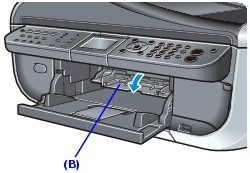
(B) Inner Cover
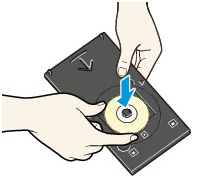
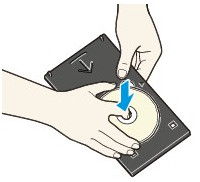
3. Place the DVD/CD.
Caution
12 cm DVD/CD:
(1) Place the disc on the CD-R Tray with the printing surface facing up.
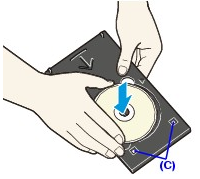
Do not touch the reflectors (C).
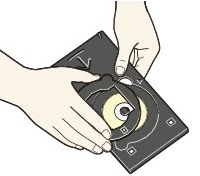
8 cm DVD/CD:
(1) Align the protrusions on both edges of the 8 cm CD-R Adapter with indentations on the CD-R Tray.

(2) Place the 8 cm disc on the CD-R Tray with the printing surface facing up.
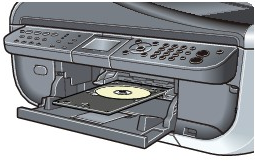
4. Place the CD-R Tray.
Caution
4-1. Place the CD-R Tray on the Inner Cover.
4-2. Insert the CD-R Tray straightly until the arrow (

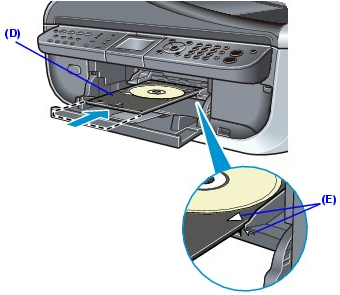
(D) Keep the CD-R Tray level when inserting it.
(E) Align the arrow (
Caution
Do not insert the CD-R Tray beyond the arrow (
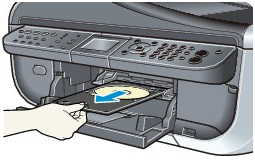
1. Pull out the CD-R Tray.
2. Close the Inner Cover.
Caution
If the Inner Cover is opened, you cannot print on paper as it will not feed properly. Make sure that the Inner Cover is closed.
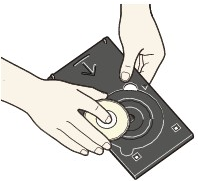
3. Remove the DVD/CD.
Caution
Do not touch the printing surface when removing the disc from the CD-R Tray.
Caution
Dry the printing surface sufficiently before removing the disc. If you see printing on the CD-R Tray or the transparent parts on inner or outer diameter of DVD/CD, wipe them off after the printing surface is dry.
12 cm DVD/CD:
(1) Remove the disc from the CD-R Tray.
8 cm DVD/CD:
(1) Remove the 8 cm CD-R Adapter from the CD-R Tray.
(2) Remove the 8 cm disc from the CD-R Tray.
You can keep the CD-R Tray in the CD-R Tray Storage Compartment located at the center of the bottom of the Cassette.
(A) Insert the CD-R Tray straight.
Caution
When you are not using the CD-R Tray, keep it on a flat place to avoid warping.
If the CD-R Tray warps, you may not be able to use it.
Printing from DVD/CD Label
Copy the label of an existing DVD/CD and print it on a printable DVD/CD.
Caution
You cannot print on 8 cm DVD/CDs.
1. Prepare for copying.
1-1. Turn on the machine.
1-2. Press the COPY button.
2. Select the copy menu.
2-1. Select the copy menu.
2-2. Use the 

2-3. Use the
The print area setting screen is displayed.
3. Specify the print area.
3-1. Use the 

3-2. Press the OK button.
Caution
4. Specify the print density.
4-1. Use the
Caution
5. Load the copy source DVD/CD.
5-1. Load the copy source DVD/CD on the Platen Glass, then press the OK button.
Caution
Be sure to load the copy source DVD/CD with its label side down on the center of the Platen Glass. If you load it near the edge of the Platen Glass, part of the image may be cut off.
6. Confirm the copy settings.
6-1. Confirm the copy settings.
6-2. Press the Color button for color copying, or the Black button for black & white copying.
The copy preparation message is displayed.
7. Set the printable DVD/CD and start copying.
7-1. Follow the on-screen instructions to set the disc.
7-2. Follow the on-screen instructions and press the OK button to start copying.
Caution
Printing from Photo Data
Print a photo saved on a memory card onto a printable DVD/CD.
Caution
You cannot print on 8 cm DVD/CDs.
1. Prepare for printing.
1-1. Turn on the machine.
1-2. Press the MEMORY CARD button.
1-3. Insert the memory card into the Card Slot.
2. Select the print menu.
2-1. Use the
2-2. Use the
The print area setting screen is displayed.
3. Specify the print area.
3-1. Use the
3-2. Press the OK button.
Caution
4. Specify the print density.
4-1. Use the
Caution
If your medium is the recommended DVD or CD, specify Optimal DVD/CD for the suitable density printing. If not, specify Other DVD/CD.
5. Select the photo to print.
5-1. Use the
5-2. Confirm the print image on the DVD/CD, then press the OK button.
6. Confirm the print settings.
6-1. Confirm the print settings.
Caution
To change the print settings, press the Back button to return to the target screen, then change the settings.
6-2. Press the Color button.
The print preparation message is displayed.
Caution
Pressing the Black button will not start printing.
7. Set the printable DVD/CD and start printing.
7-1. Follow the on-screen instructions to set the disc.
7-2. Follow the on-screen instructions and press the OK button to start printing.
Caution
Printing with CD-LabelPrint from the Computer
Windows:
Click Start ⋗ All Programs (or Programs) ⋗ CD-LabelPrint ⋗ Help.
Macintosh:
In the location where the MP Drivers were installed, open Application folder ⋗ CD-LabelPrint folder ⋗ Manual folder ⋗ double-click Manual.