Clean this machine periodically. If dust accumulates, the machine may not operate properly. When cleaning, be sure to observe the following.
Caution
Before cleaning, turn OFF the power and unplug the power plug from the AC power outlet. Failure to do so may result in a fire or electrical shock.
Unplug the power plug periodically and clean with a dry cloth to remove dust and grime. Accumulated dust may absorb humidity in the air and may result in a fire if it comes into contact with electricity.
Use a damp, well wrung-out cloth to clean the machine. Dampen cleaning cloths with water only. Do not use alcohol, benzenes, paint thinners, or other flammable substances. Do not use tissue paper or paper towels. If these substances come into contact with electrical parts inside the machine, they may generate static electricity or result in a fire or electrical shock.
Check the power cord and plug periodically for damage. Check the machine for rust, dents, scratches, cracks, or excessive heat generation. Use of poorly-maintained equipment may result in a fire or electrical shock.
Caution
The inside of the machine has high-temperature and high-voltage components. Touching these components may result in burns. Do not touch any part of the machine that is not indicated in the manual.
When loading paper or removing jammed documents or paper, be careful not to cut your hands with the edges of the paper.
Caution
When removing jammed paper or replacing toner cartridges, be careful not to get any toner on your hands or clothing. If toner gets on your hands or clothing, wash them immediately with cold water.
Exterior
Regularly wipe the exterior of the machine, especially around the ventilation slots, to keep the machine in good condition.
Caution
Ventilation slots are provided only on MF229dw / MF226dn.
1. Turn OFF the machine, and unplug the power cord from the AC power outlet.
When you turn OFF the machine, data that is waiting to be printed is deleted. Fax documents that were received by using the Memory Reception function, faxes that are waiting to be sent, and reports that are automatically printed after sending and receiving faxes are not deleted.
2. Clean the exterior of the machine and the ventilation slots.
Use a soft, well-wrung-out cloth dampened with water or a mild detergent diluted with water.
To locate the ventilation slots, see "e-Manual" (HTML manual) in the DVD-ROM supplied with the machine.
3. Wait for the exterior of machine to dry completely.
4. Reconnect the power cord and turn ON the machine.
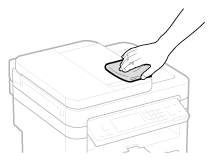
Platen Glass
Regularly wipe off the dust from the platen glass and the underside of the feeder to prevent smudges to be printed on documents or printouts.
Caution
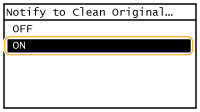
To display a message for soiling on the platen glass, set ⋖Notify to Clean Original Scanning Area⋗ to ⋖On⋗.
1. Turn OFF the machine, and unplug the power cord from the AC power outlet.
When you turn OFF the machine, data that is waiting to be printed is deleted. Fax documents that were received by using the Memory Reception function, faxes that are waiting to be sent, and reports that are automatically printed after sending and receiving faxes are not deleted.
2. Open the feeder.
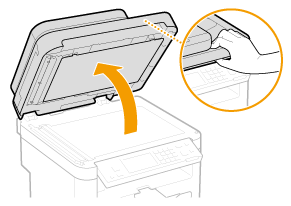
3. Clean the platen glass and the underside of the feeder.
Clean the areas with a cloth dampened with water. Then, wipe the area with a soft, dry cloth.
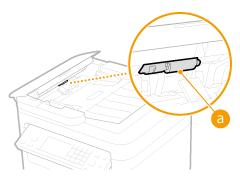
In addition to the platen glass and underside of the feeder, make sure to clean and wipe the white strip of plate (

) and the transparent plastic area (

) too.
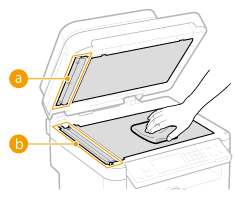

Caution when cleaning the platen glass
Be careful not to bend the clear sheet (
) at the left of the platen glass.
4. Wait for the cleaned area to dry completely.
5. Gently close the feeder.
6. Reconnect the power cord and turn ON the machine.
Feeder
Dust and graphite powder may adhere to the roller inside the feeder and cause smudges to appear on printouts. To clean the feeder, perform the following procedure.
1. Turn OFF the machine, and unplug the power cord from the AC power outlet.
When you turn OFF the machine, data that is waiting to be printed is deleted. Fax documents that were received by using the Memory Reception function, faxes that are waiting to be sent, and reports that are automatically printed after sending and receiving faxes are not deleted.
2. Open the feeder cover.
 MF229dw
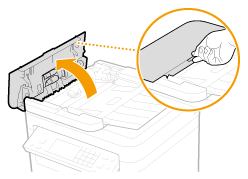
MF226dn / MF217w / MF215
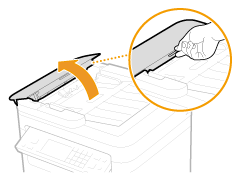
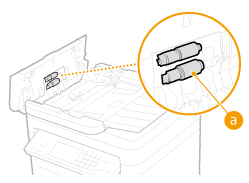
3. Wipe roller ( ) inside feeder.
Clean the areas with a well-wrung-out cloth dampened with water. Then, wipe the area with a soft, dry cloth.
MF229dw
MF226dn / MF217w / MF215
4. Gently close the feeder cover.
5. Reconnect the power cord and turn ON the machine.
Fixing Assembly
Dirt may adhere to the fixing units inside the machine and cause black streaks to appear on printouts. To clean the fixing unit, perform the following procedure. Note that you cannot clean the fixing unit when the machine has documents waiting to be printed. To clean the fixing unit, you need paper larger than plain A4 or Letter size paper. Set the paper in the paper drawer or manual feed slot before performing the following procedure.
Caution
Cleaning requires toner. Make sure that there is sufficient toner remaining beforehand.
It takes approximately 90 seconds to clean the fixing assembly.
1. Press  and tap ⋖Menu⋗.

2. Tap ⋖Adjustment/Maintenance⋗.
3. Tap ⋖Clean Fixing Assembly⋗.
4. Load paper (A4/LTR or larger) in the manual feed slot, and tap ⋖Start⋗.
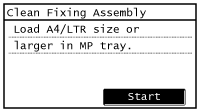
After cleaning is completed and the message ⋖Finished.⋗ appears, press
to return to the Home Screen.
Machine Interior
Clean the interior of the machine regularly so that toner/paper dust does not collect.
1. Turn OFF the machine, and unplug the power cord from the AC power outlet.
When you turn OFF the machine, data that is waiting to be printed is deleted. Fax documents that were received by using the Memory Reception function, faxes that are waiting to be sent, and reports that are automatically printed after sending and receiving faxes are not deleted.
2. Lift the operation panel.
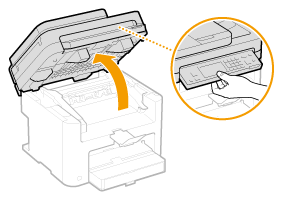

If you cannot lift the operation panel
Make sure the feeder or platen glass cover is completely closed. If a thick original such as a book is placed on the platen glass, remove the original. Forcing the operation panel up may cause damage.
3. Open the toner cover by the grip at the front right of the toner cover.
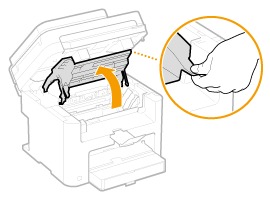
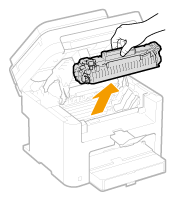
4. Pull the toner cartridge out of the machine.
5. Using a lint-free clean, soft, dry cloth, wipe away toner/paper dust from the inside.
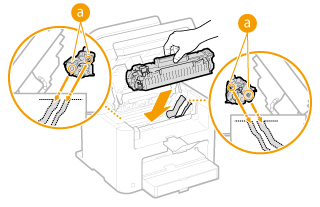
6. Install the toner cartridge.
Align the right and left projections (
) with the toner cartridge guides, and push securely all the way in.
7. Close the toner cover, and lower the operation panel.
If you cannot close the toner cover
Make sure that the toner cartridge is inserted properly. Forcing it closed may cause damage.
8. Reconnect the power cord and turn ON the machine.