

The machine's IPv4 address can be either assigned automatically by a dynamic IP addressing protocol, such as DHCP, or entered manually. When connecting the machine to a wired LAN, make sure that the connectors of the LAN cable are firmly inserted into the ports.
Setting an IPv4 Address
1. Press 

2. Use 


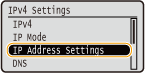
.3. Select ⋖TCP/IP Settings⋗ 
4. Configure IP address settings.
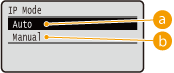
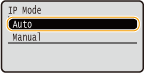
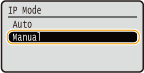
(a) ⋖Auto⋗
Select to automatically assign an IP address via a protocol such as DHCP.
(b) ⋖Manual⋗
Select to configure the IP address settings by manually entering an IP address.

4-A-1. Select ⋖Auto⋗, and press
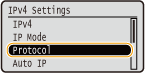
4-A-2. Select ⋖Protocol⋗, and press
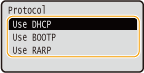
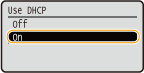
4-A-3. Select ⋖Use DHCP⋗, ⋖Use BOOTP⋗, or ⋖Use RARP⋗, and press
4-A-4. Select ⋖On⋗, and press
4-A-5. Press 
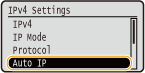
4-A-6. Select ⋖Auto IP⋗, and press
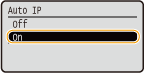
4-A-7. Select ⋖On⋗, and press
NOTE:
When using DHCP
If you turn OFF the power and ON again, an IP address differing from the current one will be assigned. This may disable printing. To use DHCP, specify one of the following settings after consulting the network administrator.
If you do not want to use DHCP/BOOTP/RARP to assign an IP address
IP addresses that are given precedence
4-B-1. Select ⋖Manual⋗, and press
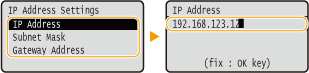
4-B-2. Select ⋖IP Address Settings⋗, and press
4-B-3. Specify the IP address, subnet mask, and gateway address (or default gateway).
・Select the item to set, press
NOTE:
How to enter addresses
 /
/ to move to the target field (a period-delimited input area), and use the numeric keys to increase/decrease the value.
When you are unsure of the IP address to input
5. Perform a hard reset.

Caution
Checking whether the settings are correct
If you have changed the IP address after installing the printer driver
Determining the IP Address to Assign to the Machine
When you want to use a fixed IP address for the machine, you can determine the IP address as shown below.
An IP address consists of four numbers delimited by a period (.) (example: 192.168.1.45). Each number must be in the range from 0 to 255. In general, set the first three numbers to be the same as those for the router because they are common in the network. Determine the last number (for example, 45 in 192.168.1.45) that is different from that for other devices.

When you want to use a fixed IP address, check the settings of the DHCP that functions to automatically assign an IP address in a network. To avoid duplication of the IP address, you need to set an IP address outside the range of IP addresses assigned by DHCP. Since a router often functions as a DHCP server, check the router settings.
Caution
1. Display the setting screen of the router.
2. Check the range of IP addresses assigned by DHCP.


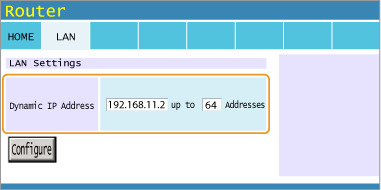
3. Determine the IP address of the machine.