

Solution
Wireless Setup Using WPS (Wi-Fi Protected Setup)Confirm Connection Status
Install the Software
Install the Software (Registration)
Install the Software (Information)
Before connecting the machine to the network, make sure that configuration of the computer and access point or router is complete, and that the computer is connected to the network.
Caution
To use the machine on additional computers (after connecting it to the first computer), refer to "How to perform the wireless LAN setup so that other computers can share the same printer (Macintosh)" and complete setup on those computers.
Notes on Network Connection
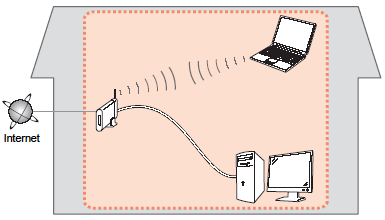
[ Wireless Connection ]
Connect to your network environment over a wireless connection.
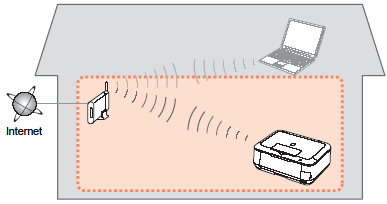
An "Ad-hoc connection," which establishes a direct connection to the computer over a wireless connection without using an access point, is not supported.
Be sure to prepare an access point.
Wireless Setup Using WPS (Wi-Fi Protected Setup)
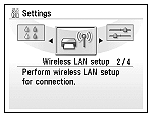
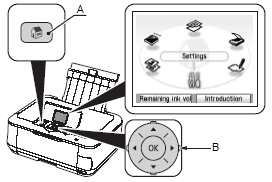
1. Use the Easy-Scroll Wheel (A) to select Settings, then press the OK button.
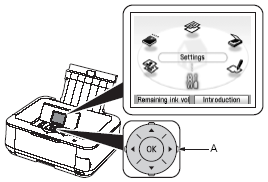
2. Select Wireless LAN setup, then press the OK button.
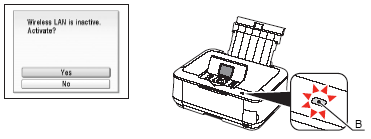
3. Select Yes, then press the OK button.
When wireless connection is enabled, the Wi-Fi lamp (B) lights blue.
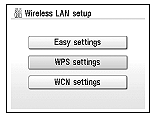
4. Select WPS settings, then press the OK button.
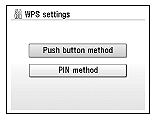
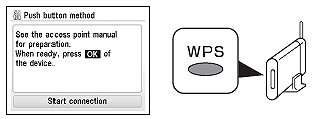
5. Select Push button method, then press the OK button.
6. Press the OK button.

Caution
To use the PIN code method for setup5, select PIN method in step , then press the OK button. Follow the on-screen instructions to operate the machine and access point. When the setup is complete, the completion screen appears. Press the OK button to return to the Settings screen.
A timeout error occurs if setup is not completed within 10 minutes. If the timeout error screen appears, press the OK button, then perform the setup again and set the new PIN code displayed on the screen to the access point. If another error appears, refer to the printed manual: Network Setup Troubleshooting.
7. When the access point is ready, press the OK button on the machine, then press the WPS button on the access point within 2 minutes.
The Wi-Fi lamp (blue) flashes while searching for an access point.
Caution
If the timeout error screen appeared repeatedly, or if another error appeared, refer to the printed manual: Network Setup Troubleshooting.
Caution
For details on WPS, refer to the manual of your access point.
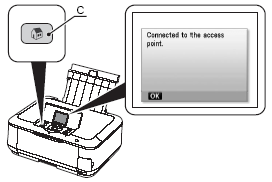
8. When the completion screen appears, press the OK button, then press the HOME button (C).
The standby screen returns.
Confirm Connection Status
1. Press the HOME button (A), select Settings using the Easy-Scroll Wheel (B), then press the OK button.
Caution
Confirm connection status after installing the machine in the target location.
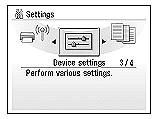
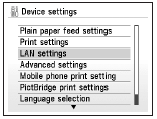
2. Select Device settings, then press the OK button.
3. Select LAN settings, then press the OK button.
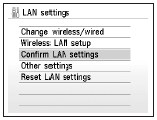
4. Select Confirm LAN settings, then press the OK button.
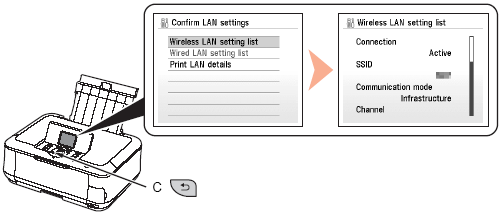
5. Select Wireless LAN setting list or Wired LAN setting list, then press the OK button.
Make sure that Connection is set to Active, then press the HOME button.
It may take a while before the connection is complete. In this case, press the Back button (C) and wait for about a minute, then display the Wireless LAN setting list screen or Wired LAN setting list screen again.
Caution
If the communication status does not improve, make sure of the following.
Install the Software
To use the machine by connecting it to a computer, software including the drivers needs to be copied (installed) to the computer's hard disk. The installation process takes about 20 minutes. (The installation time varies depending on the computer environment or the number of applications to be installed.)The screens below are based on Mac OS X v.10.5.x.
Caution
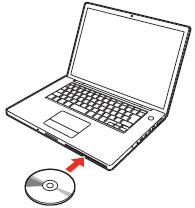
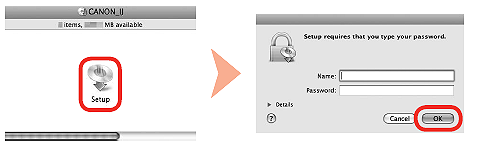
1. Turn on the computer, then insert the Setup CD-ROM into the CD-ROM drive.
2. Double-click the Setup icon of the CD-ROM folder to proceed to the following screen. Enter your administrator name and password, then click OK.
If you do not know your administrator name or password, click Help, then follow the on-screen instructions.
Caution
If the CD-ROM folder does not open automatically, double-click the CD-ROM icon on the desktop.
3. Select your place of residence, then click Next.

Caution
If the Select Language screen appears, select a language, then click Next.
4. Select a country or region, then click Next.

Caution
Displayed only when Europe, Middle East, Africa or Asia is selected on the screen in step 3.
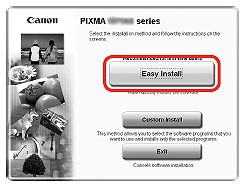
5. Click Easy Install.
The drivers, application software, and on-screen manuals are installed all together.
Caution
If you want to select particular items to install, click Custom Install.
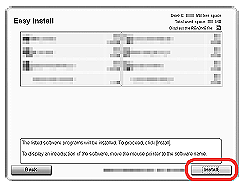
6. Click Install.
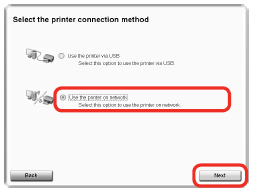
7. Select Use the printer on network, then click Next.
8. Read the License Agreement screen carefully and click Yes.
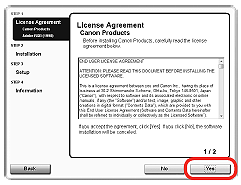
Caution
Follow any on-screen instructions to proceed with the software installation.
9. When the Printer Detection screen appears, click Next.
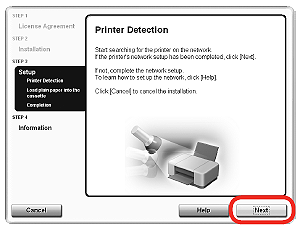
Caution
If the Printer Detection screen is not displayed, the connection method is not correctly selected in step 7. Follow on-screen instructions and proceed with the installation. Click Exit on the installation complete screen, then start again from step 2 and be sure to select Use the printer on network in step 7.
10. On the Canon IJ Network Tool screen, select MP640 series in Printers , then click
Next .
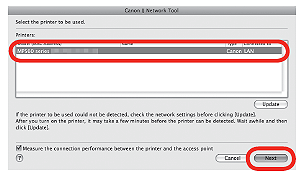
Caution
If the machine is not detected, refer to the printed manual: Network Setup Troubleshooting. Make sure there is no problem, then click Update.
11. When the Connection Performance Measurement screen appears, click Next.
Confirm the measurement results, then click Finish.
Ensure that 
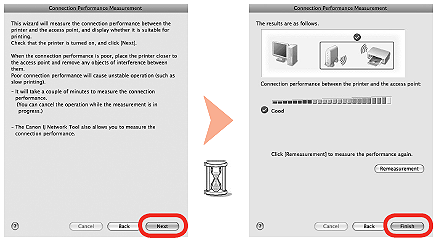
Caution
appears, improve the communication status by referring to the displayed message or the help file, then click Remeasurement.Install the Software (Registration)
This section describes how to register the machine on a Macintosh computer.
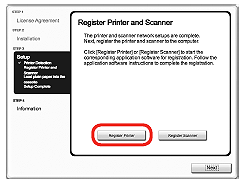
1. When the Register Printer and Scanner screen appears, click Register Printer.
Proceed to the section that relates to your operating system for further installation instructions.
Mac OS X v.10.5.x -⋗ Go to Step 2-A.
Mac OS X v.10.4.x -⋗ Go to Step 2-B.
Mac OS X v.10.3.9 -⋗ Go to Step 2-C.
Caution
- The machine is turned on.
- The firewall function of any security software is turned off.
- The computer is connected to the access point.
2-A (Mac OS X v.10.5.x)
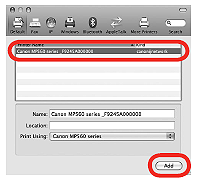
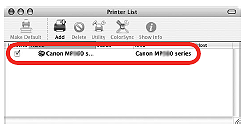
(1) Select Canon MP640 series and click Add.
-⋗ Go to Step 3.
2-B (Mac OS X v.10.4.x)
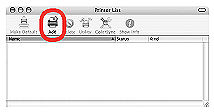
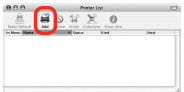
(1) When the Printer List window appears, click Add.
Caution
When the You have no printers available. screen appears, click Add.
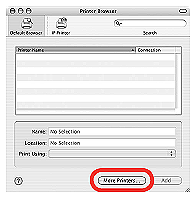
(2) Click More Printers in the Printer Browser screen.
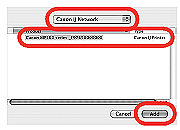
(3) Select Canon IJ Network in the pop-up menu, select Canon MP640 series in the list of printers, then click Add.
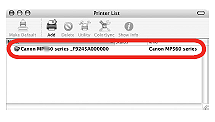
(4) Make sure that Canon MP640 series is added to the list of printers.
-⋗ Go to Step 3.
2-C (Mac OS X v.10.3.9)
(1) When the Printer List window appears, click Add.
Caution
When the You have no printers available. screen appears, click Add.
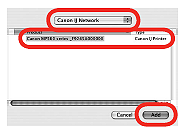
(2) Select Canon IJ Network in the pop-up menu, select Canon MP640 series in the list of printers, then click Add.
(3) Make sure that Canon MP640 series is added to the list of printers.
-⋗Go to Step 3.
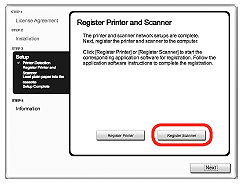
3. When the Register Printer and Scanner screen appears, click Register Scanner.
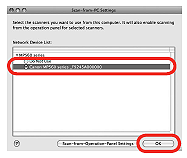
4. Select Canon MP640 series on the Scan-from-PC Settings screen, then click OK.
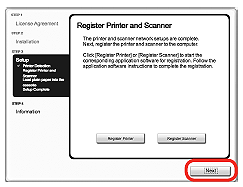
5. When the Register Printer and Scanner screen appears, click Next.
Install the Software (Information)
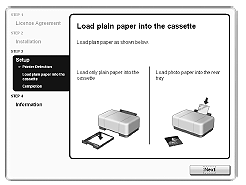
1. When the Load plain paper into the cassette screen appears, follow the on-screen instructions to proceed with the software installation.
Caution
For details, refer to Loading Paper.
Important Information for the Installation
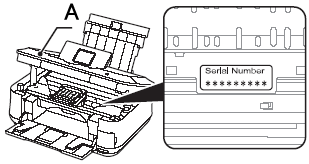
The product serial number is required when registering the product. The serial number is located inside the machine (as shown in the illustration).
Caution
When opening the Scanning Unit (Cover) (A), the Print Head Holder moves automatically if the unit is powered on.
Caution
The User Registration screen will only be displayed when Europe, Middle East, Africa is selected on the Select Your Place of Residence screen.
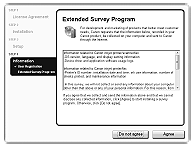
If you can agree to Extended Survey Program, click Agree.
If you click Do not agree, the Extended Survey Program will not be installed.
(This has no effect on the machine's functionality.)
Caution
The screen does not appear on Mac OS X v.10.3.9.
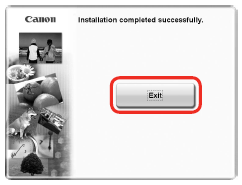
2. Click Exit to complete the installation.
If Restart is displayed, follow the instruction to restart the computer.
After restarting the computer, remove the Setup CD-ROM and keep it in a safe place.
When using Macintosh,it is necessary to restart the computer before scanning using the Operation Panel on the machine for the first time.
Caution
To use the machine on additional computers, refer to " How to perform the wireless LAN setup so that other computers can share the same printer(Maintosh)" and complete setup on those computers.