

Issue
Cause and solution
The machine is not powered on.
Cause and solution
The machine's memory is full.
Either print or delete documents in memory to free up memory. Then ask the sender to resend the fax.
Cause and solution
There was an error during reception.
Cause and solution
The telephone line is not correctly connected.
Check that the telephone line is connected correctly to the Telephone Line Jack and that the telephone (or another external device such as an answering machine or a computer modem) is connected correctly to the External Device Jack. Refer to your setup sheet.
Typical examples of connecting the machine are described below. The machine cannot send/receive faxes if the connection is incorrect. Connect the machine correctly.
Caution
If the Power Disconnects Unexpectedly
If there is a power failure or if you accidentally disconnect the power cord, the date/time settings as well as all documents stored in memory will be lost. User data and speed dialing settings are retained. If the power disconnects, the following will apply:
Methods of Connecting External Devices
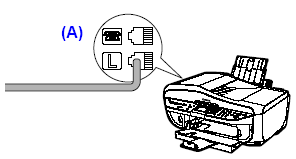
(A) Telephone line (analog)
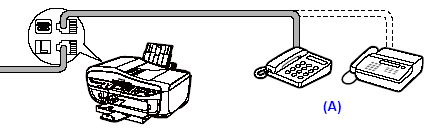
(A) Telephone or Answering machine
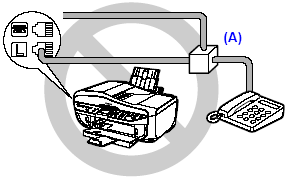
Caution
Do not connect the machine and external devices in parallel to the same telephone line using a splitter (A). The machine may not operate properly.
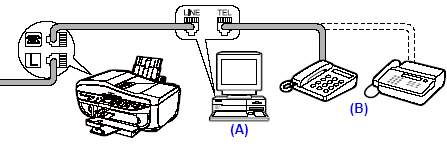
(A) Computer
(B) Telephone or Answering machine
Caution
For Users In The UK
If the connector of the external device cannot be connected to the jack on the machine, you will need to purchase a B.T. adapter to connect as follows:
Connect the external device line to the B.T. adapter, then connect the B.T. adapter to the jack.
Methods of Connecting the Various Lines
The following are some basic connection schemes that apply when you are connecting to a nonanalog telephone line. These are examples and are not guaranteed to suit every connecting
conditions. For details, refer to the instruction manual supplied with the network device (control devices such as an xDSL modem, terminal adapter, or dial-up router) you are connecting to this machine.
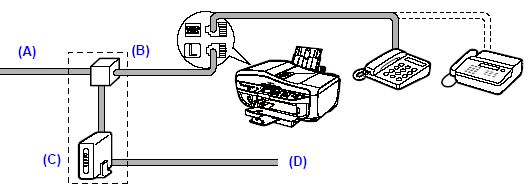
(A) Digital Subscriber Line
(B) Splitter
(C) xDSL modem (splitter may be built-in to the modem)
(D) Computer
For details on ISDN connection and settings, see the manuals supplied with your terminal adapter or dial-up router.
Setting the Telephone Line Type
Before using your machine, make sure you set the correct telephone line type for your telephone line. If you are unsure of your telephone line type, contact your telephone company. For ISDN (Integrated Services Digital Network) or xDSL (Digital Subscriber Line) connections, contact the telephone company or service provider to confirm your line type.
Caution
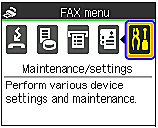
1. Display the FAX menu.
(1) Press the FAX button, then press the Menu button.
The FAX menu is displayed.
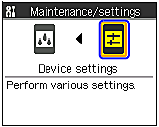
2. Display the Device settings screen.
(1) Press the 

The Maintenance/settings screen is displayed.
(2) Press the
The Device settings screen is displayed.
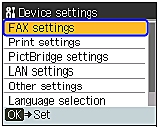
3. Display the User settings screen.
(1) Press the 

The FAX settings screen is displayed.
(2) Press the
The User settings screen is displayed.

4. Display the Telephone line type screen.
(1) Press the
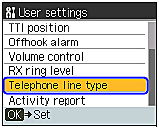
5. Select the telephone line type.
(1) Press the

Rotary pulse:
Suitable for pulse dialing.
Touch tone:
Suitable for tone dialing.
Caution
Rotary pulse may not be supported depending on the country or region of purchase.
Cause and solution
A paper size other than A4, Letter, or Legal*1 is loaded.
If a paper size other than A4, Letter, or Legal*1 is loaded in the configured paper source, incoming faxes are not printed and are stored in memory. Change the paper in the configured paper source to A4, Letter, or Legal*1 size, then press the OK button on the machine. Load legal-sized*1 paper in the Rear Tray.
*1 Legal may not be available depending on the country or region of purchase.
Caution

Caution
We recommend using genuine Canon photo media when printing photographs. For details on the specialty media Canon provides for use with its various printers, see "Compatible Media Types".
Loading Paper in the Rear Tray
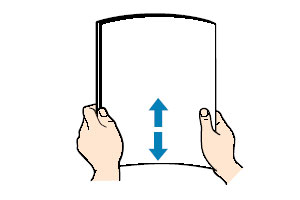
1. Flatten the four corners of the paper before loading it.
Caution
- When you do not print, remove unused paper from the Rear Tray, put them back into the package, and keep it on a level surface.
- Take out only the necessary number of sheets from the package, just before printing.
2. Prepare to load paper.
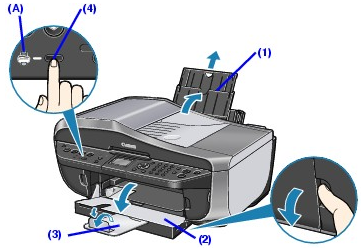
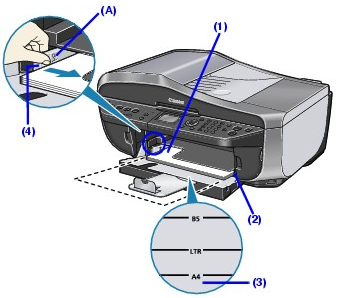
(1) Open the Rear Tray, then pull out the Paper Support.
Put your finger in the rounded indent of the Paper Support and pull it out until it stops.
(2) Open the Paper Output Tray.
(3) Extend the Output Tray Extension.
(4) Press the Feed Switch so that the Rear Tray lamp (A) lights.
Caution
You can also select the paper source with the printer driver.
For details, refer to the PC Printing Guide on-screen manual.
3. Load the paper.
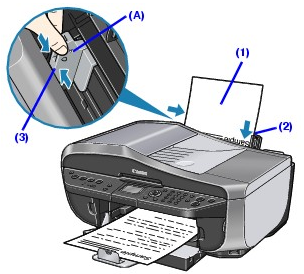
* Do not load higher than the Load Limit Mark (A).
(1) Load the paper in the Rear Tray with the print side facing UP.
(2) Align the paper stack against the Cover Guide on the right side of the Paper Support.
Caution
Make sure that the Cover Guide is set upright when you load paper in the Rear Tray.
(3) Slide the Paper Guide against the left side of the paper stack.
4. Specify the page size and media type settings according to the loaded paper.
Caution
Loading Paper in the Front Tray
You can load A4, Letter, or B5-sized plain paper (such as Canon Super White Paper SW-201) in the Front Tray. You cannot load any other paper in the Front Tray.
1. Flatten the four corners of the paper before loading it.
2. Prepare to load paper.

(1) Open the Paper Output Tray.
(2) Extend the Output Tray Extension.
(3) Press the Feed Switch so that the Front Tray lamp (A) lights.
Caution
You can also select the paper source with the printer driver.
For details, refer to the PC Printing Guide on-screen manual.
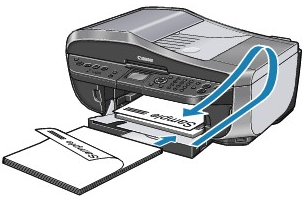
3. Load the paper with the print side facing DOWN.
* Do not load higher than the Load Limit Mark (A).
(1) Load the paper in the Front Tray with the print side facing DOWN and the leading edge to the far side.
(2) Align the paper stack against the right edge of the Front Tray.
(3) Align the near and the left edges of the paper with the Paper Size Mark.
(4) Slide the Paper Guide against the left side of the loaded paper stack.
Caution
When loading paper in the Front Tray, refer to the illustration below and make sure not to load paper with the wrong side up.
4. Specify the page size settings according to the loaded paper.
Caution
Cause and solution
The machine is not set to the appropriate receive mode.
Check the receive mode setting (A), and change it to a mode suited to your connection if necessary.
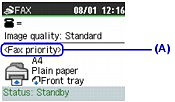
FAX only mode
TEL priority mode
FAX priority mode
DRPD
Network switch