Solution
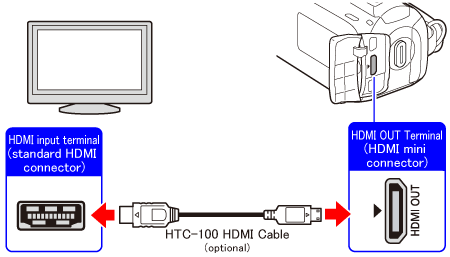
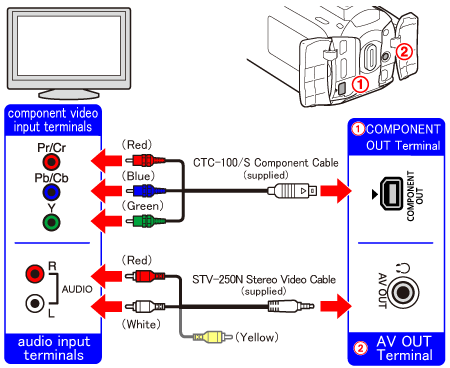
1. Connecting to a high-definition television equipped with an HDMI input terminal2. Connecting with the component cable (high-definition quality)
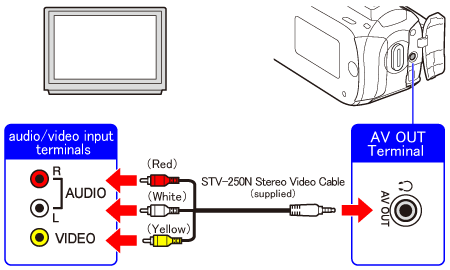
3. Connecting to audio/video input terminals (standard-definition)
This section describes how to connect your camcorder to a TV.
To play back movies in high-definition quality, the camcorder can be connected with an optional HDMI cable or with the supplied component cable and supplied stereo video cable.
To play back movies in standard-definition, the camcorder can be connected with the supplied stereo cable.
Please check the terminals of your TV and connect using the corresponding cables.
Caution
Caution
It is recommended to connect the compact power adapter to the camcorder when you play back video on the TV so that you can enjoy the video without worrying about battery power consumption.
1. Connecting to a high-definition television equipped with an HDMI input terminal
Caution
About the HDMI connection
The HDMI ( High-Definition Multimedia Interface ) connection is a convenient all-digital connection using a single cable for both video and audio.
1. Connect the camcorder to the TV.
1-1.Turn off the camcorder and the TV.
1-2. Use the HDMI cable to connect the camcorder to the TV.

2.Turn on the camcorder and the TV.
On the TV, select the HDMI terminal to which you connected the camcorder as the video input.
Set the camcorder to the movie playback mode.
3.Press the ⋖ SET ⋗ button of the camcorder to play back video.
The selected scenes will start playing.
Caution
2. Connecting with the component cable (high-definition quality)
When connecting the camcorder and a TV with the component cable, use the supplied stereo video cable to output the audio.
1. Before connecting the camcorder with a high-definition TV, make the following setting on the camcorder.
2.Connect the camcorder to the TV.
2-1.Turn off the camcorder and the TV.
2-2.Use the Component cable to connect the camcorder to the TV.
To output audio, use the stereo cable to connect the camcorder to the TV (insert terminals other than the yellow one).

3.Turn on the camcorder and the TV.
On the TV, select the component terminal to which you connected the camcorder as the video input.
Set the camcorder to the movie playback mode.
4.Press the ⋖ SET ⋗ button of the camcorder to play back movie.
The selected scenes will start playing.
3. Connecting to audio/video input terminals (standard-definition)
1. Before connecting the camcorder with a TV, make the following settings on the camcorder.
2.Use the Stereo Video Cable to connect the camcorder to the TV.

3.Turn on the camcorder and the TV.
On the TV, select the audio/video terminal to which you connected the camcorder as the video input.
Set the camcorder to the movie playback mode.
4.Press the ⋖ SET ⋗ button of the camcorder to play back movie.
The selected scenes will start playing.
Caution
When you play back your 16:9 movies on standard TV sets with a 4:3 aspect ratio, the TV set will switch automatically to widescreen mode if it is compatible with the Video ID-1 system. Otherwise, change the aspect ratio of the TV manually.


