

Issue
Cause and solution
Check 1: Make sure that the power plug is securely plugged in, then turn the machine on
While any lamp on the operation panel is flashing, the machine is initializing. Wait until the lamp stops flashing and remains lit.
Caution
Cause and solution
Check 2: Check the status of ink tanks. Replace the ink tank if ink has run out
When you need to replace an ink tank, follow the procedure below.
Caution
Handling ink
Caution
Every ink is also consumed in the standard cleaning and deep cleaning of the print head, which may be necessary to maintain the performance of the machine. When an ink tank is out of ink, replace it immediately with a new one.
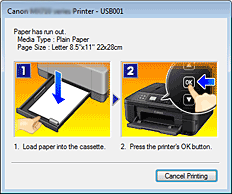
1. Make sure that the power is turned on, and open the paper output tray gently.
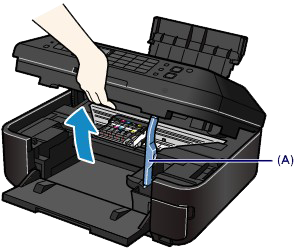
2. Lift the scanning unit / cover, then hold it open with the scanning unit support (A).
The print head holder moves to the replacement position.
Caution
Caution
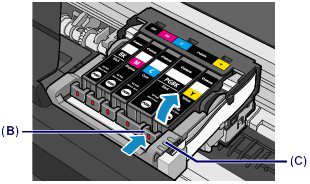
3. Remove the ink tank with the lamp flashing fast.
Push the tab (B) and lift the ink tank to remove.
Do not touch the print head lock lever (C).
Caution
Caution
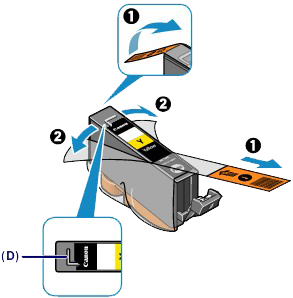
4. Prepare a new ink tank.
(1) Take a new ink tank out of its package, remove the orange tape ( 

Caution
(2) Hold the ink tank with the orange protective cap (E) pointing up while being careful not to block the L-shape air hole (D).
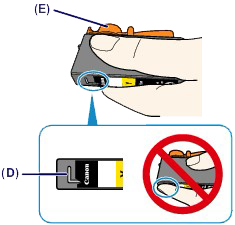
(3) Slowly twist the orange protective cap (E) 90 degrees horizontally to remove it off.
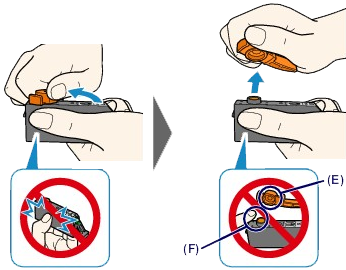

Caution
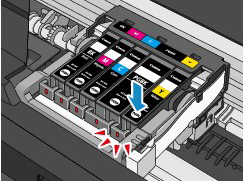
5. Install the new ink tank.
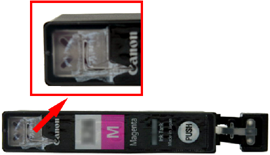
(1) Insert the front end of the ink tank into the print head at a slant.
Make sure that the position of the ink tank matches the label.

(2) Press the mark 
Make sure that the ink lamp lights up red.
Caution
6. Close the scanning unit / cover.
(1) Lift the scanning unit / cover slightly.
(2) Set the scanning unit support (G) back to its original position.
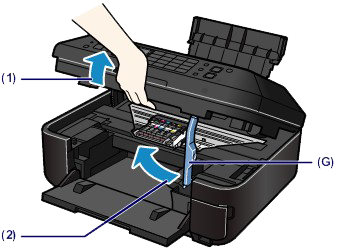
(3) Close the scanning unit / cover gently.
Caution
Caution
Caution
-⋗ [ An Error Message Is Displayed on the LCD ]
-⋗ [ Aligning the Print Head ]
Checking the Ink Status with the LCD on the Machine
1. Make sure that the power is turned on, and press the MENU button.
2. Select 
The setup menu screen will appear.
3. Select 
A symbol appears in the area (A) if there is any information about the remaining ink level.
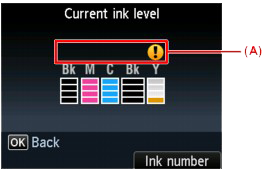
Example:

Ink tank is running low. Prepare a new ink tank.
Caution
-⋗ Refer to [ Canon IJ Status Monitor (Windows) ] within this webpage.
-⋗ Refer to [ Checking the Current Ink Level (Macintosh) ] within this webpage.
Checking the Ink Status with the Ink Lamps
1. Make sure that the power is turned on, and open the paper output tray gently.
2. Lift the scanning unit / cover, then hold it open with the scanning unit support.
-⋗ [ Replacing an Ink Tank ]
3. Check the ink lamp.
Close the scanning unit / cover after checking the ink lamp status.
-⋗ [ Replacing an Ink Tank ]
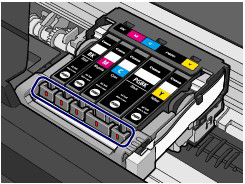
The ink tank is correctly installed.
Flashing slowly (at around 3-second intervals)

Ink tank is running low. Prepare a new ink tank.
Flashing fast (at around 1-second intervals)

The ink in the ink tank has run out, or the ink tank has been incorrectly installed. Confirm whether the label on the ink tank matches the one on the print head holder. When the tank is correctly installed, replace the ink tank whose lamp blinks quickly.
-⋗ [ Replacing an Ink Tank ]
The ink tank is not installed properly or the function for detecting the remaining ink level is disabled. If the ink tank is not installed properly, press the mark
If the ink lamp is still off after reinstalling the ink tank, there has been an error and the machine cannot print. Check the error message displayed on the LCD.
Caution
-⋗ Refer to [ Canon IJ Status Monitor (Windows) ] within this webpage.
-⋗ Refer to [ Checking the Current Ink Level (Macintosh) ] within this webpage.
You can also check the ink status on the computer screen.
Canon IJ Status Monitor (Windows)
If you are using the XPS printer driver, replace "Canon IJ Status Monitor" with "Canon IJ XPS Status Monitor" when reading this information.
The Canon IJ Status Monitor is an application software that shows the status of the printer and the progress of printing. You will know the status of the printer with graphics, icons, and messages.
- Launching the Canon IJ Status Monitor
The Canon IJ Status Monitor launches automatically when data is sent to the printer. When launched, the Canon IJ Status Monitor appears as a button on the task bar.

Click the button of the status monitor displayed on the task bar. The Canon IJ Status Monitor appears.

Caution
The information displayed on the Canon IJ Status Monitor may differ depending on the country or region where you are using your machine.
- When Errors Occur
The Canon IJ Status Monitor is automatically displayed if an error occurs (e.g., if the printer runs out of paper or if the ink is low). In such cases, take the appropriate action as described.
Checking the Current Ink Level (Macintosh)
You can check the detailed information such as the remaining ink level and the ink tank types of your model.
1. Select Ink Level Information from the pop-up menu on the Canon IJ Printer Utility
An illustration of the ink types and their status are displayed. If a warning or error related to the remaining ink level occurs, the print driver displays an icon to let you know.
In such cases, take the appropriate action as described on the screen.
2. If necessary, click Ink Details
You can check ink-related information.
Caution
 to check which ink tank your model uses.
 Cause and solution
Check 3: Open the scanning unit / cover and check to see if the ink lamps are flashing red
If there is still sufficient ink but its ink lamp is flashing red, an ink tank may not be installed in a right position.
When you need to replace an ink tank, follow the procedure below.
Caution
Handling ink
Caution
Every ink is also consumed in the standard cleaning and deep cleaning of the print head, which may be necessary to maintain the performance of the machine. When an ink tank is out of ink, replace it immediately with a new one.
1. Make sure that the power is turned on, and open the paper output tray gently.
2. Lift the scanning unit / cover, then hold it open with the scanning unit support (A).
The print head holder moves to the replacement position.
Caution
Caution
3. Remove the ink tank with the lamp flashing fast.
Push the tab (B) and lift the ink tank to remove.
Do not touch the print head lock lever (C).
Caution
Caution
4. Prepare a new ink tank.
(1) Take a new ink tank out of its package, remove the orange tape (
Caution
(2) Hold the ink tank with the orange protective cap (E) pointing up while being careful not to block the L-shape air hole (D).
(3) Slowly twist the orange protective cap (E) 90 degrees horizontally to remove it off.
Caution
5. Install the new ink tank.
(1) Insert the front end of the ink tank into the print head at a slant.
Make sure that the position of the ink tank matches the label.
(2) Press the mark
Make sure that the ink lamp lights up red.
Caution
6. Close the scanning unit / cover.
(1) Lift the scanning unit / cover slightly.
(2) Set the scanning unit support (G) back to its original position.
(3) Close the scanning unit / cover gently.
Caution
Caution
Caution
-⋗ [ An Error Message Is Displayed on the LCD ]
-⋗ [ Aligning the Print Head ]
Cause and solution
Check 4: Open the scanning unit / cover and make sure that the ink lamps light up red
If the ink lamp is not lit, press the
Cause and solution
Check 5: Make sure that the machine is connected to your computer properly
When the machine is connected to your computer with a USB cable, make sure that the USB cable is securely plugged in to the machine and the computer, then check the followings:
When you use the machine over LAN, make sure that the machine is connected to the network with a LAN cable or is set up correctly.
Cause and solution
Check 6: If you are printing from the computer and there are any unnecessary print jobs, delete them
Cause and solution
Check 7: Make sure that your machine's name is selected in the Print dialog box.

The machine will not print properly if you are using a printer driver for a different printer.
Make sure that your machine's name is selected in the Print dialog box.
Caution
To make the machine the one selected by default, select Set as Default Printer.
Cause and solution

The machine will not print properly if you are using a printer driver for a different printer.
Make sure that your machine's name is selected in Printer in the Print dialog.
Caution
Cause and solution
Check 8: Configure the printer port appropriately.(Windows)
Make sure that the printer port is configured appropriately.
1. Log on as a user account with administrator privilege.
2. Select items from the Start menu as shown below.
3. Open the properties of the printer driver for the machine.
4. Click the Ports tab to confirm the port settings.
Make sure that a port named "USBnnn" (where "n" is a number) with "Canon XXX Printer" appearing in the Printer column is selected for Print to the following port(s).
Caution
Cause and solution
Reinstall the MP Drivers.
Launch Canon My Printer from the task tray, select Diagnose and Repair Printer. Follow the on-screen instructions to set the correct printer port, then select your machine's name.
If the problem is not resolved, reinstall the MP Drivers.
Launch IJ Network Tool, and select "CNBJNP_xxxxxxxxxx" as you confirmed in step 4, then associate the port with the printer using Associate Port in the Settings menu.
If the problem is not resolved, reinstall the MP Drivers.
Cause and solution
Check 9: Is the size of the print data extremely large?
Click Print Options on the Page Setup sheet on the printer driver. Then, set Prevention of Print Data Loss in the displayed dialog to On.