

Issue
Cannot Receive a Fax, Cannot Print a Fax
Cause and solution
Check 1: Is the power turned on?
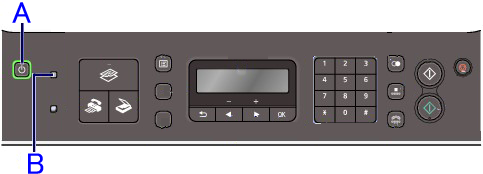
A:ON button (POWER lamp)
B:In Use/Memory lamp
Cause and solution
Check 2: Is the machine's memory full?
Either print or delete documents in the machine's memory to free it up, then ask the sender to resend the fax.
In the following cases, the machine is not able to print the received fax and will automatically store the fax in its memory.
Caution
If you disconnect the power cord, all the documents stored in memory are deleted. Send or print necessary documents before disconnecting the power cord.
Caution
When confirming, printing, or deleting a document stored in memory, you specify it by its transaction number. If you do not know the transaction number for your target document, print the list of documents first.
Printing a Document in Memory
If the machine was not able to send a fax or print a received fax, it stores the unsent or unprinted fax in its memory. If an error occurred during a fax transmission, the document is not stored in memory. You can print a list of stored documents (the memory list) or print a specified document.
Caution
The memory list shows the transaction number of the unsent or unprinted fax (TX/RX NO.), transaction mode, recipient's number, and the date and time of the transaction.
1. Load paper.
Refer to Loading Paper .
2. Press the FAX button, then press the Menu button.
The Fax settings screen is displayed.
3. Use the 
4. Print a specified document or memory list.
Use the
The memory list stored in memory is printed.
To print a specified document:
1. Use the
2. Use the Numeric buttons, or the
Caution
No mark: Indicates a black and white document.


&: Indicates the machine is receiving/printing a color document.
button or the Tone button shows the transaction time or fax/telephone number on the LCD. Each time you press the button or the Tone button, the information on the LCD changes.3. Use the
If you select Yes, only the first page of the document will be printed. If you select No, all the pages of the document stored in memory will be printed.
To print other documents, repeat the procedure from steps 2 and 3.
4. Press the Back button or Stop button.
Caution
1. Load paper.
Refer to Loading Paper .
2. Press the FAX button, then press the Menu button.
The Fax settings screen is displayed.
3. Use the
4. Use the
5. Use the
Caution
Deleting a Document in Memory
1. Press the FAX button, then press the Menu button.
The Fax settings screen is displayed.
2. Use the
3. Use the

4. Use the

Caution
No mark: Indicates a black and white document.
&: Indicates the machine is receiving/printing a color document.
button or the Tone button shows the transaction time or fax/telephone number on the LCD. Each time you press the button or the Tone button, the information on the LCD changes.5. Use the
To delete other documents, repeat the procedure from steps 4 and 5.
6. Press the Back button or Stop button.
1. Press the FAX button, then press the Menu button.
The Fax settings screen is displayed.
2. Use the
3. Use the
4. Use the
Caution
This function is not available while the machine is receiving a fax.
To save a document on a USB flash drive
You can save sent/received faxes on a USB flash drive as PDF files using the Operation Panel of the machine.
Caution
1. Press the FAX button, then press the Menu button.
The Fax settings screen is displayed.
2. Insert the USB flash drive into the Direct Print Port.
3. Use the
4. Use the
All the documents are saved on the USB flash drive.
Proceed to step 5.
5. Use the

The specified document is saved on the USB flash drive.
Caution
No mark: Indicates a black and white document.
&: Indicates the machine is receiving/printing a color document.
While the transaction number is displayed, pressing the
6. Use the
To save other documents, repeat the procedure from steps 5 and 6.
7. Press the Back button or Stop button.
Caution
- Folder name: CANON_SC\FAXDOC\0001
- File name (file extension: PDF): Running numbers, starting from FAX_0001
- File date: The date and time of saving as set in the machine.
Importing Faxes Saved on a USB Flash Drive to the Computer
You can import faxes saved on a USB flash drive to the computer.
After saving faxes, connect the USB flash drive to the computer, then import the data using Windows Explorer.
Cause and solution
Check 3: Does an error occur during reception?
-⋗ An Error Message Is Displayed on the LCD
-⋗ A Message for Faxing Is Displayed on the LCD
Cause and solution
Check 4: Is the telephone line connected correctly?
Check that the telephone line is connected correctly to the Telephone Line Jack and that the telephone (or another external device such as an answering machine or a computer modem) is connected correctly to the External Device Jack. Refer to your setup manual.
For the basic connection of the machine, refer to the printed manual: Getting Started. This guide describes other typical connections.
The machine cannot send/receive faxes if the connection is incorrect. Connect the machine correctly.
Caution
If the Power Disconnects Unexpectedly
If the power disconnects, the following will apply:
Connecting Various Lines
These are examples and could not be guaranteed to suit every connecting condition. For details, refer to the instruction manual supplied with the network device (control devices such as an xDSL (Digital Subscriber Line) modem or terminal adapter) you are connecting to this machine.
Caution
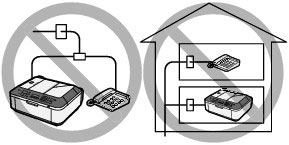
Do not connect fax machines and/or telephones in parallel (US and Canada only)
- If you pick up the handset of the telephone that is connected in parallel during fax transmission or reception, the fax image may be corrupted or a communication error may occur.
- Such services as Caller ID, etc. may not operate properly on the telephone.
Caution
Connecting the telephone
For users in the UK
Attach the B.T. adapter to the modular cable connecting the external device, then connect the B.T. adapter to the 
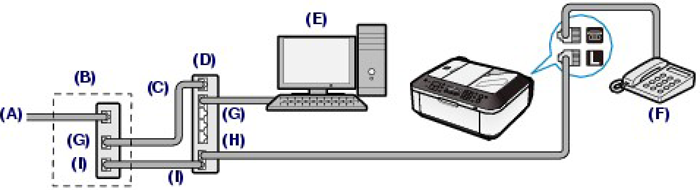
(A) Digital Subscriber Line
(B) xDSL modem (splitter may not be built-in to the modem)
(C) WAN (Wide Area Network)
(D) Broadband router compatible with Internet Telephone
(E) Computer
(F) Telephone or answering machine
(G) LAN (Local Area Network)
(H) TEL
(I) LINE
*Port configurations and names may vary depending on the product.
Caution
See Setting the Telephone Line Type.
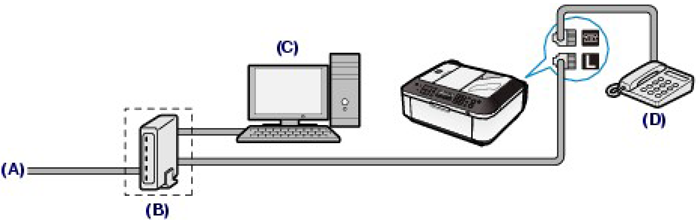
(A)Digital Subscriber Line
(B) xDSL modem (splitter may not be built-in to the modem)
(C) Computer
(D) Telephone or answering machine
Caution
When the splitter is not built-in to the modem, do not branch the telephone line before the splitter (wall side). And also, do not connect splitters in parallel. The machine may not be able to operate properly.
Caution
When connecting to the xDSL line, select the same line type as you are subscribing to in Telephone line type.
See Setting the Telephone Line Type.
For details on ISDN (Integrated Service Digital Network) connection and settings, refer to the manuals supplied with your terminal adapter or dial-up router.
Setting the Telephone Line Type
Before using your machine, make sure you set the correct telephone line type for your telephone line. If you are unsure of your telephone line type, contact your telephone company. For xDSL or ISDN connections, contact the telephone company or service provider to confirm your line type.
Caution
1. Display the Telephone line type screen.
(1) Press the FAX button, and press the Menu button.
The Fax settings menu will appear.
(2) Use the 
The FAX user settings menu will appear.
(3) Use the

2. Select the telephone line type.
(1) Use the

Rotary pulse: Suitable for pulse dialing.
Touch tone: Suitable for tone dialing.
(2) Press the OK button.
3. Press the FAX button to return to the fax standby screen.
Cause and solution
Check 5: Is a different size of paper from that specified by Page size loaded?
If a different size of paper from that specified by Page size is loaded on the Rear Tray, incoming faxes will not be printed completely and will be stored in memory. Load the same size of paper as that specified by Page size on the Rear Tray, then press the OK button on the machine.
Cause and solution
Check 6: Is Page size set to other than A4, 8.5"x11"(LTR), or Legal (or 8.5"x14")?
If Page size is set to other than A4, 8.5"x11"(LTR), or Legal (or 8.5"x14"), the received fax will not be printed and will be stored in memory (Memory Reception). Set Page size to A4, 8.5"x11"(LTR), or Legal (or 8.5"x14").
Cause and solution
Check 7: Is paper loaded?
If paper is not loaded on the Rear Tray, received faxes will be stored in memory without being printed. Load paper on the Rear Tray, then press the OK button.
Loading Plain Paper / Photo Paper
Caution
If you cut plain paper into small size such as 4" x 6" / 10 x 15 cm, 4" x 8" / 101.6 x 203.2 mm, 5" x 7" / 13 x 18 cm, or 2.16" x 3.58" / 55.0 x 91.0 mm (Card size) to perform trial print, it can cause paper jams.
Caution
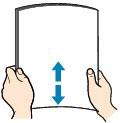
1. Prepare paper.
Align the edges of paper. If paper is curled, flatten it.
Caution
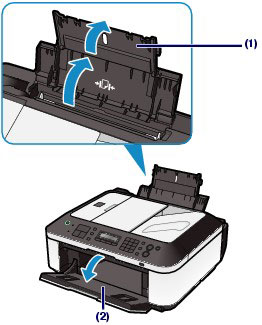
2. Load paper.
(1) Open the Paper Support, and open the support as an extension.
(2) Open the Paper Output Tray gently.
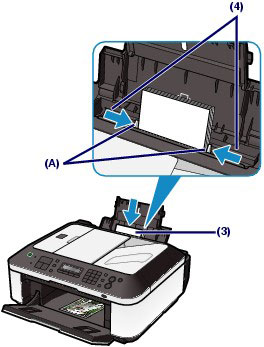
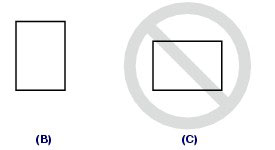
(3) Slide the Paper Guides (A) to open them, and load the paper in the center of the Rear Tray WITH THE PRINT SIDE FACING YOU.
(4) Slide the Paper Guides (A) to align them with both sides of the paper stack.
Do not slide the Paper Guides too hard. The paper may not be fed properly.
Caution
Caution
Caution
After loading paper
Loading Documents in the ADF
You can load documents to copy, fax, or scan in the ADF.
Caution
To scan a document at optimum quality, load it on the Platen Glass.
1. Make sure that any original has been removed from the Platen Glass.
2. Load a document in the ADF.
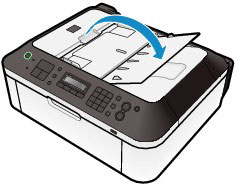
(1) Open the Document Tray.
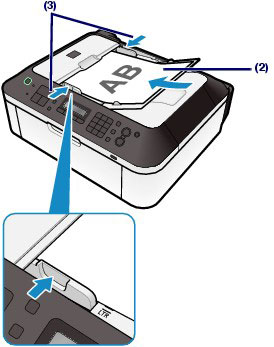
(2) Insert the document in the Document Tray until you hear a beep sound.
Load the document WITH THE SIDE TO SCAN FACING UP in the Document Tray.
Caution
When you set the alarm to be silent in Device user settings of Device settings, the alarm will not beep even if the document is inserted in the Document Tray.
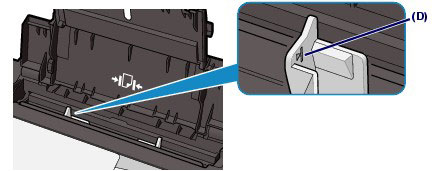
(3) Adjust the Document Guides to match the width of the document.
Do not slide the Document Guides too hard. The document may not be fed properly.
Cause and solution
Check 8: Has the ink run out?
If the ink has run out, received faxes will be stored in memory without being printed. Replace the FINE Cartridge, then print the faxes in memory.
Caution
If the ink has already run out, we recommend that OFF be selected for Auto print in FAX user settings to store the received fax in memory and print the fax manually after replacing the FINE Cartridge. After you replace the FINE Cartridge and select ON for Auto print, the fax stored in memory will be printed automatically.
Cause and solution
Check 9: Is the machine set to the appropriate receive mode?
Check the receive mode setting and change it to a mode suited to your connection if necessary.
Cause and solution
Check 10: Is Fax reception reject set to ON?
Set Fax reception reject to OFF.
Cause and solution
Check 11: Is Caller ID service set to Subscribed?
Set Caller ID service to Unsubscribed
Cause and solution
•Machine Does Not Switch Automatically between Voice and Fax Calls
Cause and solution
Check: Is the receive mode set to Fax only mode?
If the receive mode is set to Fax only mode, there will be no automatic switching between voice and fax calls. Set the receive mode to Fax priority mode, TEL priority mode, DRPD*1, or Network switch*2. If the receive mode is TEL priority mode and an answering machine is connected to the machine, check whether a proper message is played back when the answering machine answers.
*1 This setting is available only in the US and Canada.
*2 This setting may not be available depending on the country or region of purchase.
Cause and solution
•Quality of Received Fax is Poor
Cause and solution
Check 1: Check the scan settings of the sender's fax machine
Ask the sender to adjust the scan settings of the fax machine.
Cause and solution
Check 2: Is ECM RX set to OFF?
Set ECM RX to ON.
If ECM RX is enabled, the sender's fax machine resends the fax after correcting errors automatically.
Cause and solution
Check 3: Is the sender's original document or scanning area of the sender's fax machine dirty?
The image quality of the fax is mainly determined by the sender's fax machine. Contact the sender and ask the sender to check whether the scanning area of the fax machine is dirty.
Cause and solution
Check 4: Is ECM transmission/reception enabled although the line/connection is poor, or is the sender's fax machine compatible with ECM?
Cause and solution
Check 5: Did you confirm the paper and print quality settings?
Cause and solution
Cause and solution
Check: Is ECM RX set to OFF?
If ECM RX is set to OFF, the machine cannot receive color faxes. The machine will disconnect the telephone line or receive color faxes in black & white according to the setting of the sender's fax machine.
Select ON for ECM RX in Reception settings to receive color faxes.
Cause and solution
•Errors Often Occur When You Receive a Fax
Cause and solution
Check 1: Check the telephone line condition or the connection
If the telephone line or connection is poor, reducing the reception start speed may correct the error.
Reduce the reception start speed.
Cause and solution
Check 2: Is the sender's fax machine operating normally?
Contact the sender and ask the sender to check whether the fax machine is operating normally.