

Issue
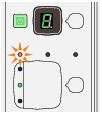
When a machine error occurs, the Alarm lamp is lit orange and E and number (error code) are alternately displayed on the LED. Check the error code displayed on the LED and take the appropriate action to correct the error.
* Depending on the error occurred, the Alarm lamp is not lit.
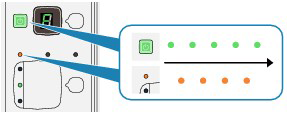
When the Power and Alarm lamps flash alternately as shown below, and P and number (error code) are alternately displayed on the LED, an error requiring servicing might have occurred.
Cause and solution
E, 0, 2
The machine is out of paper / Paper does not feed
Reload the paper on the Rear Tray correctly and press the Black or Color button.
Caution
If you cut plain paper into small size such as 4" x 6" / 10 x 15 cm, 4" X 8" / 101.6 x 203.2 mm, 5" x 7" / 13 x 18 cm, or 2.16" x 3.58" / 55.0 x 91.0 mm (Card size) to perform trial print, it can cause paper jams.
Caution
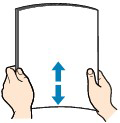
1. Prepare paper.
Align the edges of paper. If paper is curled, flatten it.
Caution
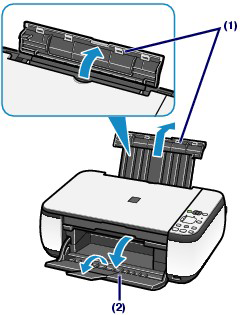
2. Load paper.
(1) Open the Paper Support, raise it, then tip it back.
(2) Open the Paper Output Tray gently, and open the Output Tray Extension.
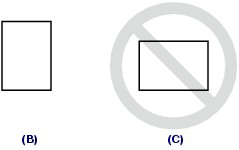
(3) Slide the Paper Guides (A) to open them, and load the paper in the center of the Rear Tray WITH THE PRINT SIDE FACING YOU.
Caution
Always load paper in the portrait orientation (B). Loading paper in the landscape orientation (C) can cause paper jams.
(4) Slide the Paper Guides (A) to align them with both sides of the paper stack.
Do not slide the Paper Guides too hard. The paper may not be fed properly.

Caution
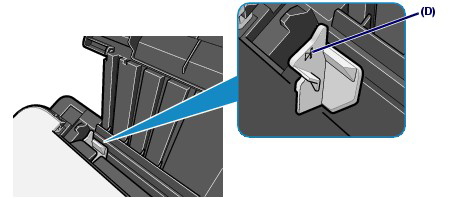
Do not load sheets of paper higher than the Load Limit Mark (D).
Caution
After loading paper
See Copying.
See "Printing Documents (Windows)" or "Printing Documents (Macintosh)".
Cause and solution
E, 0, 3
Paper Output Tray is closed / Paper jam
If the Paper Output Tray is closed, open it. The machine resumes printing.
If opening the Paper Output Tray does not resolve the problem, or if the tray was open to begin with, the paper may be jammed. Remove the jammed paper, reload paper properly in the printer, then press the Black or Color button.
Cause and solution
E, 0, 4 / E, 0, 5
The FINE Cartridge cannot be recognized
The FINE Cartridge may not be installed properly, or the Cartridge may not be compatible with this machine.
Open the Scanning Unit (Cover) and install the appropriate FINE Cartridge.
If the error is not resolved, contact the service center.
Cause and solution
E, 0, 7
FINE Cartridge is not installed in the correct position
Make sure that each FINE Cartridge is installed in the correct position.
When FINE Cartridges run out of ink, follow the procedure below to replace them.
Caution
Handling FINE Cartridges

Caution
1. Make sure that the power is turned on, and open the Paper Output Tray.
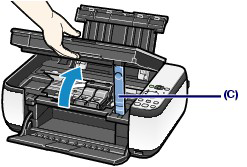
2. Lift the Scanning Unit (Cover), then hold it open with the Scanning Unit Support (C).
The FINE Cartridge Holder moves to the replacement position.
Caution
Do not hold the FINE Cartridge Holder to stop or move it forcibly. Do not touch the FINE Cartridge Holder until it stops completely.
Caution
3. Remove the empty FINE Cartridge.
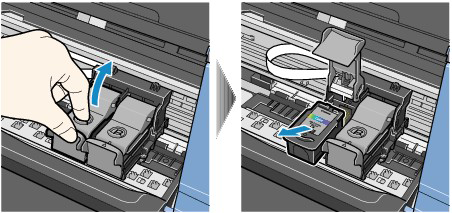
(1) Pinch the tabs and open the Ink Cartridge Locking Cover.
(2) Remove the FINE Cartridge.
Caution
4. Prepare the new FINE Cartridge.
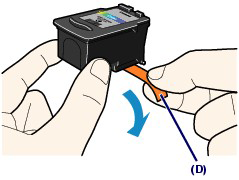
(1) Take a new FINE Cartridge out of its package and remove the orange protective tape (D) gently.
Caution
5. Install the FINE Cartridge.
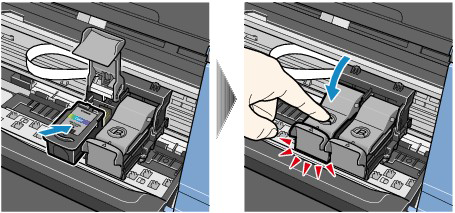
(1) Put a new FINE Cartridge in the FINE Cartridge Holder.
The Color FINE Cartridge should be installed into the left slot and the Black FINE Cartridge should be installed into the right slot.
Otherwise, those cartridges may damage the printer: Make sure to install them in the correct slots.
(2) Close the Ink Cartridge Locking Cover to lock the FINE Cartridge into place.
Push down the Ink Cartridge Locking Cover until it clicks.
(3) Confirm that the Ink Cartridge Locking Cover is closed correctly.
Caution
If the Ink Cartridge Locking Cover is not closed correctly, push down the Ink Cartridge Locking Cover until it clicks.
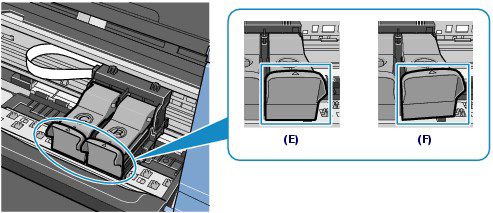
(E) Closed correctly
(F) Not closed correctly (the cover is tilted)
Caution
The machine cannot print unless both the Color and Black FINE Cartridges are installed. Be sure to install both the FINE Cartridges.
6. Lift the Scanning Unit (Cover) slightly to set the Scanning Unit Support back to its original position, and gently close the Scanning Unit (Cover).
Caution
When setting the Scanning Unit Support back to its original position, be sure to hold the Scanning Unit (Cover) firmly, and be careful not to get your fingers caught.
Caution
-⋗ "Aligning the Print Head".
Cause and solution
E, 0, 8
Ink absorber is almost full
Press the machine's Black or Color button to continue printing. Contact the service center.
Cause and solution
E, 0, 9 (MP270 series only)
The machine has not received a response from the digital camera. The digital camera or digital video camcorder connected is not compatible with this machine.
Cause and solution
E, 1, 3
Ink level cannot be detected.
Ink may have run out.
The function for detecting the remaining ink level will be disabled since the ink level cannot be correctly detected.
If you want to continue printing without this function, press the machine's Stop (Reset) button for at least 5 seconds.
Canon recommends to use new genuine Canon cartridges in order to obtain optimum qualities.
Please be advised that Canon shall not be liable for any malfunction or trouble caused by continuation of printing under the ink out condition.
You can check the ink status with the Ink lamps on the Operation Panel or with the computer screen.
Caution
The ink level detector is mounted on the machine to detect the remaining ink level. The machine considers as ink is full when a new FINE Cartridge is installed, and then starts to detect a remaining ink level. If you install a used FINE Cartridge, the indicated ink level of it may not be correct. In such case, refer to the ink level information only as a guide.
With the Ink Lamps on the Operation Panel
Make sure that the LED is in the copy standby mode. You can confirm the ink status with the Ink lamps.
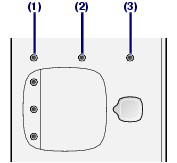
(1) Alarm lamp
(2) Color Ink lamp
(3) Black Ink lamp
[ Color Ink lamp or Black Ink lamp lights ]
Ink is low. You can continue printing for a while, but we recommend you to have a new FINE Cartridge available.
[ Color Ink lamp or Black Ink lamp flashes, while Alarm lamp lights ]
-⋗"An Error Code Is Displayed on the LED"
[ Color Ink lamp or Black Ink lamp flashes, while Alarm lamp is off ]
The function for detecting the remaining ink level is disabled.
With the Computer Screen
You can confirm the ink status with the printer status monitor (Windows) or Canon IJ Printer Utility (Macintosh).
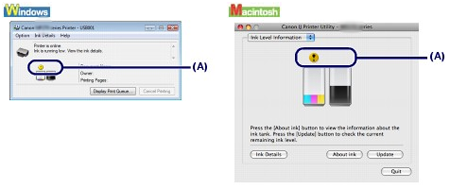
(A) Check if any symbol appears on the screen.
The ink with 
Caution
An error message may appear while printing. Confirm the message and take an appropriate action.
Follow the procedure below to open each of the confirmation screens.

1. Open the printer driver setup window from Control Panel.
2. Click View Printer Status on the Maintenance sheet.
To confirm the FINE Cartridge information, click the Ink Details menu.
Caution
You can also display the printer status monitor by clicking Canon XXX Printer (where "XXX" is your machine's name) which appears on the taskbar while printing.

1. Open the Canon IJ Printer Utility.
2. Select Ink Level Information in the pop-up menu.
To confirm the FINE Cartridge information, click Ink Details.
Cause and solution
E, 1, 4
The FINE Cartridge cannot be recognized.
The FINE Cartridge may not be compatible with this machine.
Install the appropriate FINE Cartridge.
When FINE Cartridges run out of ink, follow the procedure below to replace them.
Caution
Handling FINE Cartridges
Caution
1. Make sure that the power is turned on, and open the Paper Output Tray.
2. Lift the Scanning Unit (Cover), then hold it open with the Scanning Unit Support (C).
The FINE Cartridge Holder moves to the replacement position.
Caution
Do not hold the FINE Cartridge Holder to stop or move it forcibly. Do not touch the FINE Cartridge Holder until it stops completely.
Caution
3. Remove the empty FINE Cartridge.
(1) Pinch the tabs and open the Ink Cartridge Locking Cover.
(2) Remove the FINE Cartridge.
Caution
4. Prepare the new FINE Cartridge.
(1) Take a new FINE Cartridge out of its package and remove the orange protective tape (D) gently.
Caution
5. Install the FINE Cartridge.
(1) Put a new FINE Cartridge in the FINE Cartridge Holder.
The Color FINE Cartridge should be installed into the left slot and the Black FINE Cartridge should be installed into the right slot.
Otherwise, those cartridges may damage the printer: Make sure to install them in the correct slots.
(2) Close the Ink Cartridge Locking Cover to lock the FINE Cartridge into place.
Push down the Ink Cartridge Locking Cover until it clicks.
(3) Confirm that the Ink Cartridge Locking Cover is closed correctly.
Caution
If the Ink Cartridge Locking Cover is not closed correctly, push down the Ink Cartridge Locking Cover until it clicks.
(E) Closed correctly
(F) Not closed correctly (the cover is tilted)
Caution
The machine cannot print unless both the Color and Black FINE Cartridges are installed. Be sure to install both the FINE Cartridges.
6. Lift the Scanning Unit (Cover) slightly to set the Scanning Unit Support back to its original position, and gently close the Scanning Unit (Cover).
Caution
When setting the Scanning Unit Support back to its original position, be sure to hold the Scanning Unit (Cover) firmly, and be careful not to get your fingers caught.
Caution
-⋗ "Aligning the Print Head".
Cause and solution
E, 1, 5
The FINE Cartridge cannot be recognized.
The FINE Cartridge may not be installed properly.
Open the Scanning Unit (Cover) and install the FINE Cartridge properly.
When FINE Cartridges run out of ink, follow the procedure below to replace them.
Caution
Handling FINE Cartridges
Caution
1. Make sure that the power is turned on, and open the Paper Output Tray.
2. Lift the Scanning Unit (Cover), then hold it open with the Scanning Unit Support (C).
The FINE Cartridge Holder moves to the replacement position.
Caution
Do not hold the FINE Cartridge Holder to stop or move it forcibly. Do not touch the FINE Cartridge Holder until it stops completely.
Caution
3. Remove the empty FINE Cartridge.
(1) Pinch the tabs and open the Ink Cartridge Locking Cover.
(2) Remove the FINE Cartridge.
Caution
4. Prepare the new FINE Cartridge.
(1) Take a new FINE Cartridge out of its package and remove the orange protective tape (D) gently.
Caution
5. Install the FINE Cartridge.
(1) Put a new FINE Cartridge in the FINE Cartridge Holder.
The Color FINE Cartridge should be installed into the left slot and the Black FINE Cartridge should be installed into the right slot.
Otherwise, those cartridges may damage the printer: Make sure to install them in the correct slots.
(2) Close the Ink Cartridge Locking Cover to lock the FINE Cartridge into place.
Push down the Ink Cartridge Locking Cover until it clicks.
(3) Confirm that the Ink Cartridge Locking Cover is closed correctly.
Caution
If the Ink Cartridge Locking Cover is not closed correctly, push down the Ink Cartridge Locking Cover until it clicks.
(E) Closed correctly
(F) Not closed correctly (the cover is tilted)
Caution
The machine cannot print unless both the Color and Black FINE Cartridges are installed. Be sure to install both the FINE Cartridges.
6. Lift the Scanning Unit (Cover) slightly to set the Scanning Unit Support back to its original position, and gently close the Scanning Unit (Cover).
Caution
When setting the Scanning Unit Support back to its original position, be sure to hold the Scanning Unit (Cover) firmly, and be careful not to get your fingers caught.
Caution
-⋗ "Aligning the Print Head".
Cause and solution
E, 1, 6
Ink has run out.
Ink has run out.
Replace the ink cartridge and close the Scanning Unit (Cover).
If printing is in progress and you want to continue printing, press the machine's Stop (Reset) button for at least 5 seconds with the ink cartridge installed. Then printing can continue under the ink out condition.
The function for detecting the remaining ink level will be disabled.
Replace the empty ink cartridge immediately after the printing. The resulting print quality is not satisfactory, if printing is continued under the ink out condition.
When FINE Cartridges run out of ink, follow the procedure below to replace them.
Caution
Handling FINE Cartridges
Caution
1. Make sure that the power is turned on, and open the Paper Output Tray.
2. Lift the Scanning Unit (Cover), then hold it open with the Scanning Unit Support (C).
The FINE Cartridge Holder moves to the replacement position.
Caution
Do not hold the FINE Cartridge Holder to stop or move it forcibly. Do not touch the FINE Cartridge Holder until it stops completely.
Caution
3. Remove the empty FINE Cartridge.
(1) Pinch the tabs and open the Ink Cartridge Locking Cover.
(2) Remove the FINE Cartridge.
Caution
4. Prepare the new FINE Cartridge.
(1) Take a new FINE Cartridge out of its package and remove the orange protective tape (D) gently.
Caution
5. Install the FINE Cartridge.
(1) Put a new FINE Cartridge in the FINE Cartridge Holder.
The Color FINE Cartridge should be installed into the left slot and the Black FINE Cartridge should be installed into the right slot.
Otherwise, those cartridges may damage the printer: Make sure to install them in the correct slots.
(2) Close the Ink Cartridge Locking Cover to lock the FINE Cartridge into place.
Push down the Ink Cartridge Locking Cover until it clicks.
(3) Confirm that the Ink Cartridge Locking Cover is closed correctly.
Caution
If the Ink Cartridge Locking Cover is not closed correctly, push down the Ink Cartridge Locking Cover until it clicks.
(E) Closed correctly
(F) Not closed correctly (the cover is tilted)
Caution
The machine cannot print unless both the Color and Black FINE Cartridges are installed. Be sure to install both the FINE Cartridges.
6. Lift the Scanning Unit (Cover) slightly to set the Scanning Unit Support back to its original position, and gently close the Scanning Unit (Cover).
Caution
When setting the Scanning Unit Support back to its original position, be sure to hold the Scanning Unit (Cover) firmly, and be careful not to get your fingers caught.
Caution
-⋗ "Aligning the Print Head".
Cause and solution
E, 1, 9 (MP270 series only)
PictBridge compliant device is connected via a USB hub.
If a PictBridge compliant device is connected via a USB hub, remove the hub and connect it directly to the machine.
Cause and solution
E, 3, 0
The size of the original cannot be correctly detected or the document is too small when the Fit-to-Page copying is selected.
Cause and solution
E, 3, 1
The machine is not connected with the computer.
Connect the machine and the computer with a USB cable.
Cause and solution
E, 5, 0
Scanning the print head alignment sheet has failed.
Press the Stop/Reset button to dismiss the error, then take the actions described below.
-⋗Printing the Nozzle Check Pattern
If the error is not resolved, connect the machine to the computer and align the Print Head on the printer driver.
Automatic Print Head Alignment
If printed ruled lines are misaligned or print results are otherwise unsatisfactory, adjust the print head position.
Caution
If the remaining ink level is low, the print head alignment sheet will not be printed correctly. Replace the FINE Cartridge whose ink is low.
See "Replacing FINE Cartridges".
You need to prepare: a sheet of A4 or Letter-sized plain paper*
* Be sure to use paper that is white and clean on both sides.
1. Make sure that the power is turned on.
2. Load a sheet of A4 or Letter-sized plain paper in the Rear Tray.
3. Open the Paper Output Tray gently, and open the Output Tray Extension.
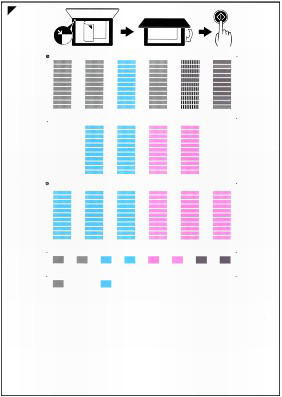
4. Print the print head alignment sheet.
(1) Press the 

(2) Press the Black or Color button.
The print head alignment sheet will be printed.
Caution
5. Scan the print head alignment sheet to adjust the print head position.
(1) Load the print head alignment sheet on the Platen Glass.
Load the print head alignment sheet WITH THE PRINTED SIDE FACING DOWN and align the mark 

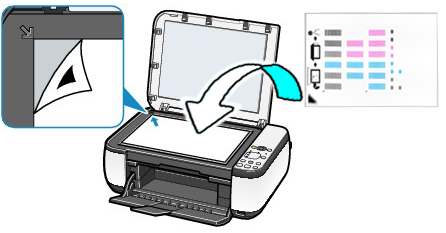
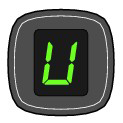
(2) Close the Document Cover gently, make sure that U (uppercase "U") appears on the LED, then press the Black or Color button.
The machine starts scanning the print head alignment sheet, and the print head position will be adjusted automatically.
When adjusting the print head position is completed, the LED returns to the copy standby mode. Remove the sheet on the Platen Glass.
Caution
- The Platen Glass and the print head alignment sheet are not dirty.
- The print head alignment sheet is placed in the correct position with the printed side facing down.
For details, refer to An Error Code Is Displayed on the LED.
Caution
Manual Print Head Alignment
Print head alignment corrects the installation positions of the print head and improves deviated colors and lines.
This machine supports two head alignment methods: automatic head alignment and manual head alignment.
To perform automatic head alignment,Refer to [ Automatic Print Head Alignment ] within this webpage and then execute the function from the operation panel of the machine.
The procedure for performing manual print head alignment is as follows:
1. Open the printer driver setup window.
2. Click Custom Settings on the Maintenance tab.
The Custom Settings dialog box opens.
3. Switch head alignment to manual.
Check the Align heads manually check box.
4. Transmit the settings.
Click Send, and click OK when the confirmation message appears.
5. Click Print Head Alignment on the Maintenance tab.
The Start Print Head Alignment dialog box opens.
6. Load paper in the machine.
Load three sheets of A4 size or Letter size plain paper into the rear tray.
7. Execute head alignment.
Make sure that the machine is on and click Align Print Head.
Follow the instruction in the message.
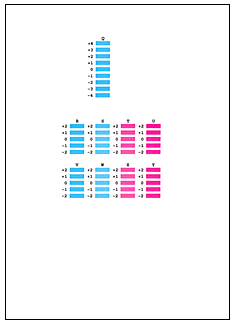
8. Check the printed pattern.
Enter the numbers of the patterns with the least amount of streaks in the associated boxes.
Clicking the patterns with the least amount of streaks in the preview window, will automatically set their numbers in the associated boxes.
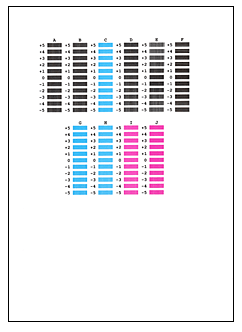
When you have entered all the necessary values, click OK.
Caution
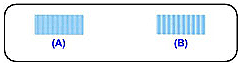
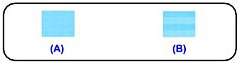
(A) Less noticeable vertical white streaks
(B) More noticeable vertical white streaks
(A) Less noticeable horizontal white streaks
(B) More noticeable horizontal white streaks
9. Confirm the displayed message and click OK.
The second pattern is printed.
Caution
Do not open the Scanning Unit (Cover) while printing is in progress.
10. Check the printed pattern.
Enter the numbers of the patterns with the least amount of streaks in the associated boxes.
Clicking the patterns with the least amount of streaks in the preview window, will automatically set their numbers in the associated boxes.
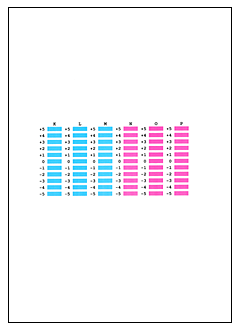
When you have entered all the necessary values, click OK.
Caution
If it is difficult to pick the best pattern, pick the setting that produces the least noticeable vertical white streaks.
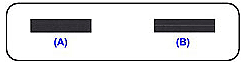
(A) Less noticeable vertical white streaks
(B) More noticeable vertical white streaks
11. Confirm the displayed message and click OK.
The third pattern is printed.
Caution
Do not open the Scanning Unit (Cover) while printing is in progress.
12. Check the printed pattern.
Enter the numbers of the patterns with the least noticeable horizontal stripes in the associated boxes.
Clicking the patterns with the least noticeable horizontal stripes in the preview window, will automatically set their numbers in the associated boxes.
When you have entered all the necessary values, click OK.
Caution
If it is difficult to pick the best pattern, pick the setting that produces the least noticeable horizontal white stripes.
(A) Less noticeable horizontal white stripes
(B) More noticeable horizontal white stripes
Caution
To print and check the current setting, open the Start Print Head Alignment dialog box, and click Print Alignment Value.
Cause and solution
P, 0, 2
Cancel printing, turn off the machine. Then clear the jammed paper or protective material that is preventing the FINE Cartridge Holder from moving, and turn on the machine again.
Caution
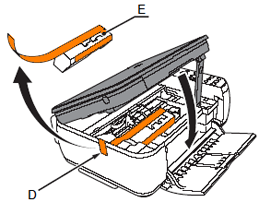
When protective materials are not removed yet,please follow the procedures below.
1. Open the Paper Output Tray.
2. Lift the Scanning Unit (Cover) and fix it with the Scanning Unit Support.
3. Pull the orange protective tape (D) and remove the protective material (E).
4. Lift the Scanning Unit (Cover) slightly and fold the Scanning Unit Support, then gently close the Scanning Unit (Cover).
Caution
Cause and solution
P, *, *
"*, *" depends on the error occurred.
Turn off the machine, and unplug the power cord of the machine from the power supply.Contact the service center.
If any object is placed in front of the machine, remove it.Open the Paper Output Tray gently, then turn the power off and back on.
Turn off the machine, and unplug the power cord of the machine from the power supply.Plug the machine back in and turn the machine back on.If the problem is not resolved, contact the service center.