

Automatic Print Head Alignment
If printed ruled lines are misaligned or print results are otherwise unsatisfactory, adjust the print head position.
Caution
-⋗ [ Replacing an Ink Tank ]
-⋗ Refer to [ Manual Print Head Alignment ] within this webpage.
You need to prepare: a sheet of A4 or Letter-sized Matte Photo Paper MP-101
1. Make sure that the power is turned on.
2. Load a sheet of supplied paper or A4 or Letter-sized Matte Photo Paper MP-101 in the rear tray.
Load the paper with the print side (whiter side) facing you in the rear tray.
Caution
3. Open the paper output tray gently, and open the output tray extension.
Caution
4. Adjust the print head position automatically.
(1) Select 
The setup menu screen will appear.
(2) Select 
The Maintenance screen will appear.
(3) Select Auto head alignment, then press the OK button.

The confirmation screen will appear.
(4) Select Yes, then press the OK button.
The print head alignment sheet will be printed and the print head position will be adjusted automatically.
This takes about 5 minutes.
Caution
Caution
(5) When the completion message appears, press the OK button.
The screen will return to the Maintenance screen.
Caution
-⋗ Refer to [ Manual Print Head Alignment ] within this webpage.
Manual Print Head Alignment
If printed ruled lines are misaligned or print results are still not satisfactory after adjusting the print head position automatically, adjust the print head position manually.
Caution
You need to prepare: three sheets of A4 or Letter-sized plain paper
1. Make sure that the power is turned on.
2. Make sure that three or more sheets of A4 or Letter-sized plain paper are loaded in the cassette.
3. Open the paper output tray gently, and open the output tray extension.
Caution
4. Print the print head alignment pattern.
(1) Select
The setup menu screen will appear.
(2) Select
The Maintenance screen will appear.
(3) Select Manual head alignment, then press the OK button.

The confirmation screen will appear.
Caution
(4) Select Yes, then press the OK button.
The print head alignment pattern is printed.
Caution
(5) When the message "Did the patterns print correctly?" appears, confirm that the pattern is printed correctly, select Yes, then press the OK button.
The input screen for the head position adjustment values will appear.
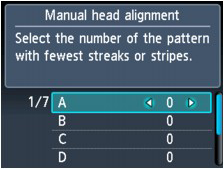
5. Look at the first pattern and adjust the print head position.
(1) Check the printed patterns, and use the 

Caution

(A) Less noticeable vertical white streaks
(B) More noticeable vertical white streaks
(2) Repeat the same procedure until you finish inputting the pattern number for columns B to G, then press the OK button.
For columns F and G, pick the setting that produces the least noticeable horizontal streaks at the position indicated by an arrow.
Caution

(C) Less noticeable horizontal white streaks
(D) More noticeable horizontal white streaks
(3) Confirm the message, then press the OK button.
The second pattern is printed.
Caution
6. Look at the second pattern and adjust the print head position.
(1) Check the printed patterns, and use the

Caution

(E) Less noticeable vertical white streaks
(F) More noticeable vertical white streaks
(2) Repeat the same procedure until you finish inputting the pattern number for columns I to Q, then press the OK button.
(3) Confirm the message, then press the OK button.
The third pattern is printed.
Caution
7. Look at the third pattern and adjust the print head position.
(1) Check the printed patterns, and use the

Caution

(G) Less noticeable horizontal streaks
(H) More noticeable horizontal streaks
(2) Repeat the same procedure until you finish inputting the pattern number for columns b to j, then press the OK button.
The manual adjustment of the print head position is complete.
(3) When the completion message appears, press the OK button.
The screen will return to the Maintenance screen.
Caution