

Preparation
Caution
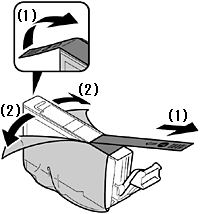
1.
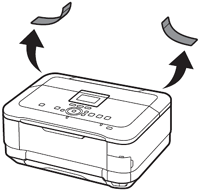
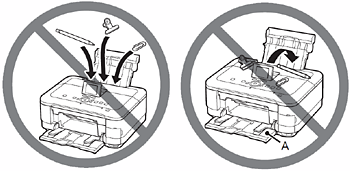
Remove all orange tape and protective materials from the inside and outside of the machine.
Caution
2.
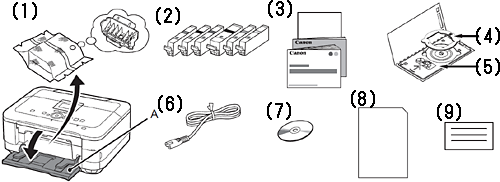
Make sure all the following items are supplied.
Some accessories (1) are stored within the Paper Output Tray (A). Open the Paper Output Tray to remove them.
(1) Print Head
(2) Ink tanks (6: M, BK, GY, PGBK, C, Y)
(3) Manuals
(4) 8 cm disc adapter
(5) Disc tray
(6) Power cord
(7) Setup CD-ROM (containing the drivers, applications and on-screen manuals)
(8) Matte Photo Paper MP-101 (for Automatic Print Head Alignment)
(9) Other documents
Caution
3.
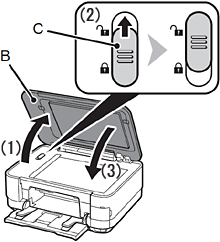
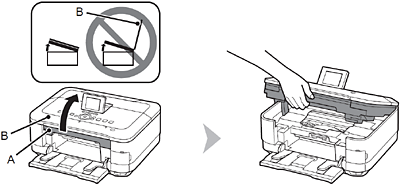
Unlock the scanner.
(1) Open the Document Cover (B)
(2) Move the Scanner Lock Switch (C) towards the release mark to unlock the Scanning Unit (Cover).
(3) Close the Document Cover.
Make sure that the Document Cover is closed and go to the next step.
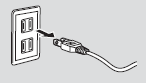
4.
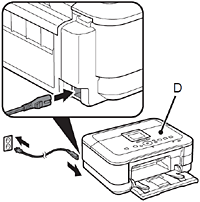
Insert the power cord into the connector on the left side at the back of the machine and into the wall outlet firmly.
Caution
5.

Press the LCD open button (E) (1), then adjust the LCD (Liquid Crystal Display) (F) to a comfortable viewing angle (2).
6.

Press the ON button (G).
Caution
7.
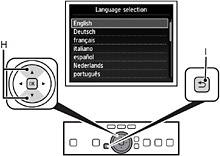
Use the 

8.

When the above screen is displayed, touch the OK button and go to the next step.
Caution
Caution
- When it is necessary to turn off the machine
Be sure to follow the procedure below.
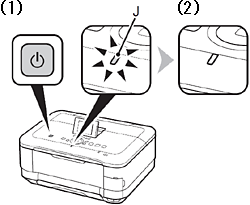
(1) Press the ON button to turn off the machine.
(2) Make sure that the POWER lamp (J) is not lit.
Operating noise may continue for up to 40 seconds until the machine turns off.
Caution
Caution
Install the Print Head
1.
Lift the Scanning Unit (Cover) (A) until it stops.
Close the Document Cover (B) and lift it with the Scanning Unit (Cover).
2.
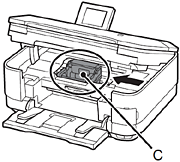
The Print Head Holder (C) moves to the installation position.
If the Print Head Holder does not move, make sure that the machine is turned on. For details, refer to 4 to 8 in [ Preparation ]
3.
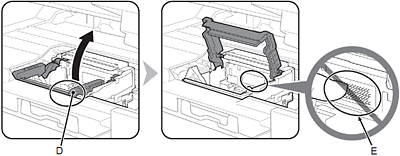

Firmly lift the part (D) of the Print Head Lock Lever in the Print Head Holder until it stops.
The Print Head Lock Lever may feel heavy.
Caution
4.

Remove the Print Head from the silver package.
5.

Remove the orange protective cap.
Caution
6.

Tilt the Print Head forward and set it in place as shown.
Caution
7.
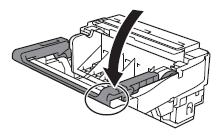
Hold the Print Head Lock Lever firmly and lower it completely.
Caution
Install the Ink Tanks
1.
(1) Remove the orange tape completely.
(2) Remove the protective film completely.
2.
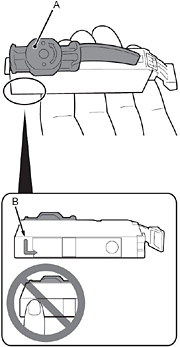

Hold the ink tank with the orange protective cap (A) pointing up while being careful not to block the Lshape air hole (B).
Caution
3.


Hold the ink tank by its sides and slowly twist the orange protective cap 90 degrees horizontally to remove it off.
Do not push the sides of the ink tank.
Caution
4.
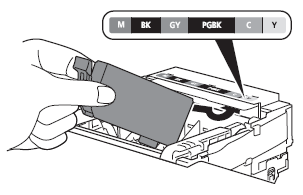
Tilt the ink tank, then insert it under the label and against the back end of the slot.
Make sure that the color of the label matches the ink tank.
Caution
5.

Press the PUSH mark on the ink tank firmly until it clicks.
When the installation is completed properly, the Ink lamp lights red.
6.

Install all the other ink tanks in the same way according to the color order indicated on the label.
Make sure all the Ink lamps light red.
Caution

7.

Close the Scanning Unit (Cover) (E).
Make sure the Inner Cover (F) is closed.
Caution
8.

Make sure that the LCD changes as shown in the illustration and go to the next step.
Do not touch the OK button yet.

Caution
Align the Print Head
1.

Prepare the Paper Support (A).
(1) Open it.
(2) Withdraw it upwards.
(3) Tilt it back.
2.

Move the Paper Guides (B) to both edges.
3.
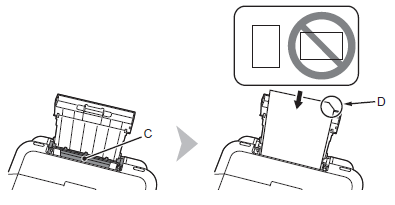
Load a sheet of supplied specialty paper (Matte Photo Paper MP-101) in the Rear Tray (C).
Load paper in portrait orientation so that the cut corner (D) is at the top right.
Caution
4.
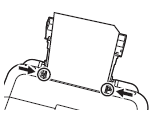
Slide the left and right Paper Guides against both edges of the paper.
5.

Make sure the Paper Output Tray (E) is open, then open the Output Tray Extension (F).
If printing starts while the Paper Output Tray is closed, it will automatically open.
6.
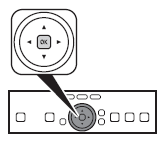
Touch the OK button.
Print Head Alignment starts.

7.

When the pattern is printed, remove the printed paper.
Print Head Alignment is now complete.
Caution
8.

Confirm the above message, then go to the next step.
Load Paper
With the machine, the paper source varies depending on the media type.
- Specialty paper including photo paper
Load paper in the Rear Tray (A).

- Plain paper
Load paper in the Cassette (B).
Caution
This section describes how to load plain paper in the Cassette. For details on how to load specialty paper in the Rear Tray, refer to 1 to 4 in [ Align the Print Head ]

- Loading specialty paper
1.

(1) Close the Output Tray Extension (D).
(2) Close the Paper Output Tray (E).
2.

Pull out the Cassette (F).
3.

Move the left Paper Guide (G) to the edge.
4.

Slide the front Paper Guide (H) to align with the actual size of the paper.
The front Paper Guide will click and stop when it aligns with the corresponding mark of paper size.
5.

Load plain paper.
Load paper with the printing side facing down.
6.
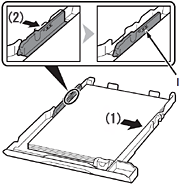
Align the paper to the right side of the Cassette (1), and slide the left Paper Guide completely against the left edge of the paper (2).
Make sure that the height of the paper stack does not exceed the line (I).
7.

Insert the Cassette slowly into the machine until it clicks into place.
8.
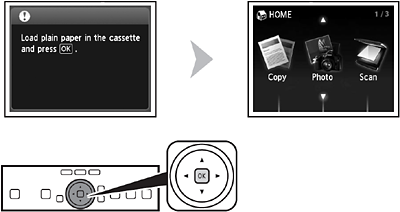
Confirm the message on the LCD, then touch the OK button.
The HOME screen appears.
Caution