

Issue
- Alarm Lamp Is Lit Orange
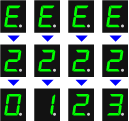
When a machine error occurs, the Alarm lamp is lit orange and the error code as follows is displayed on the LED. Check the error code displayed on the LED and take the appropriate action to correct the error.

* Depending on the error occurred, the Alarm lamp is not lit.
- Alarm Lamp Flashes Orange
When the Alarm lamps flashes and the error code as follows is displayed on the LED, an error requiring you to contact the service center has occurred.

Cause and solution
Support Code=1003 / Error Code=E, 0, 2 (LED display)

The machine is out of paper./Paper does not feed.
Reload the paper on the front tray and press the Black or Color button.
When you load the paper, insert the paper stack until the leading edge touches the far end of the front tray.
Cause and solution
Support Code=1300, 1303, 1304 / Error Code=E, 0, 3 (LED display)

Paper jam.
The paper may be jammed. Remove the jammed paper, reload paper properly in the machine, then press the Black or Color button.
Cause and solution
Support Code=1687 / Error Code=E, 0, 4 (LED display)

The FINE cartridge is not installed properly.
The FINE cartridge is not installed properly.
Open the paper output cover. When the head cover opens, push up the ink cartridge lock lever to confirm that the FINE cartridges are installed properly. After that, close the paper output cover.
If the error is not resolved, remove the FINE Cartridges, then install them again.
When you need to replace a FINE cartridge, follow the procedure below.
Caution
- Handling FINE cartridge -
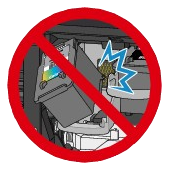
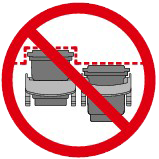
Do not touch the electrical contacts (A) or print head nozzle (B) on a FINE cartridge. The machine may not print properly if you touch them.
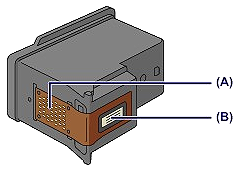
Furthermore, with such a FINE cartridge, the machine will not be able to inform you when to replace the FINE cartridge properly.
Caution
Even when printing with one ink only, print with leaving the empty FINE cartridge installed. If either of the color FINE cartridge or black FINE cartridge is not installed, an error occurs and the machine cannot print.
Both color ink and black ink are also consumed in the standard cleaning and deep cleaning of the print head, which may be necessary to maintain the performance of the machine. When ink runs out, replace the FINE cartridge immediately with a new one.
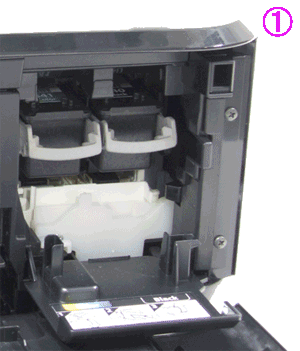
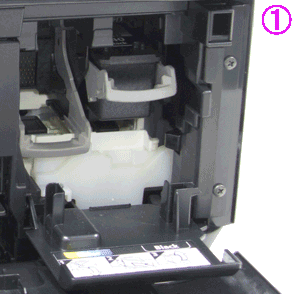
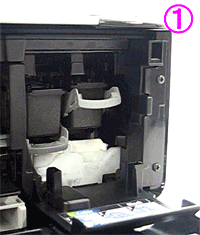
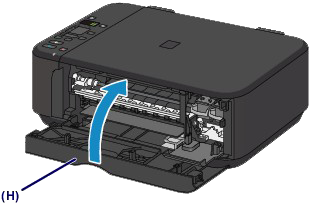
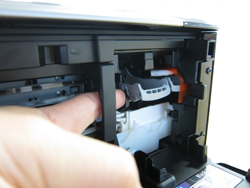
1. Make sure that the power is turned on, open the front cover (C), then open the paper output tray (D).

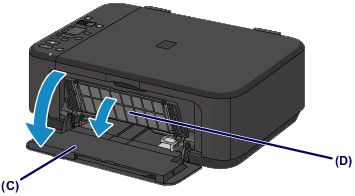
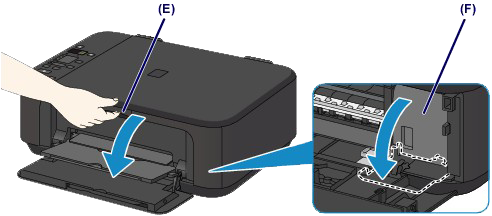
2. Open the paper output cover (E).
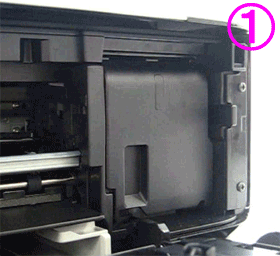
When the FINE cartridge holder moves to the replacement position, the head cover (F) OPENS AUTOMATICALLY.
Caution
Caution
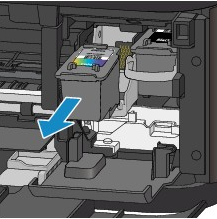
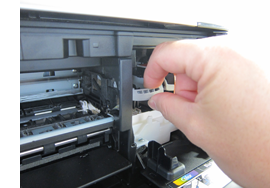
3. Remove the empty FINE cartridge.
(1) Push down the ink cartridge lock lever until it clicks.
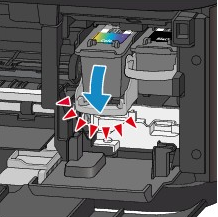
(2) Remove the FINE cartridge.
Caution
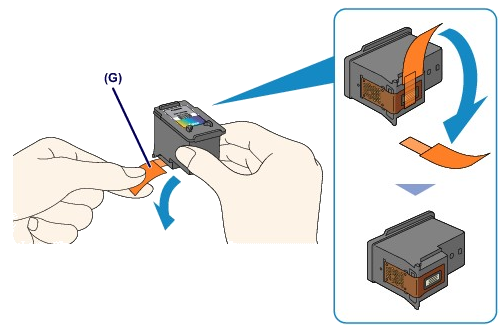
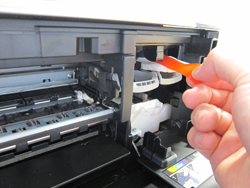
4. Prepare a new FINE cartridge.
(1) Take a new FINE cartridge out of its package and remove the protective tape (G) gently.
Caution
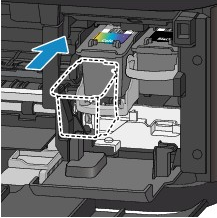
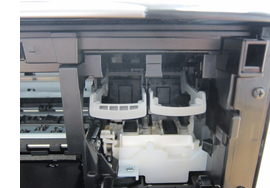
5. Install the FINE cartridge.
(1) Insert the new FINE cartridge straight into the FINE cartridge holder all the way until it touches the back.
The color FINE cartridge should be installed into the left slot and the black FINE cartridge should be installed into the right slot.
Caution
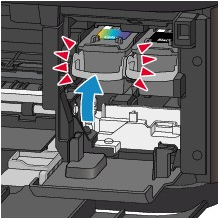
(2) Push up the ink cartridge lock lever to lock the FINE cartridge into place.
The FINE cartridge is locked into place when the ink cartridge lock lever clicks.
Caution
6. Close the paper output cover (H).
Caution
-⋗ [ An Error Code Is Displayed on the LED ]
Cause and solution
Caution
When the Head Cover does not open, turn OFF this product. Then, push the left side of the FINE Cartridge Holder, then move it until it hits the right inner side of the printer. On this occasion, do not touch the other parts.
When the Head Cover opens, move the FINE Cartridge Holder to the position that the Ink Cartridge Lock Lever can be seen.

Remove the FINE cartridge, then install it properly.
Turn ON this product to confirm that the error is solved.
Cause and solution
Support Code=1401, 1403 / Error Code=E, 0, 5 (LED display)

The FINE Cartridge is not installed properly./Appropriate FINE Cartridge is not installed.
If the error is not resolved, contact the service center.
When you need to replace a FINE cartridge, follow the procedure below.
Caution
- Handling FINE cartridge -
Do not touch the electrical contacts (A) or print head nozzle (B) on a FINE cartridge. The machine may not print properly if you touch them.
Furthermore, with such a FINE cartridge, the machine will not be able to inform you when to replace the FINE cartridge properly.
Caution
Even when printing with one ink only, print with leaving the empty FINE cartridge installed. If either of the color FINE cartridge or black FINE cartridge is not installed, an error occurs and the machine cannot print.
Both color ink and black ink are also consumed in the standard cleaning and deep cleaning of the print head, which may be necessary to maintain the performance of the machine. When ink runs out, replace the FINE cartridge immediately with a new one.
1. Make sure that the power is turned on, open the front cover (C), then open the paper output tray (D).
2. Open the paper output cover (E).
When the FINE cartridge holder moves to the replacement position, the head cover (F) OPENS AUTOMATICALLY.
Caution
Caution
3. Remove the empty FINE cartridge.
(1) Push down the ink cartridge lock lever until it clicks.
(2) Remove the FINE cartridge.
Caution
4. Prepare a new FINE cartridge.
(1) Take a new FINE cartridge out of its package and remove the protective tape (G) gently.
Caution
5. Install the FINE cartridge.
(1) Insert the new FINE cartridge straight into the FINE cartridge holder all the way until it touches the back.
The color FINE cartridge should be installed into the left slot and the black FINE cartridge should be installed into the right slot.
Caution
(2) Push up the ink cartridge lock lever to lock the FINE cartridge into place.
The FINE cartridge is locked into place when the ink cartridge lock lever clicks.
Caution
6. Close the paper output cover (H).
Caution
-⋗ [ An Error Code Is Displayed on the LED ]
Cause and solution
Support Code=1485 / Error Code=E, 0, 5 (LED display)
Appropriate FINE Cartridge is not installed.
Appropriate ink cartridge is not installed.
Printing cannot be executed because the ink cartridge is not compatible with this machine.
Install the appropriate ink cartridge.
If you want to cancel printing, press the machine's Stop/Reset button.
When you need to replace a FINE cartridge, follow the procedure below.
Caution
- Handling FINE cartridge -
Do not touch the electrical contacts (A) or print head nozzle (B) on a FINE cartridge. The machine may not print properly if you touch them.
Furthermore, with such a FINE cartridge, the machine will not be able to inform you when to replace the FINE cartridge properly.
Caution
Even when printing with one ink only, print with leaving the empty FINE cartridge installed. If either of the color FINE cartridge or black FINE cartridge is not installed, an error occurs and the machine cannot print.
Both color ink and black ink are also consumed in the standard cleaning and deep cleaning of the print head, which may be necessary to maintain the performance of the machine. When ink runs out, replace the FINE cartridge immediately with a new one.
1. Make sure that the power is turned on, open the front cover (C), then open the paper output tray (D).
2. Open the paper output cover (E).
When the FINE cartridge holder moves to the replacement position, the head cover (F) OPENS AUTOMATICALLY.
Caution
Caution
3. Remove the empty FINE cartridge.
(1) Push down the ink cartridge lock lever until it clicks.
(2) Remove the FINE cartridge.
Caution
4. Prepare a new FINE cartridge.
(1) Take a new FINE cartridge out of its package and remove the protective tape (G) gently.
Caution
5. Install the FINE cartridge.
(1) Insert the new FINE cartridge straight into the FINE cartridge holder all the way until it touches the back.
The color FINE cartridge should be installed into the left slot and the black FINE cartridge should be installed into the right slot.
Caution
(2) Push up the ink cartridge lock lever to lock the FINE cartridge into place.
The FINE cartridge is locked into place when the ink cartridge lock lever clicks.
Caution
6. Close the paper output cover (H).
Caution
-⋗ [ An Error Code Is Displayed on the LED ]
Cause and solution
Support Code=1202 / Error Code=E, 0, 6 (LED display)

The paper output cover is open.
The paper output cover is open. Close the paper output cover.
Cause and solution
Support Code=1486, 1487 / Error Code=E, 0, 7 (LED display)

FINE cartridge is not installed in the correct position.
Make sure that each FINE Cartridge is installed in the correct position.
When you need to replace a FINE cartridge, follow the procedure below.
Caution
- Handling FINE cartridge -
Do not touch the electrical contacts (A) or print head nozzle (B) on a FINE cartridge. The machine may not print properly if you touch them.
Furthermore, with such a FINE cartridge, the machine will not be able to inform you when to replace the FINE cartridge properly.
Caution
Even when printing with one ink only, print with leaving the empty FINE cartridge installed. If either of the color FINE cartridge or black FINE cartridge is not installed, an error occurs and the machine cannot print.
Both color ink and black ink are also consumed in the standard cleaning and deep cleaning of the print head, which may be necessary to maintain the performance of the machine. When ink runs out, replace the FINE cartridge immediately with a new one.
1. Make sure that the power is turned on, open the front cover (C), then open the paper output tray (D).
2. Open the paper output cover (E).
When the FINE cartridge holder moves to the replacement position, the head cover (F) OPENS AUTOMATICALLY.
Caution
Caution
3. Remove the empty FINE cartridge.
(1) Push down the ink cartridge lock lever until it clicks.
(2) Remove the FINE cartridge.
Caution
4. Prepare a new FINE cartridge.
(1) Take a new FINE cartridge out of its package and remove the protective tape (G) gently.
Caution
5. Install the FINE cartridge.
(1) Insert the new FINE cartridge straight into the FINE cartridge holder all the way until it touches the back.
The color FINE cartridge should be installed into the left slot and the black FINE cartridge should be installed into the right slot.
Caution
(2) Push up the ink cartridge lock lever to lock the FINE cartridge into place.
The FINE cartridge is locked into place when the ink cartridge lock lever clicks.
Caution
6. Close the paper output cover (H).
Caution
-⋗ [ An Error Code Is Displayed on the LED ]
Cause and solution
Support Code=1702, 1704, 1712, 1714 / Error Code=E, 0, 8 (LED display)

Ink absorber is almost full.
Press the machine's Black or Color button to continue printing. Contact the service center.
Cause and solution
Support Code=1310 / Error Code=E, 1, 0 (LED display)

Loaded paper is not compatible with automatic duplex printing.
The size of paper may not be compatible with automatic duplex printing. The sizes of media suitable for auto duplex printing are A4 and Letter. Make sure that the size of the paper loaded in the machine is correct. Pressing the Color or Black button will eject the paper and restart printing from the front side of the next paper. The reverse side of the ejected sheet will not be printed.
Cause and solution
Support Code=4100 / Error Code=E, 1, 2 (LED display)

Cannot print the contents on CREATIVE PARK PREMIUM.
You cannot print the contents on CREATIVE PARK PREMIUM.
When you print the contents on CREATIVE PARK PREMIUM, confirm the message on the computer screen, make sure that genuine Canon FINE cartridges are all installed properly, then start printing again.
Cause and solution
Support Code=1686 / Error Code=E, 1, 3 (LED display)

The remaining ink level cannot be detected.
The ink may have run out.
The function for detecting the remaining ink level will be disabled since the ink level cannot be correctly detected.
If you want to continue printing without this function, press the machine's Stop/Reset button for at least 5 seconds.
Canon recommends to use new genuine Canon cartridges in order to obtain optimum qualities.
Please be advised that Canon shall not be liable for any malfunction or trouble caused by continuation of printing under the ink out condition.
When you need to replace a FINE cartridge, follow the procedure below.
Caution
- Handling FINE cartridge -
Do not touch the electrical contacts (A) or print head nozzle (B) on a FINE cartridge. The machine may not print properly if you touch them.
Furthermore, with such a FINE cartridge, the machine will not be able to inform you when to replace the FINE cartridge properly.
Caution
Even when printing with one ink only, print with leaving the empty FINE cartridge installed. If either of the color FINE cartridge or black FINE cartridge is not installed, an error occurs and the machine cannot print.
Both color ink and black ink are also consumed in the standard cleaning and deep cleaning of the print head, which may be necessary to maintain the performance of the machine. When ink runs out, replace the FINE cartridge immediately with a new one.
1. Make sure that the power is turned on, open the front cover (C), then open the paper output tray (D).
2. Open the paper output cover (E).
When the FINE cartridge holder moves to the replacement position, the head cover (F) OPENS AUTOMATICALLY.
Caution
Caution
3. Remove the empty FINE cartridge.
(1) Push down the ink cartridge lock lever until it clicks.
(2) Remove the FINE cartridge.
Caution
4. Prepare a new FINE cartridge.
(1) Take a new FINE cartridge out of its package and remove the protective tape (G) gently.
Caution
5. Install the FINE cartridge.
(1) Insert the new FINE cartridge straight into the FINE cartridge holder all the way until it touches the back.
The color FINE cartridge should be installed into the left slot and the black FINE cartridge should be installed into the right slot.
Caution
(2) Push up the ink cartridge lock lever to lock the FINE cartridge into place.
The FINE cartridge is locked into place when the ink cartridge lock lever clicks.
Caution
6. Close the paper output cover (H).
Caution
-⋗ [ An Error Code Is Displayed on the LED ]
Cause and solution
Support Code=1684 / Error Code=E, 1, 4 (LED display)

FINE cartridge cannot be recognized.
The ink cartridge cannot be recognized.
Printing cannot be executed because the ink cartridge may not be installed properly or may not be compatible with this machine.
Install the appropriate ink cartridge.
If you want to cancel printing, press the machine's Stop/Reset button.
When you need to replace a FINE cartridge, follow the procedure below.
Caution
- Handling FINE cartridge -
Do not touch the electrical contacts (A) or print head nozzle (B) on a FINE cartridge. The machine may not print properly if you touch them.
Furthermore, with such a FINE cartridge, the machine will not be able to inform you when to replace the FINE cartridge properly.
Caution
Even when printing with one ink only, print with leaving the empty FINE cartridge installed. If either of the color FINE cartridge or black FINE cartridge is not installed, an error occurs and the machine cannot print.
Both color ink and black ink are also consumed in the standard cleaning and deep cleaning of the print head, which may be necessary to maintain the performance of the machine. When ink runs out, replace the FINE cartridge immediately with a new one.
1. Make sure that the power is turned on, open the front cover (C), then open the paper output tray (D).
2. Open the paper output cover (E).
When the FINE cartridge holder moves to the replacement position, the head cover (F) OPENS AUTOMATICALLY.
Caution
Caution
3. Remove the empty FINE cartridge.
(1) Push down the ink cartridge lock lever until it clicks.
(2) Remove the FINE cartridge.
Caution
4. Prepare a new FINE cartridge.
(1) Take a new FINE cartridge out of its package and remove the protective tape (G) gently.
Caution
5. Install the FINE cartridge.
(1) Insert the new FINE cartridge straight into the FINE cartridge holder all the way until it touches the back.
The color FINE cartridge should be installed into the left slot and the black FINE cartridge should be installed into the right slot.
Caution
(2) Push up the ink cartridge lock lever to lock the FINE cartridge into place.
The FINE cartridge is locked into place when the ink cartridge lock lever clicks.
Caution
6. Close the paper output cover (H).
Caution
-⋗ [ An Error Code Is Displayed on the LED ]
Cause and solution
Support Code=1682 / Error Code=E, 1, 5 (LED display)

The FINE Cartridge cannot be recognized.
The FINE Cartridge cannot be recognized.
Replace the FINE Cartridge.
If the error is not resolved, the FINE Cartridge may be damaged. Contact the service center.
When you need to replace a FINE cartridge, follow the procedure below.
Caution
- Handling FINE cartridge -
Do not touch the electrical contacts (A) or print head nozzle (B) on a FINE cartridge. The machine may not print properly if you touch them.
Furthermore, with such a FINE cartridge, the machine will not be able to inform you when to replace the FINE cartridge properly.
Caution
Even when printing with one ink only, print with leaving the empty FINE cartridge installed. If either of the color FINE cartridge or black FINE cartridge is not installed, an error occurs and the machine cannot print.
Both color ink and black ink are also consumed in the standard cleaning and deep cleaning of the print head, which may be necessary to maintain the performance of the machine. When ink runs out, replace the FINE cartridge immediately with a new one.
1. Make sure that the power is turned on, open the front cover (C), then open the paper output tray (D).
2. Open the paper output cover (E).
When the FINE cartridge holder moves to the replacement position, the head cover (F) OPENS AUTOMATICALLY.
Caution
Caution
3. Remove the empty FINE cartridge.
(1) Push down the ink cartridge lock lever until it clicks.
(2) Remove the FINE cartridge.
Caution
4. Prepare a new FINE cartridge.
(1) Take a new FINE cartridge out of its package and remove the protective tape (G) gently.
Caution
5. Install the FINE cartridge.
(1) Insert the new FINE cartridge straight into the FINE cartridge holder all the way until it touches the back.
The color FINE cartridge should be installed into the left slot and the black FINE cartridge should be installed into the right slot.
Caution
(2) Push up the ink cartridge lock lever to lock the FINE cartridge into place.
The FINE cartridge is locked into place when the ink cartridge lock lever clicks.
Caution
6. Close the paper output cover (H).
Caution
-⋗ [ An Error Code Is Displayed on the LED ]
Cause and solution
Support Code=1688 / Error Code=E, 1, 6 (LED display)

The ink has run out.
The ink has run out.
Replace the ink cartridge and close the paper output cover.
If printing is in progress and you want to continue printing, press the machine's Stop/Reset button for at least 5 seconds with the ink cartridge installed. Then printing can continue under the ink out condition.
The function for detecting the remaining ink level will be disabled.
Replace the empty ink cartridge immediately after the printing. The resulting print quality is not satisfactory, if printing is continued under the ink out condition.
When you need to replace a FINE cartridge, follow the procedure below.
Caution
- Handling FINE cartridge -
Do not touch the electrical contacts (A) or print head nozzle (B) on a FINE cartridge. The machine may not print properly if you touch them.
Furthermore, with such a FINE cartridge, the machine will not be able to inform you when to replace the FINE cartridge properly.
Caution
Even when printing with one ink only, print with leaving the empty FINE cartridge installed. If either of the color FINE cartridge or black FINE cartridge is not installed, an error occurs and the machine cannot print.
Both color ink and black ink are also consumed in the standard cleaning and deep cleaning of the print head, which may be necessary to maintain the performance of the machine. When ink runs out, replace the FINE cartridge immediately with a new one.
1. Make sure that the power is turned on, open the front cover (C), then open the paper output tray (D).
2. Open the paper output cover (E).
When the FINE cartridge holder moves to the replacement position, the head cover (F) OPENS AUTOMATICALLY.
Caution
Caution
3. Remove the empty FINE cartridge.
(1) Push down the ink cartridge lock lever until it clicks.
(2) Remove the FINE cartridge.
Caution
4. Prepare a new FINE cartridge.
(1) Take a new FINE cartridge out of its package and remove the protective tape (G) gently.
Caution
5. Install the FINE cartridge.
(1) Insert the new FINE cartridge straight into the FINE cartridge holder all the way until it touches the back.
The color FINE cartridge should be installed into the left slot and the black FINE cartridge should be installed into the right slot.
Caution
(2) Push up the ink cartridge lock lever to lock the FINE cartridge into place.
The FINE cartridge is locked into place when the ink cartridge lock lever clicks.
Caution
6. Close the paper output cover (H).
Caution
-⋗ [ An Error Code Is Displayed on the LED ]
Cause and solution
Support Code=1250 / Error Code=E, 1, 7 (LED display)

The Front Tray is closed.
Open the front tray to resume printing.
Cause and solution
Support Code= - / Error Code=E, 2, 0 / E, 2, 1 / E, 2, 2 / E, 2, 3 / E, 2, 4 / E, 2, 7 (LED display)

An error regarding network setup has occurred.
Press the Black button or the Color button to dismiss the error, then perform setup again.
Cause and solution
Support Code= - / Error Code=E, 3, 0 (LED display)

The size of the original cannot be correctly detected or the document is too small when the Fit-to-Page copying is selected.
Cause and solution
Support Code= - / Error Code=E, 3, 1 (LED display)

The machine is not connected with the computer.
Connect the machine and the computer with a USB cable.
Cause and solution
Support Code=1890 / Error Code=E, 4, 0 (LED display)

The protective material for the FINE Cartridge or the tape remains attached.
Check the inside of the machine. If the protective material or the tape remains attached, remove it.
Cause and solution
Support Code= - / Error Code=E, 5, 0 (LED display)

Scanning the print head alignment sheet has failed.
Press the Stop/Reset button to dismiss the error, then take the actions described below.
If the error is not resolved, connect the machine to the computer and align the Print Head on the printer driver.
Cause and solution
Support Code=5100 / Error Code=P, 0, 2 (LED display)

Follow the procedures below.
Check 1: Check if the protective material is left inside the printer
Check 2: Check if there is any foreign material inside the printer
Check 3: Check the encoder film conditions, and clean it if it is smeared
Cause and solution
- Check 1: Check if the protective material is left inside the printer
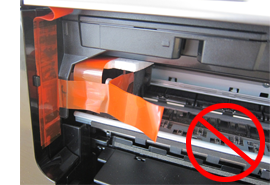
If the error occurs during on-arrival setup of the printer, confirm that all the protective orange tapes and white packing materials are removed.
Cancel printing, turn off the machine. Then clear the jammed paper or protective material that is preventing the FINE Cartridge Holder from moving, and turn on the machine again.
When this error code is displayed at the initial setup, confirm that all the protective tapes and the white fixing material have been removed.

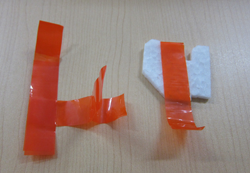
[ Protective tapes and white fixing material ]
Caution
When the protective tapes and the white fixing material cannot be removed since the FINE Cartridge Holder is behind the Head Cover, follow the procedures below to remove the protective tapes and the white fixing material.
1. Turn OFF this product.
2. Push the left side of the FINE Cartridge Holder, then move it until it hits the right inner side of the printer.
On this occasion, do not touch the other parts.
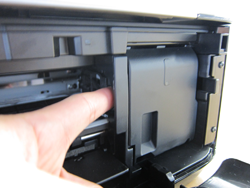
3. When the Head Cover opens, move the FINE Cartridge Holder to the position that the Ink Cartridge Lock Lever can be seen.
4. Remove the protective tape and the white fixing material attached to the FINE Cartridge Holder to confirm that the FINE Cartridge Holder is situated as shown below right.
5. Close the Head Cover and turn ON the printer, then confirm that the Head Cover opens automatically.
Caution
Cause and solution
- Check 2: Check if there is any foreign material inside the printer
If foreign material such as jammed paper is inside the printer, the FINE cartridge cannot move properly, causing faulty printing or Error P, 0, 2.
Check and remove any foreign material inside the printer, following the procedures below.
Cause and solution
- Check 3: Check the encoder film conditions, and clean it if it is smeared
The printer detects the position of the FINE cartridge holder by the encoder film. If the film is smeared, the holder position cannot be detected properly, resulting in Error P, 0, 2.
Check the encoder film condition and clean it if it is smeared, while following the procedures below.
Cause and solution
If the problem persists, contact the service center.
Cause and solution
Support Code=5B02, 5B04, 5B12, 5B14 / Error Code=P, 0, 7 (LED display)

The machine error has occurred.
Contact the service center.
Cause and solution
Support Code=B200 / Error Code=P, 1, 0 (LED display)

Turn off the machine, and unplug the power cord of the machine from the power supply.
Contact the service center.
Cause and solution
Support Code=5011, 5012, 5200, 5400, 6000, 6800, 6801, 6900, 6901, 6902, 6910, 6911, 6930, 6931, 6932, 6933, 6936, 6937, 6938, 6940, 6941, 6942, 6943, 6944, 6945, 6946 / Error Code=Other cases than above
Turn off the machine, and unplug the power cord of the machine from the power supply.
Plug the machine back in and turn the machine back on.
If the problem is not resolved, contact the service center.