

Issue
Cause and solution
FINE Cartridge is not installed properly / There is no ink left
Remove the FINE Cartridge, then reinstall it.
Small dusts may be stuck between the contact points. In this case, the print result may be improved by reinstalling the FINE Cartridge.
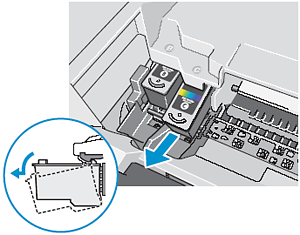
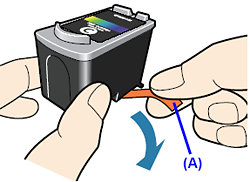
Also, check that the protective tape (A) is removed.
Cause and solution
Media Type setting in the printer driver does not match the actual type of paper
Check that the Media Type set in the Main sheet of the printer driver (Windows) or the Quality & Media in the pop-up menu of the Print dialog box (Macintosh) matches the type of the loaded printing paper.
Cause and solution
Print Head nozzles are clogged
Print the nozzle check pattern to check for uneven ink output.
Perform Print Head Deep Cleaning.
If the problem is not resolved after performing Print Head Deep Cleaning, perform Print Head Deep Cleaning again.
Printing the Nozzle Check Pattern
Print the nozzle check pattern to determine whether the ink ejects properly from the print head nozzles.
1.Make sure that the machine is on, load a sheet of A4 or Letter-sized plain paper in the Auto Sheet Feeder.
Set the Paper Thickness Lever to the left.
2.Press the Maintenance button repeatedly until A appears.
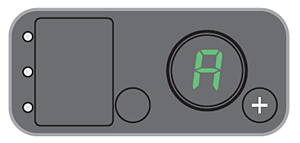
3.Press the Black or Color button.
The nozzle check pattern is printed. Do not open the Scanning Unit (Printer Cover) while printing.
4.Examine the pattern and take the appropriate action.
Examining the Nozzle Check Pattern
Examine the nozzle check pattern output by the machine, and clean the Print Head if necessary.
Caution
The nozzle check pattern will not be printed correctly if there is not enough ink. Replace the FINE Cartridge if the remaining amount of ink is insufficient.
See [ Replacing FINE Cartridges ].
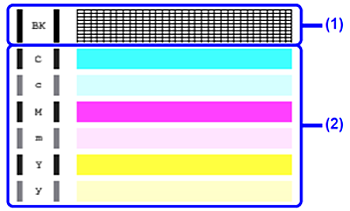
(1) If lines of this pattern are missing, the print head nozzle needs cleaning.
Example: When lines are missing (Black ink)

(2) If these patterns have white streaks, the print head nozzle needs cleaning.
Example: When white streaks appear (Color ink)

Clean the Print Head if lines are missing or if white streaks appear in the printed nozzle check pattern. Cleaning unclogs the nozzles and restores the print head condition. Note that cleaning the Print Head causes used ink to be absorbed in the ink absorber. Cleaning the Print Head consumes ink, so perform Print Head Cleaning only when necessary.
1. Make sure that the machine is turned on.
2.Press the Maintenance button repeatedly until H appears.

3. Press the Black or Color button.
Caution
If normal Print Head Cleaning does not improve the print quality, perform Print Head Deep Cleaning. See [Print Head Deep Cleaning].
If print quality does not improve by standard Print Head Cleaning, try Print Head Deep Cleaning, which is a more powerful process. Note that cleaning the Print Head causes used ink to be absorbed in the ink absorber. Print Head Deep Cleaning consumes more ink than standard Print Head Cleaning, so perform this procedure only when necessary.
1. Make sure that the machine is on.
2. Press the Maintenance button repeatedly until y appears.

3. Press the Black or Color button.
Caution
If Print Head Deep Cleaning does not improve the print quality, contact a Canon service representative.
Cause and solution
The media is loaded with the wrong side facing upwards
Load the media with the correct side facing upwards.
Many types of paper are made to be printed on only a particular side of the paper.
Printing on the wrong side may cause unclear prints or prints with reduced quality.
Refer to the instruction manuals supplied with the paper.
Cause and solution
Inappropriate Paper Thickness Lever setting
Adjust the position of the Paper Thickness Lever according to the type of paper you are printing on. See [ Compatible Media Types ].
Depending on the printing content, the printing surface may become scratched even for the types of paper to set the lever to the left. In this case, set the Paper Thickness Lever to the right.
* Reset the Paper Thickness Lever to the left when you finish printing. If the lever is not set back to the left, the inside of the machine is more likely to get dirty due to the wider clearance between the print head and the loaded paper. It may also reduce print quality.
Cause and solution
Print Head is misaligned
If you did not align the Print Head after installation, straight lines may be printed misaligned. If ruled lines are printed misaligned or print results are otherwise unsatisfactory, see [ Aligning the Print Head ] and perform Print Head Alignment.
Cause and solution
Print quality is not set appropriately
Set the Print Quality setting to High in Windows or Fine in Macintosh.
(1) Open the printer properties dialog box.
(2) On the Main sheet, click High for the Print Quality setting.
(1) Open the Print dialog box.
(2) Select Quality & Media in the pop-up menu and then click Detailed Setting.
(3) Drag the slide bar to set Print Quality to Fine.
Caution
Depending on the type of paper, you may not be able to set Print Quality to High (Windows) or Fine (Macintosh).