Solution
You can print on European DL and US Comm. Env. #10-sized envelopes.
The address is automatically rotated and printed according to the envelope's direction by specifying with the printer driver properly.
Caution
- Envelopes with an embossed or treated surface
- Envelopes with a double flap (or sticker flaps)
- Envelopes whose gummed flaps are already moistened and adhesive
Caution
In Windows, the message on how to load envelopes will appear when printing on them. This message will not appear next time if you select the Do not show this message again. check box.
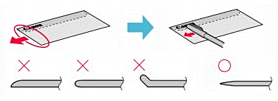
1. Prepare envelopes.
The figures above show a side view of the leading edge of the envelope.
Caution
The envelopes may jam in the machine if they are not flat or the edges are not aligned. Make sure that no curl or puff exceeds 0.1 inches / 3 mm.
2. Load envelopes.
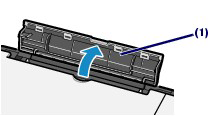
(1) Open the Paper Support.
Do not raise the Paper Support.
(2) Open the Paper Output Tray gently, and open the Output Tray Extension.
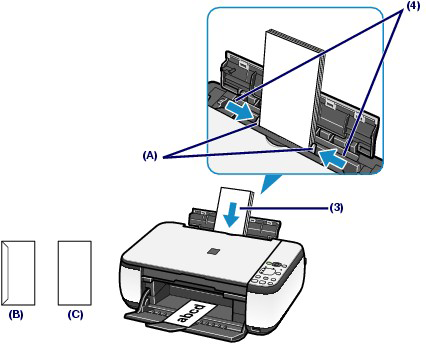
(3) Slide the Paper Guides (A) to open them, and load the envelopes in the center of the Rear Tray WITH THE ADDRESS SIDE FACING YOU.
The folded flap of the envelope will be faced down on the left side.
Up to 10 envelopes can be loaded at once.
(4) Slide the Paper Guides (A) to align them with both sides of the envelopes.
Do not slide the Paper Guides too hard. The envelopes may not be fed properly.
(B) Rear side
(C) Address side
3. Specify the settings in the printer driver.
(1) Select Envelope in Commonly Used Settings on the Quick Setup sheet.
(2) Select DL Env. or Comm. Env. #10 in the Envelope Size Setting window.
(3) Select Landscape in Orientation.
(1) Select Envelope in Media Type.
(2) Select DL Envelope or #10 Envelope in Paper Size.
(3) Select the landscape orientation in Orientation.
Caution
If you do not specify the envelope size or orientation properly, the address will be printed upside down or will be turned to 90 degrees.
Caution


