

This section describes dialing and sending faxes directly using the Numeric buttons.
Sending a Fax with the Numeric Buttons
Caution
If you enter or register an incorrect fax/telephone number with the Numeric buttons, the fax will be sent to an unexpected recipient. When sending an important fax, we recommend sending the fax after confirming the recipient's condition.
You need to prepare:
Originals to send.
1. Prepare for sending a fax.
(1) Make sure that the power is turned on.
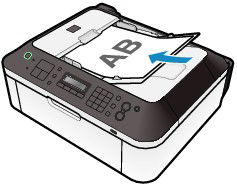
(2) Load the original in the ADF or on the Platen Glass.
Caution
When sending a double-sided document, load the document on the Platen Glass. You cannot scan double-sided documents in the ADF.
(3) Press the FAX button.
2. Adjust the scan contrast and resolution as necessary.
(1) Press the FAX Quality button.
The Scan contrast screen will appear.
(2) Use the 


The
(3) Press the OK button.
The Scan resolution screen will appear.
(4) Use the

Standard: Suitable for text-only documents.
Fine: Suitable for fine-print documents.
Extra fine: Suitable for detailed illustration or fine-print quality documents.
If the recipient's fax machine is not compatible with Extra fine (300x300dpi), the fax will be sent in the Standard or Fine resolution.
Photo: Suitable for photographs.
Caution
The color fax is sent with the resolution for Photo.
(5) Press the OK button.
3. Send the fax.
(1) Use the Numeric buttons to dial the recipient's fax/telephone number.
In the fax/telephone number entry field, the following operations are available.
- Press a Numeric button to enter that number.
- Press the
- Press the
- Press the 


- Press the Redial /Pause button to enter a pause "P".

(2) Press the Color button for color sending, or the Black button for black & white sending.
The machine starts scanning the original.
Caution
(3) Start sending.
When the document was loaded in the ADF
The machine scans the document automatically and starts sending the fax.
Caution
To cancel sending the fax, press the Stop button, and follow the message on the LCD. If documents remain in the ADF after pressing the Stop button, follow the message and press the OK button. The remaining documents are automatically fed out.
When the original was loaded on the Platen Glass
The message will appear after scanning the original.
To send the scanned page, press the OK button to start sending it.
Caution
Caution
Automatic redialing
Redialing the Number Dialed with the Numeric Buttons
1. Prepare for sending a fax.
(1) Make sure that the power is turned on.
(2) Load the original in the ADF or on the Platen Glass.
(3) Press the FAX button.
2. Adjust the scan contrast and resolution as necessary.
See step 2 in Sending a Fax with the Numeric Buttons.
3. Select the recipient to redial.
(1) Press the Redial/Pause button.
The fax/telephone number last dialed with the Numeric buttons will be displayed.
(2) Use the

(3) Press the OK button.
The selected number will appear in the fax sending screen.
4. Send the fax.
(1) Press the Color button for color sending, or the Black button for black & white sending.
The subsequent procedure varies depending on whether to load the original in the ADF or on the Platen Glass.
For details, see (3) of step 3 in Sending a Fax with the Numeric Buttons.