

Issue
When a printer error occurs, the Alarm lamp flashes orange as shown below. The number of flashes indicates the type of error that has occurred. Count the flashes and take the appropriate action to correct the error.
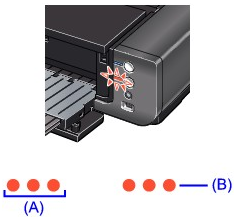
(A) Note the number of flashes
(B) Flashes repeatedly
Caution
The printer is not ready to feed paper from the Front Tray yet. Load the paper correctly in the Front Tray and press the RESUME/CANCEL button on the printer. Refer to Loading Paper for details about how to load the paper correctly in the Front Tray.
When the Power lamp flashes blue even though the printer is not in use, the printer is shaking the ink tanks. It takes about 10 seconds to 3 minutes.
Cause and solution
Two flashes:Paper does not feed in the Rear Tray
Reload paper to the Rear Tray and press the RESUME/CANCEL button.
Cause and solution
Three flashes:Front Tray or Front Feed Support is closed/Paper jams
If the Front Tray is closed, open it. The printer resumes printing.
If the Front Feed Support is closed when printing from the Front Tray, open it and press the RESUME/CANCEL button on the printer.
If the error still remains when the Front Tray or the Front Feed Support is opened, paper may be jammed. Remove the jammed paper, reload paper in the printer, and then press the RESUME/CANCEL button.
Cause and solution
Four flashes:Ink tank is not installed properly/Ink may have run out
Close the Top Cover after ink tank replacement to resume printing.
If printing is in progress and you want to continue printing, press the RESUME/CANCEL button with the ink tank installed. Then printing can continue under the ink out condition. Replace the empty ink tank immediately after the printing. The printer may be damaged if printing is continued under the ink out condition.
Caution
If multiple ink lamps are flashing, refer to [ Checking the Ink Status ].
When ink runs out while printing is in progress, the Alarm lamp flashes orange four or seventeen times and the error message will appear on your computer screen. Make sure which ink tank has run out of ink and replace it with a new one.
Caution
Replacing Procedure
When the ink tanks run out of ink, follow the procedure below to replace them.
Caution
To maintain optimal print quality, we recommend the use of specified Canon brand ink tanks. Refilling ink is not recommended.
If you remove an ink tank, replace it immediately. Do not leave the printer with ink tanks removed.
Use new ink tanks for replacement. Installing used ink tanks may cause the nozzles to clog. Furthermore, with such ink tanks, the printer will not be able to inform you when to replace the ink tanks properly.
Once an ink tank has been installed, do not remove it from the printer and leave it out in the open. This will cause the ink tank to dry out, and the printer may not operate properly when it is reinstalled. To maintain optimal printing quality, use an ink tank within six months of first use.
Caution
Color ink may be consumed even when printing a black-and-white document or when black-and-white printing is specified.
Every ink is also consumed in the standard cleaning and deep cleaning of the Print Head, which may be necessary to maintain the printer's performance. When an ink tank is out of ink, replace it immediately with a new one.
1. Make sure that the power is turned on, and open the Front Tray gently.
Gently press the upper center of the Front Tray to open it.
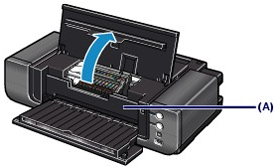
2. Open the Top Cover.
The Print Head Holder moves to the replacement position.
Caution
Do not hold the Print Head Holder to stop or move it forcibly. Do not touch the Print Head Holder until it stops completely.
Caution
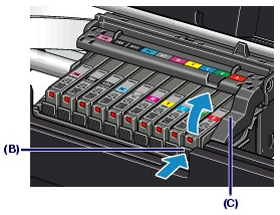
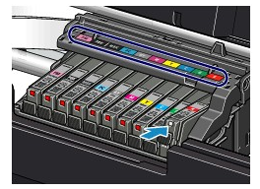
3. Replace the ink tank with the lamp flashing fast.
Push the tab (B) and lift the ink tank to remove.
Do not touch the Print Head Lock Lever (C).
Caution
Caution
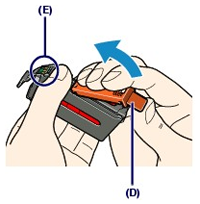
4. Prepare the new ink tank.
(1) Take the new ink tank out of its package.

(2) Remove the orange protective cap (D) from the bottom of the ink tank as indicated in the figure below.
Remove the protective cap while holding it to prevent the ink from staining your fingers.
Discard the protective cap once it is removed.
Caution
Do not touch the electrical contacts (E) on the ink tank. It can cause the printer to malfunction or become unable to print.
Caution
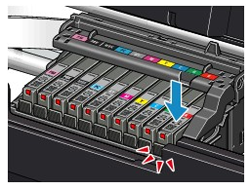
5. Install the new ink tank.
(1) Insert the front end of ink tank into the Print Head at a slant.
Make sure that the position of the ink tank matches the label.
(2) Press the mark 
Make sure that the ink lamp lights up red.
Caution
6. Close the Top Cover.
The printer will start mixing the ink automatically.
Wait until the Power lamp stops flashing and stays lit and the printer has stopped making operating noise. It takes about 3 minutes or less.
Do not open the Top Cover while the printer is operating (the Power lamp is flashing blue).
Caution
Cause and solution
Five flashes:Print Head is not installed/Print Head is defective
Follow the directions given in your setup manual to install the Print Head.
If the Print Head is already installed, remove the Print Head once and then reinstall it.
If the error is still not resolved, the Print Head may be damaged. Contact your Canon service representative.
If printed ruled lines are misaligned or print results are otherwise unsatisfactory, adjust the print head position.
You need to prepare: two sheets of A4 or Letter-sized plain paper
Caution
Aligning the Print Head without a computer
(1)Make sure that the power is turned on, and load two sheets of A4 or Letter-sized plain paper in the Rear Tray.
(2) Gently press the upper center of the Front Tray to open it, and pull out the Front Tray Extension. If the Inner Cover is open, close it.
(3)Hold down the RESUME/CANCEL button until the Power lamp flashes blue four times, then release it immediately. The print head alignment pattern will be printed and the printer will adjust the print head position automatically. Do not perform any other operations until the printer completes the printing of the print head alignment pattern.
(Windows)
1. Make sure that the power is turned on.
2. Load two sheets of A4 or Letter-sized plain paper in the Rear Tray.
Caution
You cannot feed paper from the Front Tray for aligning the Print Head. Load paper in the Rear Tray.
3. Open the Front Tray gently, and pull out the Front Tray Extension.
Gently press the upper center of the Front Tray to open it.
Caution
If the Inner Cover is open, close it.
4. Open the printer driver setup window.
5. Adjust the print head position.
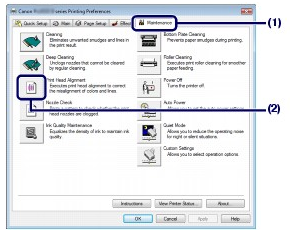
(1) Click the Maintenance tab.
(2) Click Print Head Alignment.
(3) Confirm the displayed message, and click Align Print Head.
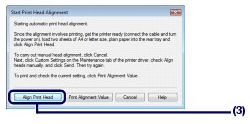
The print head alignment pattern will be printed and the printer will adjust the print head position automatically.
Do not perform any other operations until the printer completes the printing of the print head alignment pattern. This takes about 6 minutes.


Caution
(Macintosh)
1. Make sure that the power is turned on.
2. Load two sheets of A4 or Letter-sized plain paper in the Rear Tray.
Caution
You cannot feed paper from the Front Tray for aligning the Print Head. Load paper in the Rear Tray.
3. Open the Front Tray gently, and pull out the Front Tray Extension.
Gently press the upper center of the Front Tray to open it.
Caution
If the Inner Cover is open, close it.
4. Open the Canon IJ Printer Utility dialog box.
5. Adjust the print head position.
(1) Select Test Print in the pop-up menu.
(2) Click Print Head Alignment.
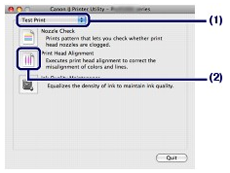
(3) Confirm the displayed message, and click Align Print Head.
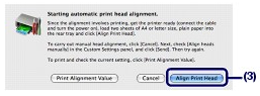
The print head alignment pattern will be printed and the printer will adjust the print head position automatically.
Do not perform any other operations until the printer completes the printing of the print head alignment pattern. This takes about 6 minutes.


Caution
Cause and solution
Six Flashes:The Inner Cover is opened
If the Inner Cover is open when starting printing on paper, close the Inner Cover, then press the RESUME/CANCEL button on the printer.
Cause and solution
Seven Flashes:Ink tank is not installed in the correct position
Confirm that the ink tanks are installed in the appropriate positions.
When ink runs out while printing is in progress, the Alarm lamp flashes orange four or seventeen times and the error message will appear on your computer screen. Make sure which ink tank has run out of ink and replace it with a new one.
Caution
Replacing Procedure
When the ink tanks run out of ink, follow the procedure below to replace them.
Caution
To maintain optimal print quality, we recommend the use of specified Canon brand ink tanks. Refilling ink is not recommended.
If you remove an ink tank, replace it immediately. Do not leave the printer with ink tanks removed.
Use new ink tanks for replacement. Installing used ink tanks may cause the nozzles to clog. Furthermore, with such ink tanks, the printer will not be able to inform you when to replace the ink tanks properly.
Once an ink tank has been installed, do not remove it from the printer and leave it out in the open. This will cause the ink tank to dry out, and the printer may not operate properly when it is reinstalled. To maintain optimal printing quality, use an ink tank within six months of first use.
Caution
Color ink may be consumed even when printing a black-and-white document or when black-and-white printing is specified.
Every ink is also consumed in the standard cleaning and deep cleaning of the Print Head, which may be necessary to maintain the printer's performance. When an ink tank is out of ink, replace it immediately with a new one.
1. Make sure that the power is turned on, and open the Front Tray gently.
Gently press the upper center of the Front Tray to open it.
2. Open the Top Cover.
The Print Head Holder moves to the replacement position.
Caution
Do not hold the Print Head Holder to stop or move it forcibly. Do not touch the Print Head Holder until it stops completely.
Caution
3. Replace the ink tank with the lamp flashing fast.
Push the tab (B) and lift the ink tank to remove.
Do not touch the Print Head Lock Lever (C).
Caution
Caution
4. Prepare the new ink tank.
(1) Take the new ink tank out of its package.
(2) Remove the orange protective cap (D) from the bottom of the ink tank as indicated in the figure below.
Remove the protective cap while holding it to prevent the ink from staining your fingers.
Discard the protective cap once it is removed.
Caution
Do not touch the electrical contacts (E) on the ink tank. It can cause the printer to malfunction or become unable to print.
Caution
5. Install the new ink tank.
(1) Insert the front end of ink tank into the Print Head at a slant.
Make sure that the position of the ink tank matches the label.
(2) Press the mark
Make sure that the ink lamp lights up red.
Caution
6. Close the Top Cover.
The printer will start mixing the ink automatically.
Wait until the Power lamp stops flashing and stays lit and the printer has stopped making operating noise. It takes about 3 minutes or less.
Do not open the Top Cover while the printer is operating (the Power lamp is flashing blue).
Caution
Cause and solution
Eight flashes:Ink absorber is almost full
The ink absorber is almost full.
Press the printer's RESUME/CANCEL button to continue printing. Contact the service center.
Cause and solution
Nine flashes:The printer has not received a response from the digital camera. The digital camera or digital video camcorder connected is not compatible with this printer
Cause and solution
Ten flashes:The Front Tray is not set to its correct position/The Front Tray was moved during printing
When printing from the Rear Tray, return the Front Tray to its normal printing position, make sure that paper is loaded in the Rear Tray, then press the RESUME/CANCEL button on the printer to resume printing. Refer toLoading Paper for details about how to return the Front Tray to its normal printing position.
If you have moved the Front Tray during printing, return the Front Tray to the correct position, then press the RESUME/CANCEL button on the printer and try printing again.
Do not move the Front Tray during printing.
Cause and solution
Eleven flashes:Automatic Print Head alignment failed/The Page Size setting does not match the size of the paper loaded in the printer
When performing Automatic Print Head Alignment:
-⋗[ Printing the Nozzle Check Pattern ]
After carrying out the above measures, if the problem continues after aligning the Print Head again, press the RESUME/CANCEL button to dismiss the error, and then perform Manual Print Head Alignment.
When printing the nozzle check pattern or performing Manual Print Head Alignment:
Other than A4/Letter-sized paper is loaded.
Press the RESUME/CANCEL button on the printer to clear the error, and load A4/Letter-sized plain paper in the Rear Tray. Then try performing again.
When performing an ordinary print job:
* Select the Detect paper width check box again once printing is complete, and then click Send.

The Custom Settings in the Maintenance sheet, clear the Detect paper width check box, and then click Send.

In the Canon IJ Printer Utility, select Custom Settings in the pop-up menu, clear the Detect paper width check box, and then click Send.
The settings here are also applied under Direct Printing from a digital camera.
If printed ruled lines are misaligned or print results are otherwise unsatisfactory, adjust the print head position.
You need to prepare: two sheets of A4 or Letter-sized plain paper
Caution
Aligning the Print Head without a computer
(1)Make sure that the power is turned on, and load two sheets of A4 or Letter-sized plain paper in the Rear Tray.
(2) Gently press the upper center of the Front Tray to open it, and pull out the Front Tray Extension. If the Inner Cover is open, close it.
(3)Hold down the RESUME/CANCEL button until the Power lamp flashes blue four times, then release it immediately. The print head alignment pattern will be printed and the printer will adjust the print head position automatically. Do not perform any other operations until the printer completes the printing of the print head alignment pattern.
(Windows)
1. Make sure that the power is turned on.
2. Load two sheets of A4 or Letter-sized plain paper in the Rear Tray.
Caution
You cannot feed paper from the Front Tray for aligning the Print Head. Load paper in the Rear Tray.
3. Open the Front Tray gently, and pull out the Front Tray Extension.
Gently press the upper center of the Front Tray to open it.
Caution
If the Inner Cover is open, close it.
4. Open the printer driver setup window.
5. Adjust the print head position.
(1) Click the Maintenance tab.
(2) Click Print Head Alignment.
(3) Confirm the displayed message, and click Align Print Head.
The print head alignment pattern will be printed and the printer will adjust the print head position automatically.
Do not perform any other operations until the printer completes the printing of the print head alignment pattern. This takes about 6 minutes.
Caution
(Macintosh)
1. Make sure that the power is turned on.
2. Load two sheets of A4 or Letter-sized plain paper in the Rear Tray.
Caution
You cannot feed paper from the Front Tray for aligning the Print Head. Load paper in the Rear Tray.
3. Open the Front Tray gently, and pull out the Front Tray Extension.
Gently press the upper center of the Front Tray to open it.
Caution
If the Inner Cover is open, close it.
4. Open the Canon IJ Printer Utility dialog box.
5. Adjust the print head position.
(1) Select Test Print in the pop-up menu.
(2) Click Print Head Alignment.
(3) Confirm the displayed message, and click Align Print Head.
The print head alignment pattern will be printed and the printer will adjust the print head position automatically.
Do not perform any other operations until the printer completes the printing of the print head alignment pattern. This takes about 6 minutes.
Caution
Cause and solution
Twelve flashes:The paper is not loaded correctly in the Front Tray/The ink tank has been replaced during printing
When printing from the Front Tray:
Press the RESUME/CANCEL button on the printer to clear the error, and then load the paper correctly in the Front Tray according to the procedure described in Loading Paper and try printing again.
If the ink tank has been replaced during printing:
Press the RESUME/CANCEL button on the printer to clear the error, then resume printing.
Cause and solution
Fourteen Flashes:Ink tank cannot be recognized
The ink tank is not compatible with this printer. (The lamp on the ink tank is off.)
Install an appropriate ink tank.
When ink runs out while printing is in progress, the Alarm lamp flashes orange four or seventeen times and the error message will appear on your computer screen. Make sure which ink tank has run out of ink and replace it with a new one.
Caution
Replacing Procedure
When the ink tanks run out of ink, follow the procedure below to replace them.
Caution
To maintain optimal print quality, we recommend the use of specified Canon brand ink tanks. Refilling ink is not recommended.
If you remove an ink tank, replace it immediately. Do not leave the printer with ink tanks removed.
Use new ink tanks for replacement. Installing used ink tanks may cause the nozzles to clog. Furthermore, with such ink tanks, the printer will not be able to inform you when to replace the ink tanks properly.
Once an ink tank has been installed, do not remove it from the printer and leave it out in the open. This will cause the ink tank to dry out, and the printer may not operate properly when it is reinstalled. To maintain optimal printing quality, use an ink tank within six months of first use.
Caution
Color ink may be consumed even when printing a black-and-white document or when black-and-white printing is specified.
Every ink is also consumed in the standard cleaning and deep cleaning of the Print Head, which may be necessary to maintain the printer's performance. When an ink tank is out of ink, replace it immediately with a new one.
1. Make sure that the power is turned on, and open the Front Tray gently.
Gently press the upper center of the Front Tray to open it.
2. Open the Top Cover.
The Print Head Holder moves to the replacement position.
Caution
Do not hold the Print Head Holder to stop or move it forcibly. Do not touch the Print Head Holder until it stops completely.
Caution
3. Replace the ink tank with the lamp flashing fast.
Push the tab (B) and lift the ink tank to remove.
Do not touch the Print Head Lock Lever (C).
Caution
Caution
4. Prepare the new ink tank.
(1) Take the new ink tank out of its package.
(2) Remove the orange protective cap (D) from the bottom of the ink tank as indicated in the figure below.
Remove the protective cap while holding it to prevent the ink from staining your fingers.
Discard the protective cap once it is removed.
Caution
Do not touch the electrical contacts (E) on the ink tank. It can cause the printer to malfunction or become unable to print.
Caution
5. Install the new ink tank.
(1) Insert the front end of ink tank into the Print Head at a slant.
Make sure that the position of the ink tank matches the label.
(2) Press the mark
Make sure that the ink lamp lights up red.
Caution
6. Close the Top Cover.
The printer will start mixing the ink automatically.
Wait until the Power lamp stops flashing and stays lit and the printer has stopped making operating noise. It takes about 3 minutes or less.
Do not open the Top Cover while the printer is operating (the Power lamp is flashing blue).
Caution
Cause and solution
Fifteen Flashes:Ink tank cannot be recognized
An Ink tank error has occurred. (The lamp on the ink tank is off.)
Replace the ink tank.
When ink runs out while printing is in progress, the Alarm lamp flashes orange four or seventeen times and the error message will appear on your computer screen. Make sure which ink tank has run out of ink and replace it with a new one.
Caution
Replacing Procedure
When the ink tanks run out of ink, follow the procedure below to replace them.
Caution
To maintain optimal print quality, we recommend the use of specified Canon brand ink tanks. Refilling ink is not recommended.
If you remove an ink tank, replace it immediately. Do not leave the printer with ink tanks removed.
Use new ink tanks for replacement. Installing used ink tanks may cause the nozzles to clog. Furthermore, with such ink tanks, the printer will not be able to inform you when to replace the ink tanks properly.
Once an ink tank has been installed, do not remove it from the printer and leave it out in the open. This will cause the ink tank to dry out, and the printer may not operate properly when it is reinstalled. To maintain optimal printing quality, use an ink tank within six months of first use.
Caution
Color ink may be consumed even when printing a black-and-white document or when black-and-white printing is specified.
Every ink is also consumed in the standard cleaning and deep cleaning of the Print Head, which may be necessary to maintain the printer's performance. When an ink tank is out of ink, replace it immediately with a new one.
1. Make sure that the power is turned on, and open the Front Tray gently.
Gently press the upper center of the Front Tray to open it.
2. Open the Top Cover.
The Print Head Holder moves to the replacement position.
Caution
Do not hold the Print Head Holder to stop or move it forcibly. Do not touch the Print Head Holder until it stops completely.
Caution
3. Replace the ink tank with the lamp flashing fast.
Push the tab (B) and lift the ink tank to remove.
Do not touch the Print Head Lock Lever (C).
Caution
Caution
4. Prepare the new ink tank.
(1) Take the new ink tank out of its package.
(2) Remove the orange protective cap (D) from the bottom of the ink tank as indicated in the figure below.
Remove the protective cap while holding it to prevent the ink from staining your fingers.
Discard the protective cap once it is removed.
Caution
Do not touch the electrical contacts (E) on the ink tank. It can cause the printer to malfunction or become unable to print.
Caution
5. Install the new ink tank.
(1) Insert the front end of ink tank into the Print Head at a slant.
Make sure that the position of the ink tank matches the label.
(2) Press the mark
Make sure that the ink lamp lights up red.
Caution
6. Close the Top Cover.
The printer will start mixing the ink automatically.
Wait until the Power lamp stops flashing and stays lit and the printer has stopped making operating noise. It takes about 3 minutes or less.
Do not open the Top Cover while the printer is operating (the Power lamp is flashing blue).
Caution
Cause and solution
Seventeen flashes:Printer detected ink out condition
Printer detected ink out condition (The lamp on the ink tank flashes).
To avoid printing troubles such as the mixing of inks, this printer is designed to stop printing by flashing the Alarm lamp orange seventeen times when the remaining ink level in an ink tank goes under the amount of ink required to maintain both printer and print quality.
Stop printing, replace the ink tank, and then print again.
Caution
If multiple ink lamps are flashing, check how fast they flash. Fast flashing (at about one second interval) indicates the ink is empty. Slow flashing (at about three second interval) indicates ink is low. For details on different flashing speeds, refer to [ Checking the Ink Status ].
When ink runs out while printing is in progress, the Alarm lamp flashes orange four or seventeen times and the error message will appear on your computer screen. Make sure which ink tank has run out of ink and replace it with a new one.
Caution
Replacing Procedure
When the ink tanks run out of ink, follow the procedure below to replace them.
Caution
To maintain optimal print quality, we recommend the use of specified Canon brand ink tanks. Refilling ink is not recommended.
If you remove an ink tank, replace it immediately. Do not leave the printer with ink tanks removed.
Use new ink tanks for replacement. Installing used ink tanks may cause the nozzles to clog. Furthermore, with such ink tanks, the printer will not be able to inform you when to replace the ink tanks properly.
Once an ink tank has been installed, do not remove it from the printer and leave it out in the open. This will cause the ink tank to dry out, and the printer may not operate properly when it is reinstalled. To maintain optimal printing quality, use an ink tank within six months of first use.
Caution
Color ink may be consumed even when printing a black-and-white document or when black-and-white printing is specified.
Every ink is also consumed in the standard cleaning and deep cleaning of the Print Head, which may be necessary to maintain the printer's performance. When an ink tank is out of ink, replace it immediately with a new one.
1. Make sure that the power is turned on, and open the Front Tray gently.
Gently press the upper center of the Front Tray to open it.
2. Open the Top Cover.
The Print Head Holder moves to the replacement position.
Caution
Do not hold the Print Head Holder to stop or move it forcibly. Do not touch the Print Head Holder until it stops completely.
Caution
3. Replace the ink tank with the lamp flashing fast.
Push the tab (B) and lift the ink tank to remove.
Do not touch the Print Head Lock Lever (C).
Caution
Caution
4. Prepare the new ink tank.
(1) Take the new ink tank out of its package.
(2) Remove the orange protective cap (D) from the bottom of the ink tank as indicated in the figure below.
Remove the protective cap while holding it to prevent the ink from staining your fingers.
Discard the protective cap once it is removed.
Caution
Do not touch the electrical contacts (E) on the ink tank. It can cause the printer to malfunction or become unable to print.
Caution
5. Install the new ink tank.
(1) Insert the front end of ink tank into the Print Head at a slant.
Make sure that the position of the ink tank matches the label.
(2) Press the mark
Make sure that the ink lamp lights up red.
Caution
6. Close the Top Cover.
The printer will start mixing the ink automatically.
Wait until the Power lamp stops flashing and stays lit and the printer has stopped making operating noise. It takes about 3 minutes or less.
Do not open the Top Cover while the printer is operating (the Power lamp is flashing blue).
Caution
Cause and solution
Eighteen flashes:Printer detected ink out condition
Printer detected ink out condition (The lamp on the ink tank flashes).
If you want to continue printing, replace the ink tank and close the Top Cover. Click Cancel Printing (Windows) or Stop Job (Macintosh) to stop printing if you do not have a new ink tank. Be sure to replace the empty ink tank before resuming printing.
You can continue printing under the ink out condition, but this may cause the printing trouble such as the mixing of inks, or a printer malfunction. If you want to continue printing, you need to release the function for detecting the remaining ink level.
To release this function, press and hold the RESUME/CANCEL button for at least 5 seconds, and then release it.
*Releasing the function for detecting the remaining ink level is memorised. Please be advised that Canon shall not be liable for any malfunction or trouble which may be caused by continuation of printing or refilling of ink.
Caution
Cause and solution
Nineteen Flashes:An unsupported USB hub is connected
If a PictBridge compliant device is connected via a USB hub, remove the hub and connect it directly to the printer.