

Solution
Guidelines for Entering Numbers, Letters, and SymbolsEntering the Date and Time
Setting Daylight Saving Time (Summer Time)
Registering Your Fax/Telephone Number and Name
A fax you receive may have information, such as the sender's name or the company name, the sender's phone or fax number, and the date and time of the transmission, printed in small type at the top of each page. Such sender information is called Transmit Terminal Identification, or TTI.
You can register the TTI in this machine, so that the recipient of the fax will know who sent it, and when it was sent.
Below is an example of how your sender information would print on a fax sent from your machine:
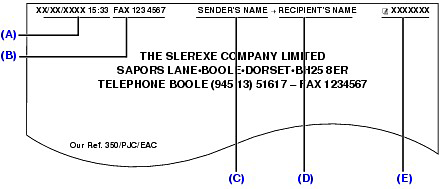
(A) Date and time of transmission
(B) Sender's fax/telephone number
(C) Sender's name
(D) Displays the recipient's name when sending from coded speed dial
(E) Page number
Caution
- When sending a fax in black & white, you can set the sender information to print inside or outside the image area.
- For color sending, the sender information is printed inside the print area and the recipient's name is not printed.
- You can select FAX or TEL to be displayed in front of the number.
- Three date display formats are available.
- You can print the User's data list to confirm the sender information you have registered.
Guidelines for Entering Numbers, Letters, and Symbols
The following characters are assigned to the Numeric buttons.
| Button | Uppercase letter mode | Lowercase letter mode | Number mode |
 | 1 | ||
 | ABCÅÄÁÀÃÂÆÇ | abcåäáàãâæç | 2 |
 | DEFËÉÈÊ | defëéèê | 3 |
 | GH I Ï Í Ì Î | gh i ï í ì î | 4 |
 | JKL | jkl | 5 |
 | MNOÑØÖÓÒÕÔ | mnoñøöóòõô | 6 |
 | PQRSÞ | pqrsþ | 7 |
 | TUVÜÚÙÛ | tuvüúùû | 8 |
 | WXYZÝ | wxyzý | 9 |
 | 0 | ||
 | -.SP #!",;:^`_=/|'?$@%&+()[]{}<> #!",;:^`_=/|'?$@%&+()[]{}<> | ||
 | Press the Tone  button to switch to uppercase letter mode (:A), lowercase letter mode button to switch to uppercase letter mode (:A), lowercase letter mode (:a), or number mode (:1). | ||
* SP indicates a space.
Follow the procedure below to enter letters and numbers when you register names and fax/phone numbers for the sender information or a speed dial.
1.Switch the input mode.
(1) Press the Tone
You can see what mode you are in by the character displayed in the upper right corner of the LCD.
Example: uppercase letter mode
Caution
2.Use the Numeric buttons to enter a character.
Press the button repeatedly until the character you want to enter appears.
Press the 
(1) Press the

(2) Press the

Press the
Press the 
Press and hold the
Entering the Date and Time
Caution
1.Display the Date/time setting screen.
(1) Press the FAX button, and press the Menu button.
The Fax settings menu will appear.

(2) Use the
The User settings menu will appear.

(3) Use the
2.Enter the date and time.
(1) Use the Numeric buttons to enter the date and time (in 24-hour format).
Enter only the last two digits of the year.

Caution
If you misentered the date and time, press the
(2) Press the OK button.
3.Return to the fax standby screen.
(1) Press the FAX button.
Setting Daylight Saving Time (Summer Time)
Some countries adopt the daylight saving time (summer time) system that shifts the clock time forward at certain periods of the year.
You can set your machine to automatically change the time by registering the day and time that daylight saving (summer time) begins and ends.
Caution
Caution
1.Display the Summer time setting screen.
(1) Press the FAX button, and press the Menu button.
The Fax settings menu will appear.

(2) Use the
The User settings menu will appear.

(3) Use the
2.Enable summer time.
(1) Use the

To disable summer time, select OFF.
(2) Press the OK button.
3.Set the date and time that summer time starts.
(1) Use the

(2) Make sure that Set month is selected, and press the OK button.
(3) Use the

(4) Make sure that Set week is selected, and press the OK button.
(5) Use the

(6) Make sure that Set day of week is selected, and press the OK button.
(7) Use the

(8) Make sure that Set shift time is selected, and press the OK button.
(9) Use the Numeric buttons to enter the time (in 24-hour format) when summer time starts.
Precede single digits with a zero.

(10) Press the OK button.
The summer time start date/time will be set.
4.Set the date and time that summer time ends.
(1) Make sure that End date/time is selected, and press the OK button.

(2) Make sure that Set month is selected, and press the OK button.
(3) Use the

(4) Make sure that Set week is selected, and press the OK button.
(5) Use the

(6) Make sure that Set day of week is selected, and press the OK button.
(7) Use the

(8) Make sure that Set shift time is selected, and press the OK button.
(9) Use the Numeric buttons to enter the time (in 24-hour format) when summer time ends.
Precede single digits with a zero.

(10) Press the OK button.
The summer time end date/time will be set.
5.Return to the fax standby screen.
(1) Press the FAX button.
Registering Your Fax/Telephone Number and Name
Caution
1.Display the Unit TEL no. registr. screen.
(1) Press the FAX button, and press the Menu button.
The Fax settings menu will appear.

(2) Use the
The User settings menu will appear.

(3) Use the
2.Enter your fax/telephone number.
(1) Use the Numeric buttons to enter your fax/telephone number (max. 20 digits, including spaces).
To enter a plus sign (+) before the number, press the

Caution
(2) Press the OK button.
3.Enter your name.
(1) Make sure that Unit name registr. is selected, and press the OK button.
(2) Use the Numeric buttons to enter your name (max. 24 characters, including spaces).

Caution
(3) Press the OK button.
4.Return to the fax standby screen.
(1) Press the FAX button.