

Solution
Making CopiesDisplaying the Preview Screen
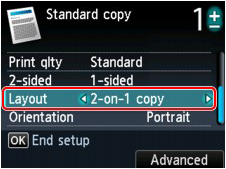
Setting Items
Reducing or Enlarging a Copy
Copying onto Both Sides of the Paper
Copying Two Pages to Fit onto a Single Page
Copying Four Pages to Fit onto a Single Page
Copying Thick Originals Such as Books
Copying without Borders
Copying Photos
Making Copies
Load the original on the platen glass to copy.
This section describes the procedure to copy with Standard copy.
1. Make sure that the machine is turned on.
2. Load paper.
-⋗ [ Loading Paper ]
3. Select 
The Copy standby screen is displayed.
4. Load the original on the platen glass.
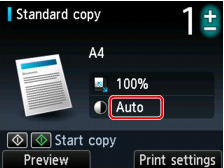
5. Specify the settings as necessary.
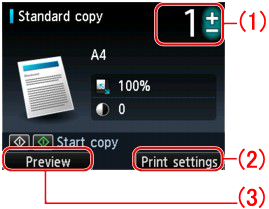
(1)Number of copies
Specify by using the + or - button.
(2)Print settings
By pressing the right Function button, the print settings screen is displayed.
On the print settings screen, you can change the settings of page size, media type, and print quality and so on.
-⋗ Refer to [Setting Items] within this webpage.
(3)Preview
By pressing the left Function button, you can preview an image of the printout on the preview screen.
-⋗ Refer to [Displaying the Preview Screen] within this webpage.
Caution
To reset the settings of magnification, intensity, and number of copies, press the Stop button.
6. Press the Color button for color copying, or the Black button for black & white copying.
The machine starts copying.
Remove the original on the platen glass after copying is complete.
Caution
Do not open the document cover or remove the original from the platen glass until scanning is completed.
Caution
To cancel copying, press the Stop button.
- Adding the Copying Job (Reserve copy)
You can add the copying job while printing (Reserve copy).
The screen below is displayed when you can add the copying job.
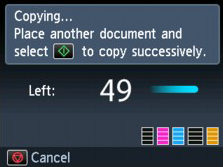
Load the original on the platen glass and press the same button (the Color button or the Black button) as the one which you previously pushed.
Caution
When you load the original on the platen glass, move the document cover gently.
Caution
Displaying the Preview Screen
When you select Standard copy or Frame erase copy in Advanced copy, pressing the left Function button in the Copy standby screen allows you to preview an image of the printout on the preview screen.
Caution
-2-sided is selected for 2-sided.
-2-on-1 copy or 4-on-1 copy is selected for Layout.
When either of the conditions above is selected, you can set to display the preview screen after scanning the original is finished.
-⋗ Refer to [Copying onto Both Sides of the Paper] within this webpage.
-⋗ Refer to [Copying Two Pages to Fit onto a Single Page] within this webpage.
-⋗ Refer to [Copying Four Pages to Fit onto a Single Page] within this webpage.
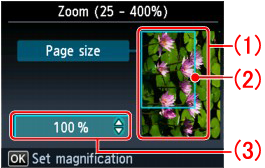
(1) Preview of the original
The original that is set on the platen glass is displayed.
(2)Page size
A frame showing the selected page size appears over the image. The inside of the frame will be printed.
(3)Magnification
The magnification setting, which was set when the preview screen was displayed, is displayed. If the setting other than Fit to page is selected, you can change the magnification setting using the 
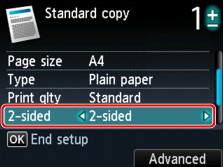
Setting Items
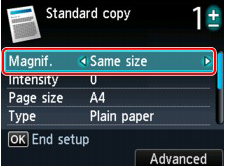
When the Copy standby screen is displayed, press the right Function button to change the copy settings such as page size, media type, and print quality.
Use the 
Caution
The setting item which cannot be selected is displayed grayed out.
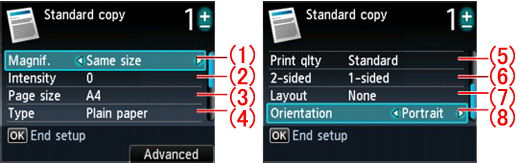
(1) Magnif. (Magnification)
Specify the reduction/enlargement method.
Refer to [Reducing or Enlarging a Copy] within this webpage.
(2) Intensity
Specify the intensity. When Auto is selected, the intensity is adjusted automatically according to the originals loaded on the platen glass. Auto is displayed on the Copy standby screen.
(3) Page size
Select the page size of the loaded paper.
(4) Type (Media type)
Select the media type of the loaded paper.
(5) Print qlty (Print quality)
Adjust print quality according to the original.
Caution
(6) 2-sided
Specify the setting of Two-sided copy.
Refer to [Copying onto Both Sides of the Paper] within this webpage.
(7) Layout
Select the layout.
-⋗ Refer to [Copying Two Pages to Fit onto a Single Page] within this webpage.
-⋗ Refer to [Copying Four Pages to Fit onto a Single Page] within this webpage.
(8) Orientation
Select the orientation of the original document.
Reducing or Enlarging a Copy
You can specify the magnification optionally or select the preset-ratio copying or fit-to-page copying.
The LCD below is displayed when you press the right Function button in the Copy standby screen. Select the reduction/enlargement method from Magnif..
Caution
Some of the reduction/enlargement methods are not available depending on the copy menu.
The machine automatically reduces or enlarges the image to fit the page size.

The setting in Magnif.: Fit to page
Caution
You can select one of the preset ratios to reduce or enlarge copies.
Select the appropriate ratio for size of original and page size.
The setting in Magnif.: 70% A4-⋗A5/86% A4-⋗B5/94% A4-⋗LTR/115% B5-⋗A4/141% A5-⋗A4/156% 5x7-⋗LTR/183% 4x6-⋗LTR
Caution
You can specify the copy ratio as a percentage to reduce or enlarge copies.
If you select other than Fit to page and press the right Function button, Magnification screen is displayed. Use the
Caution
Copying onto Both Sides of the Paper
When you select 2-sided for 2-sided in Standard copy, you can copy two original pages onto the both sides of a single sheet of paper.
Press the right Function button to select the stapling side.
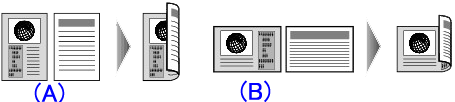
(A) Long-side stapling
(B) Short-side stapling
After selecting the stapling side and press the OK button, you can select whether you use the preview screen. If you select ON, the preview screen is displayed so that you can check the orientation.
Caution
-⋗ Refer to [Copying Two Pages to Fit onto a Single Page] within this webpage.
-⋗ Refer to [Copying Four Pages to Fit onto a Single Page] within this webpage.
- When checking the orientation:
When you are using the preview screen, the screen below is displayed so that you can check the orientation.
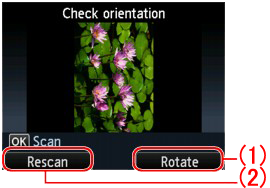
(1) Rotate
If you press the right Function button, the original rotates by 180 degrees.
(2) Rescan
If you press the left Function button, the original is rescanned.
Press the OK button to start scanning.
- When scanning is finished:
Document setting screen appears on the LCD after scanning each sheet of original.
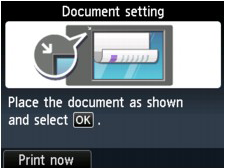
Remove the sheet of original from the platen glass after scanning and load the next sheet on the platen glass, then press the OK button.
Caution
-⋗ Refer to [Adding the Copying Job (Reserve copy)] within this webpage.
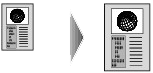
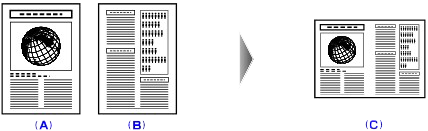
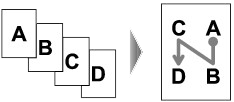
Copying Two Pages to Fit onto a Single Page
When you select 2-on-1 copy for Layout in Standard copy, you can copy two original pages (A) (B) onto a single sheet of paper (C) by reducing each image.
Press the right Function button on the Copy standby screen to display the print settings screen, then select 2-on-1 copy for Layout.
Press the right Function button to specify the advanced layout. You can also use this function with Orientation setting.
2-on-1 copy layout: Left to right

2-on-1 copy layout: Right to left
2-on-1 copy layout: Top to bottom

2-on-1 copy layout: Bottom to top

After selecting the layout and press the OK button, you can select whether you use the preview screen. If you select ON, the preview screen is displayed so that you can check the orientation.
Caution
If you use this function in combination, you can copy four original pages on one sheet of paper. In this case, two original pages are copied on each side of paper.
If you use this function in combination, select the two-sided copy setting for 2-sided and the stapling side of print paper on the Print settings screen.
For details on two-sided copy function:
-⋗ Refer to [Copying onto Both Sides of the Paper] within this webpage.
- When checking the orientation:
When you are using the preview screen, the screen below is displayed so that you can check the orientation.
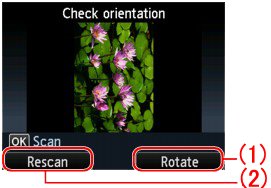
(1) Rotate
If you press the right Function button, the original rotates by 180 degrees.
(2) Rescan
If you press the left Function button, the original is rescanned.
Press the OK button to start scanning.
- When scanning is finished:
Document setting screen appears on the LCD after scanning the first sheet of original.

Remove the first sheet of original from the platen glass and load the second sheet on the platen glass, then press the OK button.
The machine starts scanning the second sheet of original and copying.
Caution
-⋗ Refer to [Adding the Copying Job (Reserve copy)] within this webpage.
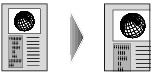
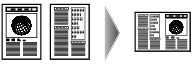
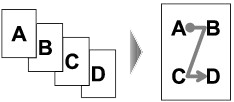
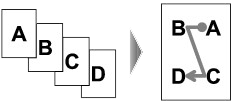
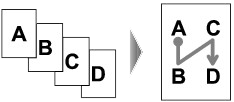
Copying Four Pages to Fit onto a Single Page
When you select 4-on-1 copy for Layout in Standard copy, you can copy four original pages onto a single sheet of paper by reducing each image. Four different layouts are available.
Press the right Function button on the Copy standby screen to display the print settings screen, then select 4-on-1 copy for Layout.
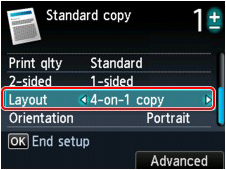
Press the right Function button to specify the advanced layout.
After selecting the layout, press the OK button, you can select whether you use the preview screen. If you select ON, the preview screen is displayed so that you can check the orientation.
Caution
If you use this function in combination, you can copy eight original pages on one sheet of paper. In this case, four original pages are copied on each side of paper.
If you use this function in combination, select the two-sided copy setting for 2-sided and the stapling side of print paper on the Print settings screen.
For details on two-sided copy function:
-⋗ Refer to [Copying onto Both Sides of the Paper] within this webpage.
- When checking the orientation:
When you are using the preview screen, the screen below is displayed so that you can check the orientation.

(1) Rotate
If you press the right Function button, the original rotates by 180 degrees.
(2) Rescan
If you press the left Function button, the original is rescanned.
Press the OK button to start scanning.
- When scanning is finished:
Document setting screen appears on the LCD after scanning each sheet of original.

Remove the sheet of original from the platen glass after scanning and load the next sheet on the platen glass, then press the OK button.
After scanning the fourth sheet of original, the machine starts copying.
Caution
-⋗ Refer to [Adding the Copying Job (Reserve copy)] within this webpage.
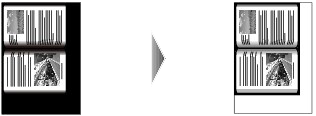
Copying Thick Originals Such as Books
When copying thick originals such as books, you can make a copy without black margins around the image and gutter shadows. Using this function, you can reduce unnecessary ink consumption.
1. Make sure that the machine is turned on.
2. Load paper.
-⋗ [ Loading Paper ]
3. Select 
4. Select 
5. Load the original on the platen glass.
6. Specify the number of copies by using the + or - button.
Change the print settings as necessary.
-⋗ Refer to [Setting Items] within this webpage.
Caution
-⋗Refer to [Displaying the Preview Screen] within this webpage.
7. Press the Color button for color copying, or the Black button for black & white copying.
The machine starts copying.
Caution
Copying without Borders
You can copy images on photo paper so that they fill the entire page without borders.

1. Make sure that the machine is turned on.
2. Load the paper on the rear tray.
-⋗ [ Loading Paper ]
3. Select 
4. Select 
5. Load the original on the platen glass.
6. Specify the number of copies by using the + or - button.
Change the print settings as necessary.
-⋗ Refer to [Setting Items] within this webpage.
7. Press the Color button for color copying, or the Black button for black & white copying.
The machine starts copying.
Caution
-⋗ [ Printing Area ]
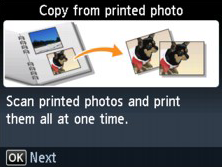
Copying Photos
You can scan printed photos and copy them all at one time.
1. Make sure that the machine is turned on.
2. Load the photo paper on the rear tray.
-⋗ [ Loading Paper ]
3. Select 
4. Confirm the on-screen instructions, then press the OK button.
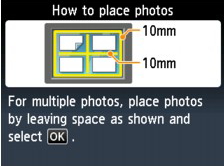
5. Load the printed photo on the platen glass following the on-screen instructions, then press the OK button.
When scanning is finished, the print settings confirmation screen is displayed.
6. Specify the settings as necessary.
Use the
Caution
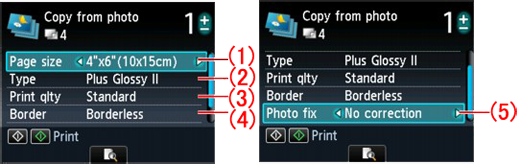
(1) Page size
Select the page size of the loaded paper.
(2) Type (Media type)
Select the media type of the loaded paper.
(3) Print qlty (Print quality)
Select print quality according to the original.
(4) Border (Bordered/Borderless print)
Select bordered or borderless print.
(5) Photo fix
Select whether the machine corrects the scanned image automatically.
Select No correction, Auto photo fix, or Fade restoration.
Caution
7. Specify the number of copies by using the + or - button.
Caution
button to change the scanned photo.If 
8. Press the Color button for color printing, or the Black button for black & white printing.
The machine starts printing.
Caution