

This section describes the procedure for basic printing. When printing photographs, you can also use Easy-PhotoPrint to easily specify print settings. Easy-PhotoPrint is provided on the Setup CD-ROM.
Printing with Windows
Caution
Depending on your application program, operations may differ. For details, refer to the instruction manual of your application.
The steps described in this section are for printing in Windows XP SP2.
1. Turn on the machine and load the paper in the machine.
See [Loading Paper].
2. Create a document or open a file to print using an appropriate application software.
3. Open the printer properties dialog box.
(1) Select Print on the application software's File menu.
The Print dialog box opens.
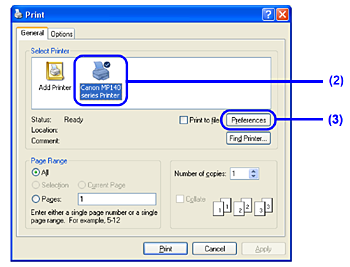
(2) Make sure that Canon XXX Printer (where “XXX” is your machine's name) is selected in Select Printer.
Caution
If a different printer is selected, click Canon XXX Printer (where “XXX” is your machine's name).
(3) Click Preferences (or Properties).
The Main sheet of the Printing Preferences dialog box appears.
4.Specify the required settings.
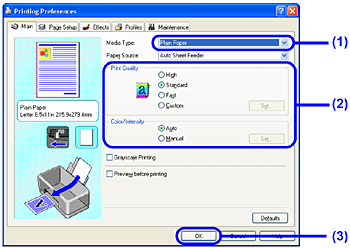
(1) Select the desired media type in Media Type.
(2) Set Print Quality and Color/Intensity as needed.
(3) Click OK.
The Print dialog box is displayed.
Caution
5.Print the document.
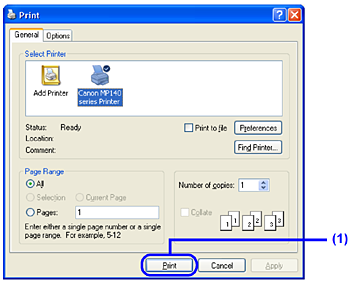
(1) Click Print (or OK).
Printing begins. Do not open the Scanning Unit (Printer Cover) while printing.
Caution
To cancel a print job in progress, press the Stop/Reset button on the machine or click Cancel Printing on the Canon IJ Status Monitor. To display the Canon IJ Status Monitor, click Canon XXX Printer (where “XXX” is your machine's name) on the taskbar.
Printing with Macintosh
Caution
Depending on your application program, operations may differ. For details, refer to the instruction manual of your application.
The steps described in this section are for printing in Mac OS X v.10.4.x.
1. Turn on the machine and load the paper in the machine.
See [Loading Paper].
2. Create a document or open a file to print using an appropriate application software.
3. Select Paper Size.
(1) Select Page Setup on the application software's File menu.
The Page Setup dialog box opens.

(2) Make sure that your machine's name is selected in Format for.
(3) Select the desired paper size in Paper Size.
(4) Click OK.
4. Specify the required settings.
(1) Select Print on the application software's File menu.
The Print dialog box opens.

(2) Select Quality & Media in the pop-up menu.
(3) Select the desired media type in Media Type.
(4) Select the print mode appropriate to your document in Print Mode.
Caution
– Printing a top-quality photo: Select when printing documents consisting mainly of photographs and graphics featuring fine color gradation.
– Printing tables and charts: Select when printing documents consisting mainly of graphs and graphics (illustrations) with strong color definition.
– Printing a composite document: Select when printing documents consisting mainly of text.
– Detailed Setting: Select to fine-tune the Print Quality and Halftoning settings.
 on the Quality & Media, Color Options, Special Effects, Borderless Printing, or Margin sheet to view the PC Printing Guide onscreen manual. If the on-screen manuals are not installed, the PC Printing Guide onscreen manual is not displayed even if
  is clicked.
5. Print the document.
(1) Click Print.
Printing begins. Do not open the Scanning Unit (Printer Cover) while printing.
Caution
Click the printer icon in the Dock to display the list of print jobs in progress. If you are using Mac OS X v.10.2.8, click the printer icon in the Dock to start up the Print Center and doubleclick the name of your machine in the Printer List.
To cancel a print job in progress, select the desired document in the Name list and click Delete. To temporarily stop a job in progress, click Hold. To stop all the jobs in the list, click Stop Jobs.