

Solution
This article explains how to shoot movies with the default settings.
For details on how to shoot movies when making changes to settings, refer to the related information.
| Movie Recording Quality | Recording Formats | ||
| MOV | MP4 | ||
| ALL-I (For editing) | UHS Speed Class 3 or faster | - | |
| IPB (Standard) |  : :  | - | SD Speed Class 10 or faster |
| Other than above | - | SD Speed Class 6 or faster | |
| IPB (Light) | - | SD Speed Class 4 or faster | |
Caution
Do not point the camera toward an intense light source, such as the sun or an intense artificial light source. Doing so may damage the image sensor or the camera's internal components.
Caution
When shooting movies, use a large-capacity card with a reading/writing speed class at least as high as shown in the following table.
Caution
Icons in this Article
⋖ 


* In addition to the above, the icons and symbols used on the camera's buttons and displayed on the LCD monitor are also used in this article when discussing relevant operations and functionality.
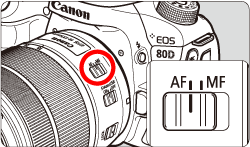
1. Set the lens's focus mode switch to ⋖AF⋗.
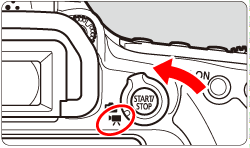
2. Set the Live View shooting/Movie shooting switch to ⋖
The reflex mirror will make a sound, then the image will appear on the LCD monitor.
3. Set the shooting mode dial to anything other than ⋖M⋗.
4. Press the ⋖
 " mark will be displayed on the upper right of the screen.
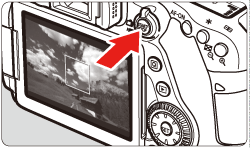
Caution
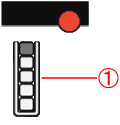
If you use a card with a slow writing speed, a five-level indicator may appear on the right of the screen during movie shooting. It indicates how much data has not yet been written to the card (remaining capacity of the internal buffer memory). The slower the card, the faster the indicator will climb upward. If the indicator becomes full, movie shooting will stop automatically. If the card has a fast writing speed, the indicator will either not appear or the level (if displayed) will hardly go upward. First, shoot a few test movies to see if the card can write fast enough.

5. Press the ⋖
Caution
 ] Internal Temperature Warning Icon
-If the camera's internal temperature increases due to prolonged movie shooting or a high ambient temperature, a red [
-The red [
-Shooting a movie at a high temperature for a prolonged period will cause the [
 ⋗ or ⋖
 ⋗ is set and the ISO speed or aperture changes during movie shooting, the white balance may also change.
Caution
] and [ ] in the menu.-If the attached lens has an Image Stabilizer and you set the Image Stabilizer (IS) switch to ⋖ON⋗, the Image Stabilizer will operate at all times even if you do not press the shutter button halfway. The Image Stabilizer consumes battery power and may shorten the total movie shooting time depending on the shooting conditions. If you use a tripod or if the Image Stabilizer is not necessary, it is recommended to set the IS switch to ⋖OFF⋗.
-Stereo sound is recorded by the camera's built-in microphones.
-The camera's built-in microphones will also pick up the operation sound during shooting and mechanical sound of the camera.
-Use a commercially-available external microphone to reduce these sounds in the movie.
-Most external stereo microphones equipped with a 3.5mm diameter mini plug can be used.
-Be careful not to cover the microphones with your finger, etc.
-Do not connect anything other than an external microphone to the camera's external microphone IN terminal.
-If the brightness changes during autoexposure movie shooting, the movie may freeze temporarily. In such a case, shoot movies with manual exposure.
-If there is a very bright light source in the image, the bright area may appear black on the LCD monitor. The movie will be recorded almost exactly as it appears on the LCD monitor.
-In low light, noise or irregular colors may appear in the image. The movie will be recorded almost exactly as it appears on the LCD monitor.
-If you play back a movie with other devices, image or sound quality may deteriorate or playback may not be possible (even if the devices support MOV/MP4 format).
-If the movie shooting time reaches 29 min. 59 sec., the movie shooting will stop automatically. You can start shooting a movie again by pressing the
-A movie file is recorded each time you shoot a movie. If the file exceeds 4 GB, a new movie file will be created for every subsequent 4 GB.
-With a fully-charged Battery Pack LP-E6N, the total movie shooting time will be as follows: approx. 1 hr. 50 min. at room temperature (23°C / 73°F) and approx. 1 hr. 40 min. at low temperatures (0°C / 32°F) (with [
-The movie image's field of view is approx. 100% (with movie recording size set to [1920x1080]).