

Issue
If an error message is displayed on the LCD, take the corresponding action described below.
Cause and solution
The ink may have run out. Replacing the ink tank is recommended. U041
If the lamp on the ink tank is flashing, ink may have run out.
Replacing the ink tank is recommended.
If printing is in progress and you want to continue printing, press the machine's OK button with the ink tank installed. Then printing can continue. Replacing the ink tank is recommended after the printing. The machine may be damaged if printing is continued under the ink out condition.
-⋗ [ Replacing an Ink Tank ]
Caution
Cause and solution
Some ink tanks are not installed in place. U072 / More than one ink tank of the following color is installed. U071
Confirm that the ink tanks are installed in the appropriate positions.
When you need to replace an ink tank, follow the procedure below.
Caution
Handling ink
Caution
Every ink is also consumed in the standard cleaning and deep cleaning of the print head, which may be necessary to maintain the performance of the machine. When an ink tank is out of ink, replace it immediately with a new one.
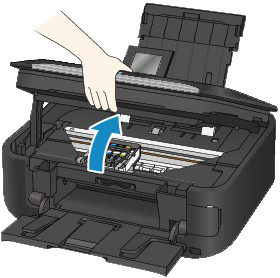
1. Make sure that the power is turned on, and open the paper output tray gently.
2. Lift the scanning unit / cover until it stops.
The print head holder moves to the replacement position.
Caution
Caution
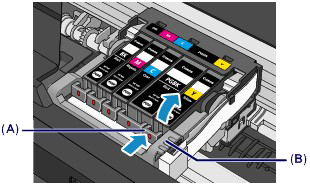
3. Remove the ink tank with the lamp flashing fast.
Push the tab (A) and lift the ink tank to remove.
Do not touch the print head lock lever (B).
Caution
Caution
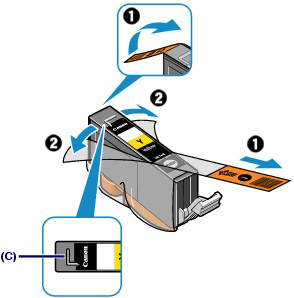
4. Prepare a new ink tank.
(1) Take a new ink tank out of its package, remove the orange tape ( 

Caution
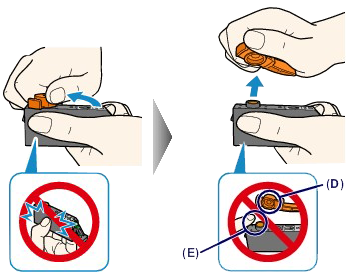
(2) Hold the ink tank with the orange protective cap (D) pointing up while being careful not to block the L-shape air hole (C).
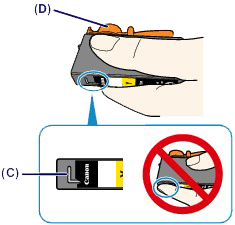
(3) Slowly twist the orange protective cap (D) 90 degrees horizontally to remove it off.
Caution
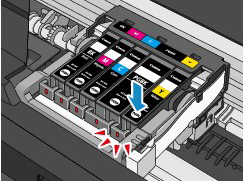
5. Install the new ink tank.
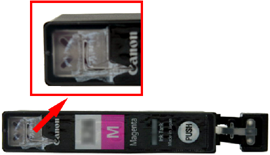
(1) Insert the front end of the ink tank into the print head at a slant.
Make sure that the position of the ink tank matches the label.

(2) Press the mark 
Make sure that the ink lamp lights up red.
Caution
6. Close the scanning unit / cover gently.
Caution
Caution
Caution
-⋗ [ An Error Message Is Displayed on the LCD ]
-⋗ [ Aligning the Print Head ]
Cause and solution
The remaining level of the ink cannot be correctly detected. Replace the ink tank. U130
The remaining ink level cannot be correctly detected. (The lamp on the ink tank flashes.)
Replace the ink tank and close the scanning unit / cover.
-⋗ [ Replacing an Ink Tank ]
Printing with an ink tank that was once empty may damage the machine.
If you want to continue printing in this condition, you need to release the function for detecting the remaining ink level. Press and hold the machine's Stop button for at least 5 seconds, and then release it.
With this operation, releasing the function for detecting the remaining ink level is memorized. Please be advised that Canon shall not be liable for any machine malfunction or damage caused by refilled ink tanks.
Caution
-⋗ [ Checking the Ink Status ]
Cause and solution
The following ink tank cannot be recognized. U043 U140 U150
-⋗ [ Replacing an Ink Tank ]
Printing cannot be executed because the ink tank is not compatible with this machine.
Install the appropriate ink tank.
If you want to cancel printing, press the machine's Stop button.
-⋗ [ Replacing an Ink Tank ]
Replace the ink tank.
-⋗ [ Replacing an Ink Tank ]
Cause and solution
Appropriate ink tank is not installed. Install the appropriate ink tank U141
Appropriate ink tank is not installed.
Printing cannot be executed because the ink tank is not compatible with this machine.
Install the appropriate ink tank.
-⋗ [ Replacing an Ink Tank ]
If you want to cancel printing, press the machine's Stop button.
Cause and solution
The ink has run out. Replace the ink tank. U163
The ink has run out. (The lamp on the ink tank flashes.)
Replace the ink tank and close the scanning unit / cover.
-⋗ [ Replacing an Ink Tank ]
Printing under the current condition may damage the machine.
If you want to continue printing in this condition, you need to release the function for detecting the remaining ink level. Press and hold the machine's Stop button for at least 5 seconds, and then release it.
With this operation, releasing the function for detecting the remaining ink level is memorized. Please be advised that Canon shall not be liable for any malfunction or trouble which may be caused by continuation of printing under the ink out condition.
Caution
-⋗ [ Checking the Ink Status ]
Cause and solution
Data of supported types are not saved
Caution
Cause and solution
Cannot print the specified PDF file. An error has occurred while scanning the file, or the format is not supported, or the file is too large
Caution
- The Details screen is not displayed for the PDF file you want to print.
- Characters other than machine name, MP Navigator EX V5.0, or MP Navigator EX are displayed on Created with on the Details screen.
- "?" is displayed on the preview screen.
Cause and solution
Cause and solution
The specified PDF file contains unprintable data. Some portions may not be printed
PDF file which contain lot of graphics or hi-resolution images may lose that data or stop before printing is completed. In this case, print from the computer.
Cause and solution
Inner cover is open. Close the inner cover and press OK
If the inner cover (the cover of the disc tray) is open while printing other than disc label printing is in progress, close the inner cover, then press the OK button.
Cause and solution
Open the inner cover, set the disc tray and select [OK]
If the inner cover is closed when starting disc label printing, open the inner cover with the scanning unit / cover closed, set the disc tray, and then press the OK button on the machine to dismiss the error.
Do not open or close the inner cover while printing is in progress. Doing so may damage the machine.
Cause and solution
Cannot prepare to print. Inner cover is open. Close the inner cover and select [OK]
If the inner cover is open when starting disc label printing, close the inner cover with the scanning unit / cover closed, set the disc tray, and then press the OK button on the machine to dismiss the error.
Cause and solution
The ink absorber is almost full. Press OK to continue printing. Contact the service center
The ink absorber is almost full.
Press the machine's OK button to continue printing. Contact the service center.
Cause and solution
Printer error has occurred. Contact the service center
The machine error has occurred.
Contact the service center.
Cause and solution
Timeout error has occurred
Some errors occurred while copying and a certain time passed.
Press the OK button to dismiss the error, and try to copy again.
Cause and solution
Incompatible device detected. Remove the device
Cause and solution
Auto head align has failed. Press OK and repeat operation.
Press the OK button to dismiss the error, and print the nozzle check pattern to check the status of the print head.
-⋗ [ Printing the Nozzle Check Pattern ]
Press the OK button on the machine to dismiss the error, then load a sheet of A4/Letter-sized Canon Matte Photo Paper MP-101 with the printing side (whiter side) facing UP in the rear tray.
For Automatic Print Head Alignment, always load paper in the rear tray.
Press the OK button to dismiss the error message, and then adjust your operating environment and/or the position of the machine so that the paper output slot is not exposed directly to strong light.
After carrying out the above measures, if the problem continues after aligning the print head again, press the OK button to dismiss the error, and then perform Manual Print Head Alignment.
-⋗ [ Manual Print Head Alignment ]
Cause and solution
An unsupported USB hub is connected. Remove the hub
If a PictBridge compliant device is connected via a USB hub, remove the hub and connect it directly to the machine.
Cause and solution
B200 Printer error has occurred. Unplug the power cord and contact the service center
Turn off the machine, and unplug the power cord of the machine from the power supply.
Contact the service center.
Cause and solution
**** Printer error has occurred. Turn off power then back on again. If problem persists, see the manual
"****" is displayed in the alphanumeric character and depends on the error occurred.
Cancel printing, and turn off the machine. Then clear the jammed paper or protective material that is preventing the print head holder from moving, and turn on the machine again.
Caution
Cause and solution
If any object is placed in front of the machine, remove it.
Open the Paper Output Tray gently, then turn the power off and back on.
Turn off the machine, and unplug the power cord of the machine from the power supply.
Plug the machine back in and turn the machine back on.
If the problem is not resolved, contact the service center.
Cause and solution
5101 Remove the protective material if it is attached to the holder and turn off power and back on
Check the inside of the machine. If you find the protective material attached to the holder, remove it, turn the machine off, then turn it back on.
Turn the machine off, then check the inside of the machine. If the protective material remains attached, remove it and turn the machine back on.
If the problem is not resolved, contact the service center.
Cause and solution
Scanner is not operating correctly
Turn off the machine, and unplug the power cord of the machine from the power supply.
After a while, plug the power cord of the machine back in, and then turn on the machine. If the same error occurs, contact the service center.
Cause and solution
The card is currently writable from PC. Set to [Not writable from PC]
The Card Slot is set to Writable from USB PC or Writable from LAN PC.
You cannot print from the memory card or save the scanned data to the memory card when the Card Slot is set to Writable from USB PC or Writable from LAN PC. After writing on the memory card, select Not writable from PC in Read/write attribute in Device user settings.
Cause and solution
Power was not turned off correctly the last time. Press the ON button when turning power off
The power cord may have been unplugged last while the machine was still on.
Press the OK button to dismiss the error.
Cause and solution
Cannot print the data
When you print the contents on CREATIVE PARK PREMIUM, confirm the message on the computer screen, make sure that genuine Canon ink tanks are installed properly for all colors, then start printing again.
Cause and solution
Cannot connect to the server Try again
You cannot connect to the server properly When you have tried to access a photo sharing site, it is possible that your album has been deleted.
Press the OK button to dismiss the error, then try again.
Cause and solution
Cannot connect to the server Please wait a while and try again
You cannot connect to the server due to some communication error. When you have tried to access a photo sharing site, it is possible that your photos have been deleted.
Press the OK button to dismiss the error, then try again after a while.