

Issue
Cause and solution
Check 1: Make sure of the following when you load paper
Loading Plain Paper / Photo Paper
Caution
If you cut plain paper into small size such as 4" x 6" / 10 x 15 cm, 4" x 8" / 101.6 x 203.2 mm, 5" x 7" / 13 x 18 cm, or 2.16" x 3.58" / 55.0 x 91.0 mm (Card size) to perform trial print, it can cause paper jams.
Caution
1. Prepare paper.
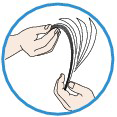
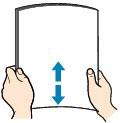
Align the edges of paper. If paper is curled, flatten it.
Caution
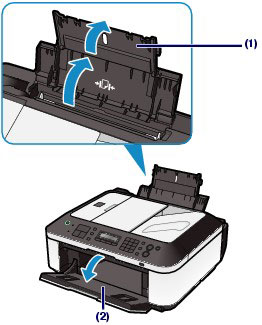
2. Load paper.
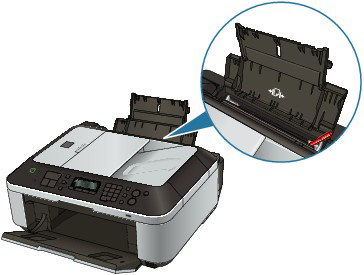
(1) Open the Paper Support, and open the support as an extension.
(2) Open the Paper Output Tray gently.
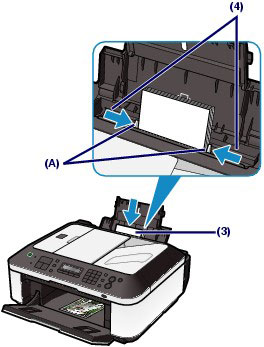
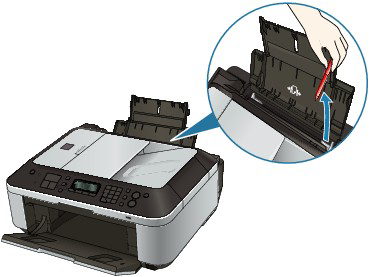
(3) Slide the Paper Guides (A) to open them, and load the paper in the center of the Rear Tray WITH THE PRINT SIDE FACING YOU.
(4) Slide the Paper Guides (A) to align them with both sides of the paper stack.
Do not slide the Paper Guides too hard. The paper may not be fed properly.
Caution
Caution
Caution
After loading paper
Loading Documents in the ADF
You can load documents to copy, fax, or scan in the ADF.
Caution
To scan a document at optimum quality, load it on the Platen Glass.
1. Make sure that any original has been removed from the Platen Glass.
2. Load a document in the ADF.
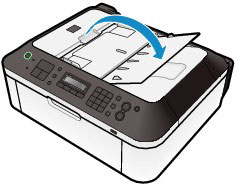
(1) Open the Document Tray.
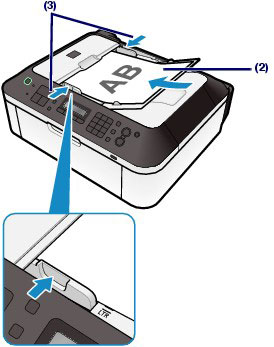
(2) Insert the document in the Document Tray until you hear a beep sound.
Load the document WITH THE SIDE TO SCAN FACING UP in the Document Tray.
Caution
When you set the alarm to be silent in Device user settings of Device settings, the alarm will not beep even if the document is inserted in the Document Tray.
(3) Adjust the Document Guides to match the width of the document.
Do not slide the Document Guides too hard. The document may not be fed properly.
Cause and solution
Check 2: Check to see if the paper you are printing on is not too thick or curled
Choose paper suitable for printing, for the best print results. Canon provides you various types of paper to enhance the fun of printing, such as stickers as well as papers for photo or document. We recommend the use of Canon genuine paper for printing your important photos.
Media Types
Commercially available papers
- Media type settings -
Operation Panel: Plain paper
Printer driver: Plain Paper
- Paper load limit -
Rear Tray: Approx. 100 sheets
- Paper Output Tray load limit -
Approx. 50 sheets
Caution
Proper feeding of paper may not be possible at the maximum capacity depending on the type of paper or environmental conditions (either very high or low temperature or humidity). In such cases, reduce the number of paper you load at a time to less than half (100% recycled paper can be used).
- Media type settings -
Printer driver: Envelope
- Paper load limit -
Rear Tray: 10 envelopes
- Paper Output Tray load limit -
We recommend that you remove the previously printed envelope from the Paper Output Tray before continuously printing to avoid blurs and discoloration.
Caution
Available only when printing from your computer.
Canon genuine papers
Refer to the instruction manual supplied with the paper for detailed information on the printable side and notes on handling paper. For information on the page sizes available for each Canon genuine paper, visit our website.
Caution
For printing photos:
- Media type settings -
Operation Panel: Pro Platinum
Printer driver: Photo Paper Pro Platinum
- Media type settings -
Operation Panel: Pro II
Printer driver: Photo Paper Pro II
- Media type settings -
Operation Panel: Glossy
Printer driver: Glossy Photo Paper
- Media type settings -
Operation Panel: Glossy
Printer driver: Glossy Photo Paper
- Media type settings -
Operation Panel: Plus Glossy II
Printer driver: Photo Paper Plus Glossy II
- Media type settings -
Operation Panel: Plus Semi-gloss
Printer driver: Photo Paper Plus Semi-gloss
- Media type settings -
Operation Panel: Matte
Printer driver: Matte Photo Paper
- Paper load limit -
Rear Tray:
10 sheets for A4, Letter / 8.5" x 11", 5" x 7" / 13 x 18 cm, and 8" x 10" / 20 x 25 cm
20 sheets for 4" x 6" / 10 x 15 cm
- Paper Output Tray load limit -
We recommend that you remove the previously printed sheet from the Paper Output Tray before continuously printing to avoid blurs and discoloration.
Caution
When loading paper in stacks, the print side may become marked as it is fed or paper may not feed properly. In this case, load one sheet at a time (except for Matte Photo Paper ⋖MP-101⋗).
For printing business documents:
- Media type settings -
Printer driver: High Resolution Paper
- Paper load limit -
Rear Tray: 80 sheets
- Paper Output Tray load limit -
50 sheets
Caution
Available only when printing from your computer.
For creating your own prints:
- Media type settings -
Printer driver: T-Shirt Transfers
- Media type settings -
Operation Panel: Glossy
Printer driver: Glossy Photo Paper
- Paper load limit -
Rear Tray: 1 sheet
- Paper Output Tray load limit -
We recommend that you remove the previously printed sheet from the Paper Output Tray before continuously printing to avoid blurs and discoloration.
*1 Available only when printing from your computer.
*2 When copying onto sticker paper, be sure to select Sticker copy in the Special copy menu. If Sticker copy is selected, the type of paper cannot be selected.
See Using Various Copy Functions.
When printing photos saved on your mobile phone onto sticker paper, select Sticker for Page size in Mobile phone settings under Device settings.
*3 You can easily specify print settings for sticker paper with Easy-PhotoPrint EX provided on the Setup CD-ROM. Install it on your computer.
Page Sizes
You can use the following page sizes.
Standard sizes:
Non-standard sizes:
You can also specify a custom size within the following range.
2.17 x 3.58 inches / 55.0 x 91.0 mm
8.50 x 26.61 inches / 215.9 x 676.0 mm
Paper Weight
17 to 28 lb / 64 to 105 g/m2 (except for Canon genuine paper)
Do not use heavier or lighter paper (except for Canon genuine paper), as it could jam in the machine.
Notes on Storing Paper
Notes on Paper for Full-page Borderless Printing
Cause and solution
Check 3: Make sure of the following when you load envelopes
When printing on envelopes, refer to Loading Envelopes , and prepare the envelopes before printing.
Once you have prepared the envelopes, load them in portrait orientation. If the envelopes are placed in landscape orientation, they will not feed properly.
Cause and solution
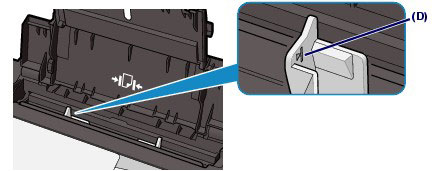
Check 4: Make sure no foreign objects in the rear tray
If the paper tears in the Rear Tray, see Paper Jams to remove it.
If there are any foreign objects in the Rear Tray, be sure to turn off the machine, unplug it from the power supply, then remove the foreign object.
Cause and solution
Check 5: Clean the Paper Feed Roller
Caution
Cleaning the Paper Feed Roller will wear the roller, so perform this procedure only when necessary.
If the Paper Feed Roller is dirty or paper powder is attached to it, paper may not be fed properly.
In this case, clean the Paper Feed Roller. Cleaning will wear out the Paper Feed Roller, so perform this only when necessary.
You need to prepare: three sheets of A4 or Letter-sized plain paper
1.Make sure that the power is turned on, and remove any paper in the Rear Tray.
2.Open the Paper Output Tray gently.
3.Clean the Paper Feed Roller without paper.
(1) Press the Menu button repeatedly until Maintenance appears.
(2) Use the 


The Paper Feed Roller will rotate as it is cleaned.
4. Clean the Paper Feed Roller with paper.
(1) Make sure that the Paper Feed Roller stops rotating, and load three or more sheets of A4 or Letter-sized plain paper in the Rear Tray.
(2) Repeat the procedures in step 3.
The machine starts cleaning. The cleaning will be completed after the paper is ejected.
If the problem is not resolved after cleaning the Paper Feed Roller, contact the service center.