

Issue
Cause and solution
Check 1: Confirm the paper source setting for plain paper.
* If the paper source setting is not changed since you purchased this machine, the paper source for plain paper is the cassette.
(Changing the Machine Settings on the LCD)
1. Make sure that the machine is turned on.
2. Press the MENU button.
The menu screen is displayed.
3. Select 
4. Select 
The Device settings screen is displayed.
5. Use the 
6. Specifies the paper source for A4, Letter, A5, and B5 plain paper.
Caution
A4, Letter, A5, and B5 paper can be loaded in the cassette. Load the other sizes of paper on the rear tray.
Cause and solution
(Switching the Paper Source to Match the Purpose)
In this machine, there are two paper sources, a rear tray and a cassette.
You can facilitate printing by selecting a paper source setting that matches your print conditions or purpose.
The procedure for setting paper source is as follows:
You can also set the paper source on the Quick Setup tab.
1. Open the printer driver setup window
2. Select the paper source
From the Paper Source list on the Main tab, select the paper source that matches your purpose.
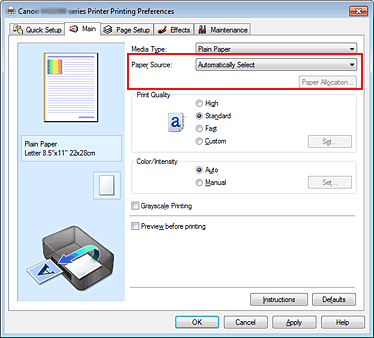
[Automatically Select]
Plain paper whose Page Size is Letter 8.5"x11" 22x28cm, A5, A4, or B5 is fed from the cassette. Other sizes of plain paper and paper types other than plain paper are fed from the rear tray.
[Rear Tray]
Paper is always fed from the rear tray.
[Cassette]
Paper is always fed from the cassette.
Caution
Plain paper that is not Letter 8.5"x11" 22x28cm, A5, A4, or B5 and paper types other than plain paper cannot be fed from the cassette.
Cause and solution
[Continuous Autofeed]
When plain paper runs out in the specified paper source, the printer automatically switches the paper source.
When printing a large volume of data, load plain paper of the same size in both the rear tray and the cassette. The printer then automatically switches the paper source when paper runs out in one paper source, thus reducing the work of reloading paper.
Caution
Cause and solution
[Paper Allocation]
When the media type for the print data is plain paper and the paper size matches the paper allocation setting, the printer automatically feeds paper from the cassette. If not, the printer feeds paper from the rear tray.
To change the paper allocation settings, click Paper Allocation..., specify the Paper Size to be loaded in the cassette, and then click OK.
When you load frequently used plain paper in the cassette, the printer feeds other types of paper from the rear tray, thus reducing the work of reloading paper.
3. Complete the setup
Click OK.
When you execute print, the printer uses the specified paper source to print the data.
Cause and solution
(Setting the Paper Source for Plain Paper)
When you select Automatically Select from Paper Source, you can use the printer driver to select the paper source for plain paper.
The procedure for setting the paper source is as follows:

1. Open the printer driver setup window
2. Click Paper Source Setting for Plain Paper on the Maintenance tab
The Paper Source Setting for Plain Paper dialog box opens.
Caution
If the machine is off or bi-directional communication is disabled, a message may appear because the computer cannot collect the machine status.
If this happens, click OK to display the most recent settings specified on your computer.
Cause and solution
3. Apply the settings
Select the paper source for plain paper, and then click OK.
The selected settings are enabled hereafter.
Caution
The descriptions in the machine manual assume that the plain paper is supplied from the cassette. When you change the paper source setting, replace all instances of "cassette" with the new paper source.
Cause and solution
Check 2: Make sure that paper is loaded.
Paper Sources to Load Paper
The machine has two paper sources to feed paper; cassette and rear tray.
You can load paper in either one of the paper sources, depending on the page size and media type of paper. Paper is fed from the cassette or rear tray depending on the selection of the page size or media type.
-⋗ [ Media Types You Can Use ]
Caution
For details on how to load paper in each paper source, see below.
-⋗ Refer to [ Loading Plain Paper in the Cassette ] within this webpage.
-⋗ Refer to [ Loading Photo Paper in the Rear Tray ] within this webpage.
-⋗ [ Loading Envelopes in the Rear Tray ]
- Loading Plain Paper in the cassette
When you use A4, B5, A5, or Letter-sized plain paper, load it in the cassette.
The machine feeds paper from the cassette automatically by selecting plain paper (A4, B5, A5, or Letter size) in the print settings with the operation panel or the printer driver when printing.
- Loading Photo Paper / Envelopes in the rear tray
When you use photo paper, load it in the rear tray.
The machine feeds paper from the rear tray automatically by selecting the media types other than plain paper, such as photo paper, in the print settings with the operation panel or the printer driver when printing.
When you use plain paper other than A4, B5, A5, or Letter size, also load it in the rear tray.
Loading Plain Paper in the Cassette
You can load only A4, B5, A5, or Letter-sized plain paper in the cassette.
Load other sizes or types of paper in the rear tray.
Caution
For details on the Canon genuine paper, see [ Media Types You Can Use ].
For the page size and paper weight you can use for this machine, see [ Media Types You Can Use ].
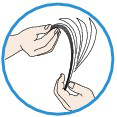
1. Prepare paper.
Align the edges of paper. If paper is curled, flatten it.

Caution
For details on how to flatten curled paper, see [ Load the paper after correcting its curl. ] in [ Paper Is Smudged/Printed Surface Is Scratched ].
2. Load paper.
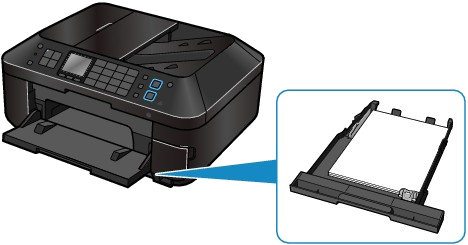
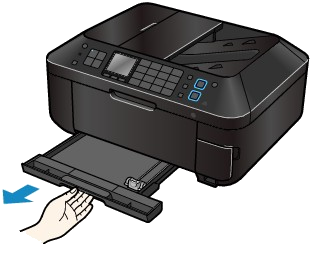
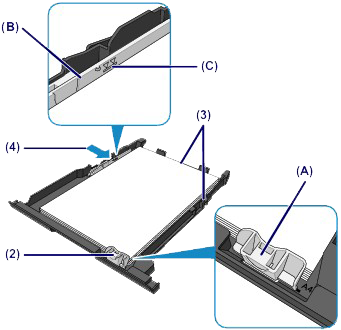
(1) Pull out the cassette from the machine.
(2) Slide the paper guide (A) to align with the mark of page size.
The paper guide (A) will stop when it aligns with the corresponding page size mark.
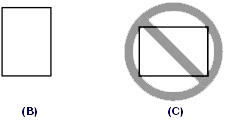
(3) Load the paper stack WITH THE PRINT SIDE FACING DOWN and THE LEADING EDGE TO THE FAR SIDE, and align it against the right side of the cassette.
Caution
(4) Slide the paper guide (B) on the left to align completely with the side of the paper stack.
Caution
(5) Insert the cassette into the machine.
Push the cassette all the way into the machine.

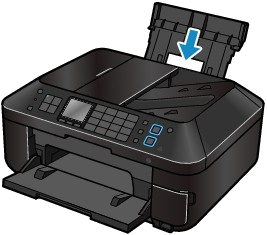
3. Open the paper output tray gently.
Caution
After loading paper
Loading Photo Paper in the Rear Tray
Load photo paper in the rear tray. When you use plain paper other than A4, B5, A5, or Letter size, also load it in the rear tray.
Caution
1. Prepare paper.
Align the edges of paper. If paper is curled, flatten it.

Caution
For details on how to flatten curled paper, see [ Load the paper after correcting its curl. ] in [ Paper Is Smudged/Printed Surface Is Scratched ].
2. Load paper.
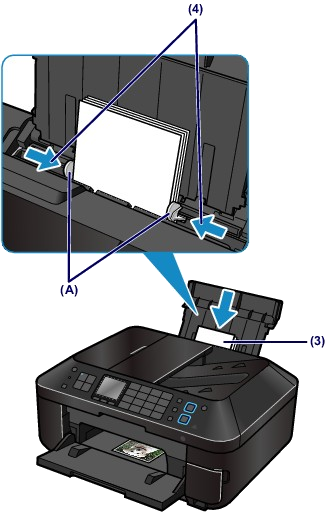
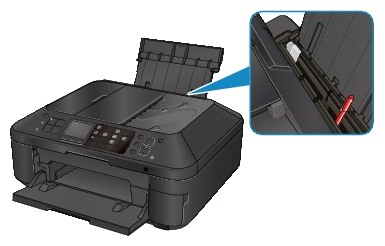
(1) Open the paper support, raise it, then tip it back.
(2) Open the paper output tray gently.

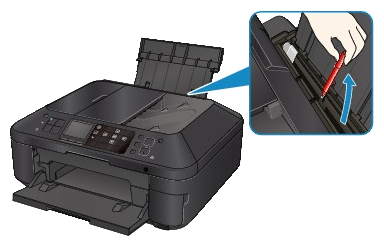
(3) Slide the paper guides (A) to open them, and load the paper in the center of the rear tray WITH THE PRINT SIDE FACING YOU.
(4) Slide the paper guides (A) to align them with both sides of the paper stack.
Do not slide the paper guides too hard against the paper. The paper may not be fed properly.
Caution
Caution

Caution
After loading paper
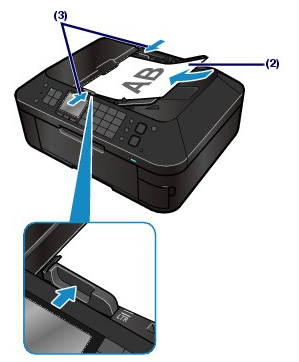
Loading Documents in the ADF (Auto Document Feeder)
You can load documents to copy, fax, or scan in the ADF (Auto Document Feeder).
Caution
1. Make sure that any original has been removed from the platen glass.
2. Load a document in the ADF.
(1) Open the document tray.
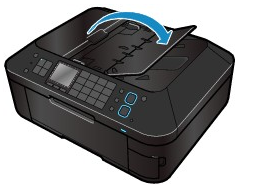
(2) Insert the document in the document tray until you hear a beep sound.
Load the document WITH THE SIDE TO SCAN FACING UP in the document tray.
Caution
(3) Adjust the document guides to match the width of the document.
Do not slide the document guides too hard against the document. The document may not be fed properly.
Caution
You can specify the output setting when scanning both sided originals in Two-sided paper output setting of Device user settings. You can select whether to output the pages in correct order or with front and back reversed. The reverse setting prioritizes scanning speed.
Cause and solution
Check 3: Make sure of the following when you load paper.
However, proper feeding of paper may not be possible at this maximum capacity depending on the type of paper or environmental conditions (either very high or low temperature and humidity). In such cases, reduce the sheets of paper you load at a time to less than half of the paper load limit.
Paper Sources to Load Paper
The machine has two paper sources to feed paper; cassette and rear tray.
You can load paper in either one of the paper sources, depending on the page size and media type of paper. Paper is fed from the cassette or rear tray depending on the selection of the page size or media type.
-⋗ [ Media Types You Can Use ]
Caution
For details on how to load paper in each paper source, see below.
-⋗ Refer to [ Loading Plain Paper in the Cassette ] within this webpage.
-⋗ Refer to [ Loading Photo Paper in the Rear Tray ] within this webpage.
-⋗ [ Loading Envelopes in the Rear Tray ]
- Loading Plain Paper in the cassette
When you use A4, B5, A5, or Letter-sized plain paper, load it in the cassette.
The machine feeds paper from the cassette automatically by selecting plain paper (A4, B5, A5, or Letter size) in the print settings with the operation panel or the printer driver when printing.
- Loading Photo Paper / Envelopes in the rear tray
When you use photo paper, load it in the rear tray.
The machine feeds paper from the rear tray automatically by selecting the media types other than plain paper, such as photo paper, in the print settings with the operation panel or the printer driver when printing.
When you use plain paper other than A4, B5, A5, or Letter size, also load it in the rear tray.
Loading Plain Paper in the Cassette
You can load only A4, B5, A5, or Letter-sized plain paper in the cassette.
Load other sizes or types of paper in the rear tray.
Caution
For details on the Canon genuine paper, see [ Media Types You Can Use ].
For the page size and paper weight you can use for this machine, see [ Media Types You Can Use ].
1. Prepare paper.
Align the edges of paper. If paper is curled, flatten it.
Caution
For details on how to flatten curled paper, see [ Load the paper after correcting its curl. ] in [ Paper Is Smudged/Printed Surface Is Scratched ].
2. Load paper.
(1) Pull out the cassette from the machine.
(2) Slide the paper guide (A) to align with the mark of page size.
The paper guide (A) will stop when it aligns with the corresponding page size mark.
(3) Load the paper stack WITH THE PRINT SIDE FACING DOWN and THE LEADING EDGE TO THE FAR SIDE, and align it against the right side of the cassette.
Caution
(4) Slide the paper guide (B) on the left to align completely with the side of the paper stack.
Caution
(5) Insert the cassette into the machine.
Push the cassette all the way into the machine.
3. Open the paper output tray gently.
Caution
After loading paper
Loading Photo Paper in the Rear Tray
Load photo paper in the rear tray. When you use plain paper other than A4, B5, A5, or Letter size, also load it in the rear tray.
Caution
1. Prepare paper.
Align the edges of paper. If paper is curled, flatten it.
Caution
For details on how to flatten curled paper, see [ Load the paper after correcting its curl. ] in [ Paper Is Smudged/Printed Surface Is Scratched ].
2. Load paper.
(1) Open the paper support, raise it, then tip it back.
(2) Open the paper output tray gently.
(3) Slide the paper guides (A) to open them, and load the paper in the center of the rear tray WITH THE PRINT SIDE FACING YOU.
(4) Slide the paper guides (A) to align them with both sides of the paper stack.
Do not slide the paper guides too hard against the paper. The paper may not be fed properly.
Caution
Caution
Caution
After loading paper
Loading Documents in the ADF (Auto Document Feeder)
You can load documents to copy, fax, or scan in the ADF (Auto Document Feeder).
Caution
1. Make sure that any original has been removed from the platen glass.
2. Load a document in the ADF.
(1) Open the document tray.
(2) Insert the document in the document tray until you hear a beep sound.
Load the document WITH THE SIDE TO SCAN FACING UP in the document tray.
Caution
(3) Adjust the document guides to match the width of the document.
Do not slide the document guides too hard against the document. The document may not be fed properly.
Caution
You can specify the output setting when scanning both sided originals in Two-sided paper output setting of Device user settings. You can select whether to output the pages in correct order or with front and back reversed. The reverse setting prioritizes scanning speed.
Cause and solution
Check 4: Check to see if the paper you are printing on is not too thick or curled.
Do not use the following types of paper. Using such paper will cause not only unsatisfactory results, but also the machine to jam or malfunction.
Paper Sources to Load Paper
The machine has two paper sources to feed paper; cassette and rear tray.
You can load paper in either one of the paper sources, depending on the page size and media type of paper. Paper is fed from the cassette or rear tray depending on the selection of the page size or media type.
-⋗ [ Media Types You Can Use ]
Caution
For details on how to load paper in each paper source, see below.
-⋗ Refer to [ Loading Plain Paper in the Cassette ] within this webpage.
-⋗ Refer to [ Loading Photo Paper in the Rear Tray ] within this webpage.
-⋗ [ Loading Envelopes in the Rear Tray ]
- Loading Plain Paper in the cassette
When you use A4, B5, A5, or Letter-sized plain paper, load it in the cassette.
The machine feeds paper from the cassette automatically by selecting plain paper (A4, B5, A5, or Letter size) in the print settings with the operation panel or the printer driver when printing.
- Loading Photo Paper / Envelopes in the rear tray
When you use photo paper, load it in the rear tray.
The machine feeds paper from the rear tray automatically by selecting the media types other than plain paper, such as photo paper, in the print settings with the operation panel or the printer driver when printing.
When you use plain paper other than A4, B5, A5, or Letter size, also load it in the rear tray.
Loading Plain Paper in the Cassette
You can load only A4, B5, A5, or Letter-sized plain paper in the cassette.
Load other sizes or types of paper in the rear tray.
Caution
For details on the Canon genuine paper, see [ Media Types You Can Use ].
For the page size and paper weight you can use for this machine, see [ Media Types You Can Use ].
1. Prepare paper.
Align the edges of paper. If paper is curled, flatten it.
Caution
For details on how to flatten curled paper, see [ Load the paper after correcting its curl. ] in [ Paper Is Smudged/Printed Surface Is Scratched ].
2. Load paper.
(1) Pull out the cassette from the machine.
(2) Slide the paper guide (A) to align with the mark of page size.
The paper guide (A) will stop when it aligns with the corresponding page size mark.
(3) Load the paper stack WITH THE PRINT SIDE FACING DOWN and THE LEADING EDGE TO THE FAR SIDE, and align it against the right side of the cassette.
Caution
(4) Slide the paper guide (B) on the left to align completely with the side of the paper stack.
Caution
(5) Insert the cassette into the machine.
Push the cassette all the way into the machine.
3. Open the paper output tray gently.
Caution
After loading paper
Loading Photo Paper in the Rear Tray
Load photo paper in the rear tray. When you use plain paper other than A4, B5, A5, or Letter size, also load it in the rear tray.
Caution
1. Prepare paper.
Align the edges of paper. If paper is curled, flatten it.
Caution
For details on how to flatten curled paper, see [ Load the paper after correcting its curl. ] in [ Paper Is Smudged/Printed Surface Is Scratched ].
2. Load paper.
(1) Open the paper support, raise it, then tip it back.
(2) Open the paper output tray gently.
(3) Slide the paper guides (A) to open them, and load the paper in the center of the rear tray WITH THE PRINT SIDE FACING YOU.
(4) Slide the paper guides (A) to align them with both sides of the paper stack.
Do not slide the paper guides too hard against the paper. The paper may not be fed properly.
Caution
Caution
Caution
After loading paper
Loading Documents in the ADF (Auto Document Feeder)
You can load documents to copy, fax, or scan in the ADF (Auto Document Feeder).
Caution
1. Make sure that any original has been removed from the platen glass.
2. Load a document in the ADF.
(1) Open the document tray.
(2) Insert the document in the document tray until you hear a beep sound.
Load the document WITH THE SIDE TO SCAN FACING UP in the document tray.
Caution
(3) Adjust the document guides to match the width of the document.
Do not slide the document guides too hard against the document. The document may not be fed properly.
Caution
You can specify the output setting when scanning both sided originals in Two-sided paper output setting of Device user settings. You can select whether to output the pages in correct order or with front and back reversed. The reverse setting prioritizes scanning speed.
Cause and solution
Check 5: Make sure of the following when you load envelopes.
When printing on envelopes, refer to [ Loading Envelopes in the Rear Tray ], and prepare the envelopes before printing.
Once you have prepared the envelopes, load them in portrait orientation. If the envelopes are placed in landscape orientation, they will not feed properly.
Cause and solution
Check 6: Confirm that the media type and the paper size settings correspond with the loaded paper.
Cause and solution
Check 7: Remove the foreign object in the cassette
Cause and solution
Check 8: Make sure that there are not any foreign objects in the rear tray
If the paper tears in the rear tray, see [ Paper Jams ] to remove it.
If there are any foreign objects in the rear tray, be sure to turn off the machine, unplug it from the power supply, then remove the foreign object.
Cause and solution
Check 9: Clean the paper feed roller.
Caution
Cleaning the Paper Feed Roller
If the paper feed roller is dirty or paper powder is attached to it, paper may not be fed properly.
In this case, clean the paper feed roller. Cleaning will wear out the paper feed roller, so perform this only when necessary.
You need to prepare: three sheets of A4 or Letter-sized plain paper
1. Make sure that the power is turned on.
2. Open the paper output tray gently, and open the output tray extension.
Caution
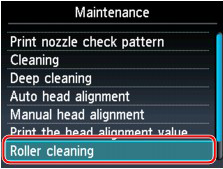
3. Select Roller cleaning.
(1) Select
The setup menu screen will appear.
(2) Select 
The Maintenance screen will appear.
(3) Select Roller cleaning, then press the OK button.
The confirmation screen will appear.
(4) Select Yes, then press the OK button.
(5) Select the paper source to clean (Rear tray or Cassette), then press the OK button.
4. Clean the paper feed roller without paper.
(1) Follow the message to remove any paper from the paper source you selected in (5) of step 3.
(2) Press the OK button.
The paper feed roller will rotate as it is cleaned.
5. Clean the paper feed roller with paper.
(1) Make sure that the paper feed roller has stopped rotating, then follow the message to load three or more sheets of A4 or Letter-sized plain paper in the paper source you selected in (5) of step 3.
(2) Press the OK button.
The machine starts cleaning. The cleaning will be complete when the paper is ejected.
(3) When the completion message appears, press the OK button.
The screen will return to the Maintenance screen.
Caution
If the problem is not resolved after cleaning the paper feed roller, contact the service center.
Cleaning the Protrusions Inside the Machine
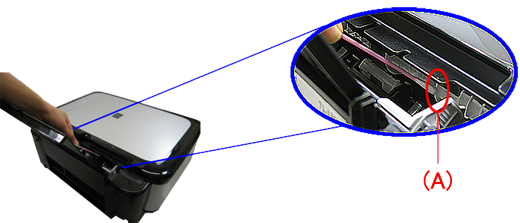
(The photo is the MP560.)
1. Make sure that the power is turned on.
2. Open the paper output tray gently, and open the output tray extension.
Caution
3. Select Roller cleaning.
(1) Select
The setup menu screen will appear.
(2) Select
The Maintenance screen will appear.
(3) Select Roller cleaning, then press the OK button.

The confirmation screen will appear.
(4) Select Yes, then press the OK button.
(5) Open the Rear Tray.
(6) Place a moistened cotton swab, etc. to one of the protrusions (A) of the feed roller shaft.
(7) Select the paper source to clean (Rear tray), and press the OK button.
Paper feed roller cleaning starts and the shaft will rotate. While the shaft is rotating, clean the protrusions (A) by keeping the swab touching to them one by one.
(8) Repeat steps 6 and 7 for each protrusion (A) of the feed roller shaft until you clean all of them.
Cause and solution
Check 10: If two or more sheets of paper feed from the cassette at once, clean the inside of the cassette.
For information on cleaning the inside of the cassette, refer to [ Cleaning the Pad in the Cassette ].
Cause and solution
Check 11: Is the rear cover closed completely?
Paper may be jammed if the Rear Cover is not closed completely. Push the Rear Cover until it is closed completely.