Solution
Initializing the Network Settings Using the Remote UIInitializing the Network Settings Using FTP Client
Initializing the Network Settings Using NetSpot Device Installer
Initializing the Network Settings Using the Reset Button
If you want to reset the network settings to the default values, use the Remote UI, FTP Client, or NetSpot Device Installer.
Even if none of the above methods work, you can initialize the network settings by using the reset button on the printer.
Caution
Make sure that the printer is not operating before initializing the network settings. If you initialize the network settings while the printer is printing or receiving data, the received data may not be printed properly, or may result in paper jams or damage to the printer.
Initializing the Network Settings Using the Remote UI
1. Start the Remote UI.
1-1. Display the Printer Status Window.
For details on methods for displaying the Printer Status Window, see [Displaying the Printer Status Window].
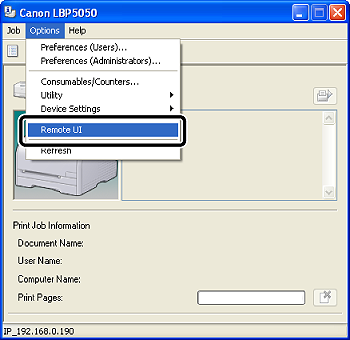
1-2. From the [Options] menu, select [Remote UI].
Caution
You can also start the Remote UI by entering the IP address of the printer in a web browser.
For details on starting the Remote UI by entering the IP address of the printer in a web browser, see "User's Guide" (HTML manual) in the CD-ROM supplied with the printer.
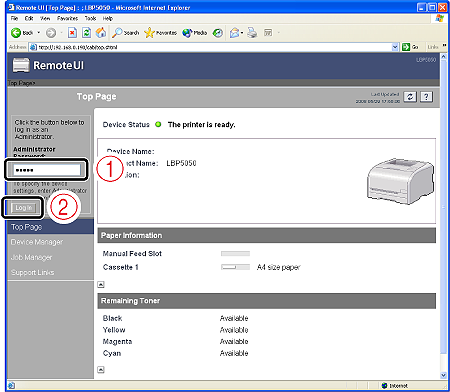
2. Enter [Administrator Password] (1), then click [Log In] (2).
Caution
If the password is not specified, it is not required to enter any value.
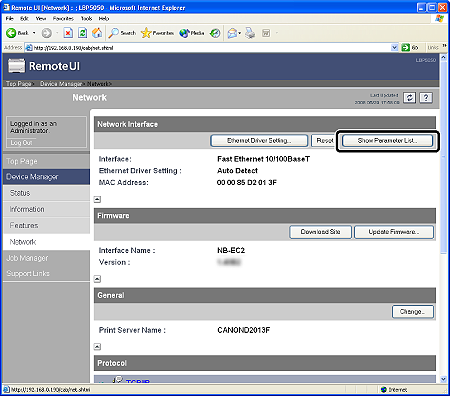
3. From the [Device Manager] menu, select [Network].
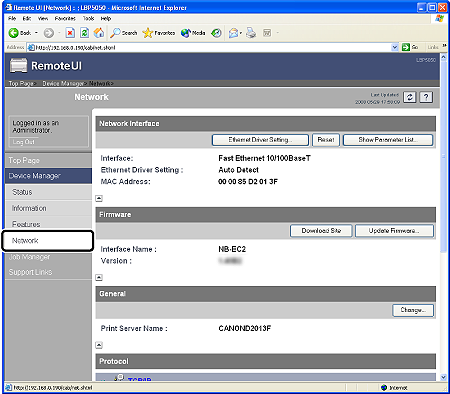
4. Click [Show Parameter List] in [Network Interface].
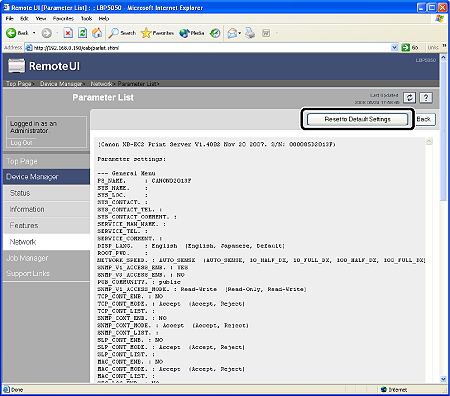
5. Click [Reset to Default Settings].
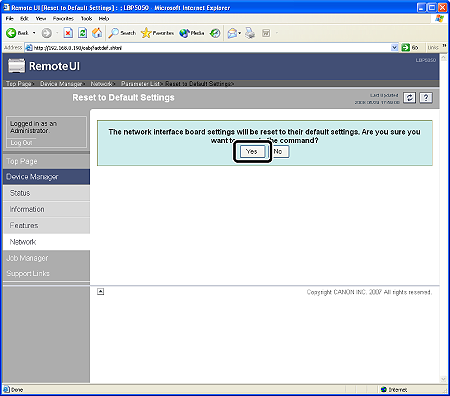
6. Clicking [Yes] initializes the network settings.
Clicking [No] does not initialize the network settings but displays the original page.
Initializing the Network Settings Using FTP Client
1. Run Command Prompt.

From the [Start] menu, select [Programs] ⋗ [Accessories] ⋗ [Command Prompt].


From the [Start] menu, select [All Programs] ⋗ [Accessories] ⋗ [Command Prompt].
2. Enter the following command, then press the [ENTER] key on your keyboard.
ftp ⋖the IP address of the printer⋗
Input Example: ftp 192.168.0.215
Caution
If you are not sure about the IP address of the printer, check it using any of the following procedures.
- Referring to Network Status Print [Performing Network Status Print]
- Consulting your network administrator
3. Enter "root" as the user name, then press the [ENTER] key on your keyboard.
4. Enter the password, then press the [ENTER] key on your keyboard.
If the password has not been specified yet, do not enter any value, but press the [ENTER] key on your keyboard.
5. Enter the following command, then press the [ENTER] key on your keyboard.
get defaults
The defaults file (the list of the default values of the network settings) is downloaded.
Caution
The download directory for the defaults file varies depending on the operating system or settings.
If you cannot find the defaults file, browse the defaults file using the file browse function of the operating system.
6. Enter the following command, then press the [ENTER] key on your keyboard.
put defaults CONFIG
7. Enter the following command, then press the [ENTER] key on your keyboard to reset the printer's network board.
get reset
After completing the reset of the printer's network board, the settings are effective.
Caution
The settings also become effective by restarting the printer (Turn OFF the printer once, wait for 10 seconds or longer, and then turn it ON.).
8. Enter "quit", then press the [ENTER] key on your keyboard.
9. Enter "exit", then press the [ENTER] key on your keyboard.
Command Prompt exits.
Initializing the Network Settings Using NetSpot Device Installer
Caution
If you are using Windows XP SP2 or another operating system equipped with Windows Firewall, and the Windows Firewall is enabled, you cannot search for the printers on a subnet that is different from the one that the computers using NetSpot Device Installer are on.
To search for such printers and initialize the network settings, you need to perform either of the following procedures.
- Adding "NetSpot Device Installer" to the [Exceptions] sheet in the [Windows Firewall] dialog box (See Readme of NetSpot Device Installer)
- Installing NetSpot Device Installer (You can add it to Windows Firewall during the installation.)
To display Readme of NetSpot Device Installer, click [ 
Caution
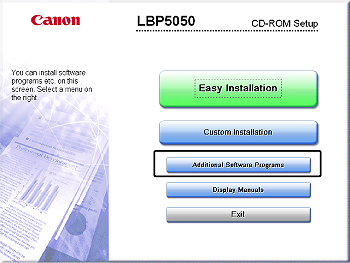
1. Insert the CD-ROM supplied with the printer into the CD-ROM drive.
If the CD-ROM is already in the drive, eject the disk and re-insert it into the drive.
Caution
- If you are using an operating system other than Windows Vista, select [Run] from the [Start] menu, enter "D:\English\MInst.exe", and then click [OK].
- If you are using Windows Vista, enter "D:\English\MInst.exe" in [Start Search] under the [Start] menu, and then press the [ENTER] key on your keyboard.
2. Click [Additional Software Programs].
3. Click [Start] in [NetSpot Device Installer for TCP/IP].
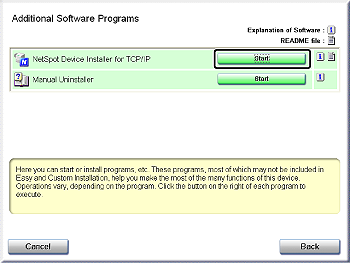
If the [License Agreement] dialog box appears, confirm the contents, and then click [Yes].
NetSpot Device Installer runs, and the target printer search starts.
Caution
If you are using Windows Vista and the [User Account Control] dialog box appears, click [Continue].
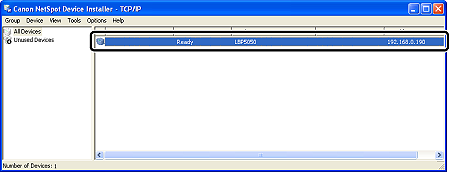
4. Select the printer to be initialized.
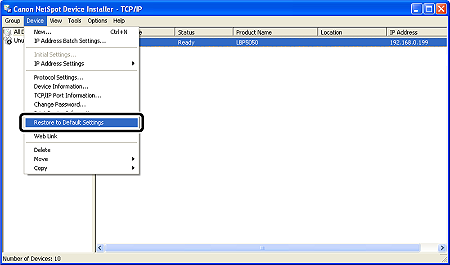
5. Select [Restore to Default Settings] from the [Device] menu.
6. Click [Yes].

7. Check the displayed message.

Click [OK].
To perform a reset operation properly, wait for approximately 20 seconds or longer as is after clicking [OK].
The settings are effective after resetting of the network board is completed.
Click [OK].
Cycling the power of the printer enables the settings.
Initializing the Network Settings Using the Reset Button
Even if any methods of Remote UI, FTP Client, and NetSpot Device Installer do not work, you can initialize the network settings by using the reset button on the printer.
1. Turn the printer OFF.
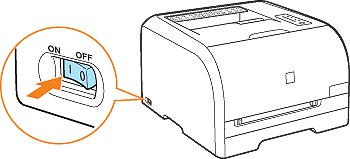
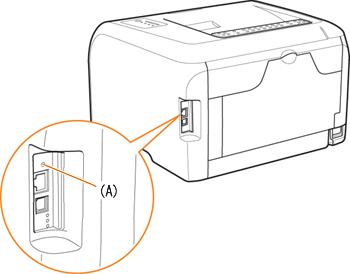
2. While pressing the reset button (A), turn the printer ON.
Press the reset button with the tip of a ball-point pen etc.