Issue
If a message is displayed on the Fax standby screen, take the corresponding action described below.
Cause and solution
Auto redial
The machine is waiting to redial the recipient's number because the line was busy or the recipient did not answer when you tried to send a document. Wait for the machine to automatically redial the number. If you want to cancel automatic redialing, wait until the machine starts dialing the number, then press the Stop button. You can also delete the document from machine's memory to cancel automatic redialing.
Sending Faxes by Entering Fax/Telephone Number
This section describes dialing and sending faxes directly by entering the fax/telephone numbers.
Caution
1. Make sure that the machine is turned on.
2. Load documents on the platen glass or in the ADF.
Caution
3. Flick the HOME screen, then tap 
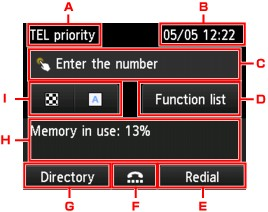
The Fax standby screen is displayed.
A. Receive mode
The receive mode selected currently is displayed.
B. Date and time
The date and time are displayed.
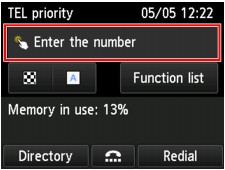
C. Entry field of fax/telephone numbers
Tap to display the screen to enter the fax/telephone numbers.
D. Function list
You can use the each fax function and change the setting for the fax.
E. Redial
Tap to send faxes with redialing.
-⋗ See [ Resending Faxes (Redialing a Busy Number) ]in this page.
F. On hook dial
Tap to send faxes with the on hook dial function.
G. Directory
You can select a registered fax/telephone number.
H. Current state
The current state is displayed.
I. Scan contrast and resolution
Caution
4. Dial the recipient's fax/telephone number.
(1) Tap the entry field of fax/telephone numbers.
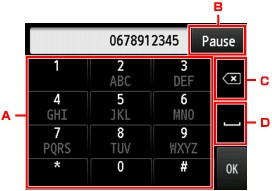
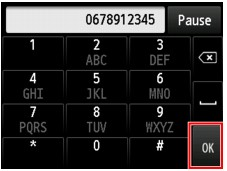
(2) Enter the fax/telephone number.
A. Numeric keys
Enters the number.
B. Pause
Enters a pause "P".
C. Delete
Deletes the entered number.
D. Blank space
Enters a blank space.
(3) Tap OK.
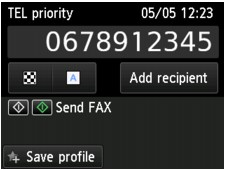
The touch screen returns to the Fax standby screen.
Caution
By tapping Save profile, you can register the current print settings as a custom setting.
5. Press the Color button for color transmission, or the Black button for black & white transmission.
The machine starts scanning the document.
Caution
6. Start sending.
The machine scans the document automatically and starts sending the fax.
Caution
After scanning the document, the confirmation screen asking you if you load the next document is displayed.
To send the scanned document, tap Send now to start sending it.
To send two or more pages, follow the message to load the next page, and tap Scan. After scanning all pages, tap Send now to start sending.
Caution
Caution
-⋗ See [ Resending Faxes (Redialing a Busy Number) ] in this page.
Unsent documents, such as those pending redial, are stored in the machine's memory. They are not stored in the case of a sending error.
-⋗ [ Document Stored in Machine's Memory ]
Resending Faxes (Redialing a Busy Number)
There are two methods of redialing: Automatic redialing and Manual redialing.
If you send a document and the recipient's line is busy, the machine will redial the number after a specified interval.
You can redial to the recipients dialed by entering the fax/telephone numbers.
Caution
Caution
-⋗ See [ Sending Faxes by Entering Fax/Telephone Number ] in this page.
You can enable or disable automatic redialing. If you enable automatic redialing, you can specify the maximum number of redial attempts and the length of time the machine waits between redial attempts.
Enable and specify the automatic redialing setting on Auto redial in Advanced FAX settings under FAX settings.
Caution
Caution
Follow the procedure below for manual redialing.
1. Make sure that the machine is turned on.
2. Load documents on the platen glass or in the ADF.
3. Flick the HOME screen, then tap 
The Fax standby screen is displayed.
4. Adjust the scan contrast and resolution as necessary.
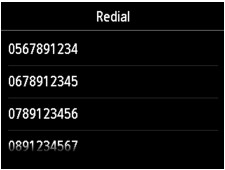
5. Tap Redial.
The Redial screen is displayed.
6. Tap a recipient's number to redial.
7. Press the Color button for color transmission, or the Black button for black & white transmission.
Caution
Caution
Cause and solution
This group dial cannot be used. Directory ##
* "##" represents a two-digit number.
The group dial cannot be specified in the on hook dial function.
Specify the individual recipient.
Cause and solution
Replace the receiver
The handset is not placed in the handset cradle correctly.
Replace the handset correctly.
Cause and solution
Try again in black & white
The recipient's fax machine is not color-compatible.
Press the Black button to resend the fax.
Alternatively, you select [ Send in black & white ] for [ Color transmission ] in [ Advanced FAX settings ] under [ FAX settings ]. The machine converts color documents into black & white data if the recipient's fax machine does not support color faxing.
Cause and solution
Failed to connect
The telephone line cable with a modular plug may not be plugged in properly.
Make sure that the cable is plugged in properly, and resend the fax after a while. If you still cannot send the fax, select [ OFF ] for [ Dial tone detect ] in [ Advanced FAX settings ] under [ FAX settings ].
Cause and solution
Received in memory
If the machine receives a fax under one of the following conditions, the machine will not be able to print the received fax and will store it in the machine's memory. When the problem is resolved as described, the fax stored in the machine's memory is printed automatically.
Replace the ink tank.
-⋗ [ Replacing an Ink Tank ]
Caution
You can set the machine to forcibly print a received fax even if the ink has run out.
Set Print when out of ink in Auto print settings under FAX settings to Print.
However, part or all of the fax may not be printed since the ink has run out.
Also, the contents of the fax will not be stored in the machine's memory.
If the ink has already run out, we recommend that Do not print be selected for Received documents in Auto print settings under FAX settings to store the received fax in the machine's memory. After you replace the ink tank and select Print for Received documents in Auto print settings, the fax stored in the machine's memory will be printed automatically.
Cause and solution
Load the paper and tap OK on the touch screen.
Load the same size of paper as that specified by Page size, then tap OK on the touch screen.
Press the HOME button and tap FAX to resume printing of the fax.
You can print the faxes stored in the machine's memory from the Memory reference screen in the Fax menu.
-⋗ [ Document Stored in Machine's Memory ]
Caution
Cause and solution
Busy/no signal
-⋗ [ Sending Faxes ]
Cause and solution
Memory is full
The machine's memory is full because it has sent/received too many documents, or a detailed document.
Print the faxes stored in the machine's memory or save them on the USB flash drive, and delete them from the machine's memory.
When sending a fax, resend it. If this message still appears, delete the faxes stored in the machine's memory, divide the faxes for sending, and send them again.
When receiving a fax, have the sender resend the faxes.
If the sending faxes is not complete or the machine was not able to print the received faxes, these faxes are stored in the machine's memory.
If an error occurred during a fax transmission, the document is not stored in the machine's memory.
In the following cases, the machine is not able to print the received fax and will automatically store the fax in its memory.
Caution
You can print or delete the faxes stored in the machine's memory. You can also save the received faxes stored in the machine's memory on the USB flash drive or forward the received faxes stored in the machine's memory to the shared folder on the computer.
-⋗ See [ Printing a Document in Machine's Memory ] in this page.
-⋗ See [ Deleting a Document in Machine's Memory ] in this page.
-⋗ See [ Saving a Document in Machine's Memory to USB Flash Drive ] in this page.
-⋗ See [ Forwarding a Document in Machine's Memory to Shared Folder on the Computer ] in this page.
Caution
When confirming, printing, or deleting a document stored in the machine's memory, you specify it by its transaction number. If you do not know the transaction number for your target document, print the list of documents (MEMORY LIST) first.
For details on how to print MEMORY LIST, see [ Printing a Document in Machine's Memory ] in this page.
Printing a Document in Machine's Memory
You can print a specified document in the machine's memory or print all the documents in its memory at a time.
When printing a specified document, you specify it by its transaction number. If you do not know the transaction number for your target document, print the list of documents (MEMORY LIST) first.
1. Make sure that the machine is turned on.
2. Load paper.
3. Flick the HOME screen, then tap 
The Fax standby screen is displayed.
4. Tap Function list.
The Function list screen is displayed.
5. Tap Memory reference.
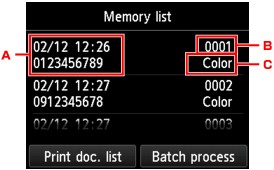
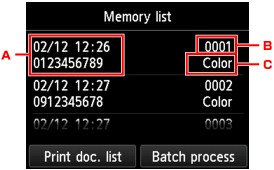
The memory list is displayed.
A. Date and time of transaction and fax/telephone number
B. Transaction number (TX/RX NO.)
A transaction number from "0001" to "4999" indicates a document being sent.
A transaction number from "5001" to "9999" indicates a document being received.
C. Color information
Color is displayed for color transmission/reception. Nothing is displayed for black & white transmission/reception.
Caution
6. Select a print menu.
You can print a list of the documents in the machine's memory by tapping Print doc. list.
When the print confirmation screen is displayed, tap Yes. The printing starts.
MEMORY LIST shows the transaction number of the unsent or unprinted fax (TX/RX NO.), transaction mode, recipient's number, and the date and time of the transaction.
A transaction number from "0001" to "4999" on MEMORY LIST indicates a document being sent. A transaction number from "5001" to "9999" on MEMORY LIST indicates a document being received.
Select a document to print on the Memory list screen, tap Print specified document.
Caution
The confirmation screen to select whether to print only the first page of the document is displayed.
If you select Yes, only the first page of the document will be printed. The document is still stored in the machine's memory.
If you select No, all pages of the document will be printed. The screen to confirm whether to delete the printed document in the machine's memory is displayed after printing.
Tap Batch process then tap Print all RX documents.
When the print confirmation screen is displayed, tap Yes. All the documents in the machine's memory are printed.
Each time a document is printed, the screen to confirm whether to delete the printed document in the machine's memory is displayed.
If you tap Yes, the printed document in the machine's memory is deleted.
Deleting a Document in Machine's Memory
You can delete a specified document in the machine's memory or delete all the documents in its memory at a time.
Caution
When deleting a specified document, you specify it by its transaction number. If you do not know the transaction number for your target document, print the list of documents (MEMORY LIST) first.
-⋗ See [ Printing a Document in Machine's Memory ] in this page.
1. Make sure that the machine is turned on.
2. Flick the HOME screen, then tap 
The Fax standby screen is displayed.
3. Tap Function list.
The Function list screen is displayed.
4. Tap Memory reference.
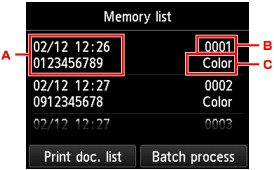
The memory list is displayed.
A. Date and time of transaction and fax/telephone number
B. Transaction number (TX/RX NO.)
A transaction number from "0001" to "4999" indicates a document being sent.
A transaction number from "5001" to "9999" indicates a document being received.
C. Color information
Color is displayed for color transmission/reception. Nothing is displayed for black & white transmission/reception.
Caution
If no document is stored in the machine's memory, There is no document in memory. is displayed. Tap OK to return to the previous screen.
5. Select a delete menu.
Select a document to delete on the Memory list screen, tap Delete specified doc..
Caution
The confirmation screen is displayed.
If you select Yes, the specified document is deleted from machine's memory.
Tap Batch process then tap Delete all documents.
The confirmation screen is displayed.
If you select Yes, all documents are deleted from machine's memory.
Saving a Document in Machine's Memory to USB Flash Drive
You can save the received faxes stored in the machine's memory to the USB flash drive as PDF files using the operation panel of the machine.
You can save a specified document in the machine's memory to the USB flash drive or save all the documents in its memory to the USB flash drive at a time.
Caution
Caution
-⋗ See [ Printing a Document in Machine's Memory ] in this page.
For details on how to delete the fax in the machine's memory, see [ Deleting a Document in Machine's Memory ] in this page.
1. Make sure that the machine is turned on.
2. Insert the USB flash drive into the USB flash drive port.
3. Flick the HOME screen, then tap 
The Fax standby screen is displayed.
4. Tap Function list.
The Function list screen is displayed.
5. Tap Memory reference.
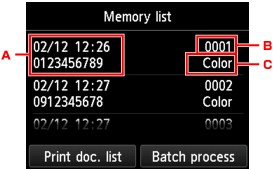
The memory list is displayed.
A.Date and time of transaction and fax/telephone number
B.Transaction number (TX/RX NO.)
A transaction number from "0001" to "4999" indicates a document being sent.
A transaction number from "5001" to "9999" indicates a document being received.
C.Color information
Color is displayed for color transmission/reception. Nothing is displayed for black & white transmission/reception.
Caution
If no document is stored in the machine's memory, There is no document in memory. is displayed. Tap OK to return to the previous screen.
6. Select a save menu.
Select a document to save on the Memory list screen, tap Save specified document.
Caution
Tap USB flash drive as the destination. The specified document is saved on the USB flash drive.
Tap Batch process then tap Save all RX documents.
Tap USB flash drive as the destination. All documents are saved on the USB flash drive.
Caution
- Folder name: CANON_SC\FAXDOC\0001
- File name (file extension: PDF): Running numbers, starting from FAX_0001
- File date: The date and time of saving as set in the machine.
-⋗ See [ Setting the Date and Time ] in this page.
Forwarding a Document in Machine's Memory to Shared Folder on the Computer
You can forward the received faxes stored in the machine's memory to the shared folder on the computer as PDF files using the operation panel of the machine.
You can forward a specified document in the machine's memory to the shared folder on the computer or forward all the documents in its memory to the shared folder on the computer at a time.
Caution
Caution
-⋗ See [ Printing a Document in Machine's Memory ] in this page.
For details on how to delete the fax in the machine's memory, see [ Deleting a Document in Machine's Memory ] in this page.
1. Make sure that the machine is turned on.
2. Make sure that the machine is connected with the destination computer.
3. Flick the HOME screen, then tap 
The Fax standby screen is displayed.
4. Tap Function list.
The Function list screen is displayed.
5. Tap Memory reference.
The memory list is displayed.
A. Date and time of transaction and fax/telephone number
B. Transaction number (TX/RX NO.)
A transaction number from "0001" to "4999" indicates a document being sent.
A transaction number from "5001" to "9999" indicates a document being received.
C. Color information
Color is displayed for color transmission/reception. Nothing is displayed for black & white transmission/reception.
Caution
6. Select a forward menu.
Select a document to forward on the Memory list screen, tap Save specified document.
Caution
Tap Destination folder as the destination.
Tap a destination folder to forward the specified document to the shared folder on the computer.
Caution
Tap Batch process then tap Save all RX documents.
Tap Destination folder as the destination.
Tap a destination folder to forward all documents to the shared folder on the computer.
Caution
Caution
Cause and solution
Awaiting document processing
The received faxes are stored in the machine's memory. Insert the writable USB flash drive, then save the received faxes to the USB flash drive manually.
The received faxes are stored in the machine's memory. Connect the machine with the computer, then forward the received faxes to the shared folder on the computer manually.
Delete the unnecessary fax from machine's memory after saving to the USB flash drive, forwarding to the shared folder on the computer, or printing.
If the sending faxes is not complete or the machine was not able to print the received faxes, these faxes are stored in the machine's memory.
If an error occurred during a fax transmission, the document is not stored in the machine's memory.
In the following cases, the machine is not able to print the received fax and will automatically store the fax in its memory.
Caution
You can print or delete the faxes stored in the machine's memory. You can also save the received faxes stored in the machine's memory on the USB flash drive or forward the received faxes stored in the machine's memory to the shared folder on the computer.
-⋗ See [ Printing a Document in Machine's Memory ] in this page.
-⋗ See [ Deleting a Document in Machine's Memory ] in this page.
-⋗ See [ Saving a Document in Machine's Memory to USB Flash Drive ] in this page.
-⋗ See [ Forwarding a Document in Machine's Memory to Shared Folder on the Computer ] in this page.
Caution
When confirming, printing, or deleting a document stored in the machine's memory, you specify it by its transaction number. If you do not know the transaction number for your target document, print the list of documents (MEMORY LIST) first.
For details on how to print MEMORY LIST, see [ Printing a Document in Machine's Memory ] in this page.
Printing a Document in Machine's Memory
You can print a specified document in the machine's memory or print all the documents in its memory at a time.
When printing a specified document, you specify it by its transaction number. If you do not know the transaction number for your target document, print the list of documents (MEMORY LIST) first.
1. Make sure that the machine is turned on.
2. Load paper.
3. Flick the HOME screen, then tap 
The Fax standby screen is displayed.
4. Tap Function list.
The Function list screen is displayed.
5. Tap Memory reference.
The memory list is displayed.
A. Date and time of transaction and fax/telephone number
B. Transaction number (TX/RX NO.)
A transaction number from "0001" to "4999" indicates a document being sent.
A transaction number from "5001" to "9999" indicates a document being received.
C. Color information
Color is displayed for color transmission/reception. Nothing is displayed for black & white transmission/reception.
Caution
6. Select a print menu.
You can print a list of the documents in the machine's memory by tapping Print doc. list.
When the print confirmation screen is displayed, tap Yes. The printing starts.
MEMORY LIST shows the transaction number of the unsent or unprinted fax (TX/RX NO.), transaction mode, recipient's number, and the date and time of the transaction.
A transaction number from "0001" to "4999" on MEMORY LIST indicates a document being sent. A transaction number from "5001" to "9999" on MEMORY LIST indicates a document being received.
Select a document to print on the Memory list screen, tap Print specified document.
Caution
The confirmation screen to select whether to print only the first page of the document is displayed.
If you select Yes, only the first page of the document will be printed. The document is still stored in the machine's memory.
If you select No, all pages of the document will be printed. The screen to confirm whether to delete the printed document in the machine's memory is displayed after printing.
Tap Batch process then tap Print all RX documents.
When the print confirmation screen is displayed, tap Yes. All the documents in the machine's memory are printed.
Each time a document is printed, the screen to confirm whether to delete the printed document in the machine's memory is displayed.
If you tap Yes, the printed document in the machine's memory is deleted.
Deleting a Document in Machine's Memory
You can delete a specified document in the machine's memory or delete all the documents in its memory at a time.
Caution
When deleting a specified document, you specify it by its transaction number. If you do not know the transaction number for your target document, print the list of documents (MEMORY LIST) first.
-⋗ See [ Printing a Document in Machine's Memory ] in this page.
1. Make sure that the machine is turned on.
2. Flick the HOME screen, then tap 
The Fax standby screen is displayed.
3. Tap Function list.
The Function list screen is displayed.
4. Tap Memory reference.
The memory list is displayed.
A. Date and time of transaction and fax/telephone number
B. Transaction number (TX/RX NO.)
A transaction number from "0001" to "4999" indicates a document being sent.
A transaction number from "5001" to "9999" indicates a document being received.
C. Color information
Color is displayed for color transmission/reception. Nothing is displayed for black & white transmission/reception.
Caution
If no document is stored in the machine's memory, There is no document in memory. is displayed. Tap OK to return to the previous screen.
5. Select a delete menu.
Select a document to delete on the Memory list screen, tap Delete specified doc..
Caution
The confirmation screen is displayed.
If you select Yes, the specified document is deleted from machine's memory.
Tap Batch process then tap Delete all documents.
The confirmation screen is displayed.
If you select Yes, all documents are deleted from machine's memory.
Saving a Document in Machine's Memory to USB Flash Drive
You can save the received faxes stored in the machine's memory to the USB flash drive as PDF files using the operation panel of the machine.
You can save a specified document in the machine's memory to the USB flash drive or save all the documents in its memory to the USB flash drive at a time.
Caution
Caution
-⋗ See [ Printing a Document in Machine's Memory ] in this page.
For details on how to delete the fax in the machine's memory, see [ Deleting a Document in Machine's Memory ] in this page.
1. Make sure that the machine is turned on.
2. Insert the USB flash drive into the USB flash drive port.
3. Flick the HOME screen, then tap 
The Fax standby screen is displayed.
4. Tap Function list.
The Function list screen is displayed.
5. Tap Memory reference.
The memory list is displayed.
A.Date and time of transaction and fax/telephone number
B.Transaction number (TX/RX NO.)
A transaction number from "0001" to "4999" indicates a document being sent.
A transaction number from "5001" to "9999" indicates a document being received.
C.Color information
Color is displayed for color transmission/reception. Nothing is displayed for black & white transmission/reception.
Caution
If no document is stored in the machine's memory, There is no document in memory. is displayed. Tap OK to return to the previous screen.
6. Select a save menu.
Select a document to save on the Memory list screen, tap Save specified document.
Caution
Tap USB flash drive as the destination. The specified document is saved on the USB flash drive.
Tap Batch process then tap Save all RX documents.
Tap USB flash drive as the destination. All documents are saved on the USB flash drive.
Caution
- Folder name: CANON_SC\FAXDOC\0001
- File name (file extension: PDF): Running numbers, starting from FAX_0001
- File date: The date and time of saving as set in the machine.
-⋗ See [ Setting the Date and Time ] in this page.
Forwarding a Document in Machine's Memory to Shared Folder on the Computer
You can forward the received faxes stored in the machine's memory to the shared folder on the computer as PDF files using the operation panel of the machine.
You can forward a specified document in the machine's memory to the shared folder on the computer or forward all the documents in its memory to the shared folder on the computer at a time.
Caution
Caution
-⋗ See [ Printing a Document in Machine's Memory ] in this page.
For details on how to delete the fax in the machine's memory, see [ Deleting a Document in Machine's Memory ] in this page.
1. Make sure that the machine is turned on.
2. Make sure that the machine is connected with the destination computer.
3. Flick the HOME screen, then tap 
The Fax standby screen is displayed.
4. Tap Function list.
The Function list screen is displayed.
5. Tap Memory reference.
The memory list is displayed.
A. Date and time of transaction and fax/telephone number
B. Transaction number (TX/RX NO.)
A transaction number from "0001" to "4999" indicates a document being sent.
A transaction number from "5001" to "9999" indicates a document being received.
C. Color information
Color is displayed for color transmission/reception. Nothing is displayed for black & white transmission/reception.
Caution
6. Select a forward menu.
Select a document to forward on the Memory list screen, tap Save specified document.
Caution
Tap Destination folder as the destination.
Tap a destination folder to forward the specified document to the shared folder on the computer.
Caution
Tap Batch process then tap Save all RX documents.
Tap Destination folder as the destination.
Tap a destination folder to forward all documents to the shared folder on the computer.
Caution
Caution
Cause and solution
Fax info does not match
Transmission has been canceled because the machine could not detect the recipient's fax machine information or the information did not match the dialed number. This message is displayed when [ Check RX FAX information ] in [ Security control ] under [ FAX settings ] is set to [ ON ].
Cause and solution
Reception rejected
Reception has been rejected because the fax matches the fax rejection condition specified by FAX reception reject in Security control under FAX settings.
Cause and solution
Waiting for report output...
If the machine receives a fax under one of the following conditions, the machine will not be able to print the reports. When the problem is resolved as described, the reports are printed automatically.
Replace the ink tank.
-⋗ [ Replacing an Ink Tank ]
Load the paper and tap OK on the touch screen.
Load the same size of paper as that specified by Page size, then tap OK on the touch screen.
Press the HOME button and tap FAX to resume printing of the report.


