

When recording on the tape in either HDV or DV standard, audio is recorded on two channels.
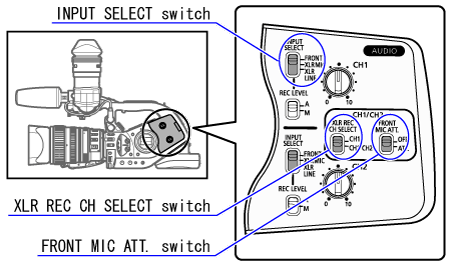
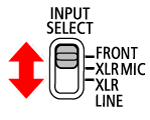
Select the audio input from FRONT (supplied microphone), XLR MIC (XLR terminals) or XLR LINE (XLR terminals). You can select the audio input independently for channel 1 and channel 2.
Microphone in Use and Input Selection
| Microphone in use | Microphone terminals | Position of the < INPUT SELECT > switch | Position of the < XLR REC CH SELECT > switch | Recorded channel on CH1 , CH2 | ||
| (CH1) | (CH2) | CH1 | CH2 | |||
| FRONT MIC XLR MIC 1 | FRONT MIC XLR CH1 | XLR MIC | FRONT | CH1 | XLR MIC 1 | MONO/(STEREO CH2) |
CH1  CH2 CH2 | XLR MIC 1 | |||||
| FRONT MIC XLR MIC 2 | FRONT MIC XLR CH2 | FRONT | FRONT | - | STEREO CH1 / (MONO) | STEREO CH2 / (MONO) |
| XLR MIC | - | MONO/ (STEREO CH1) | XLR MIC 2 | |||
| XLR MIC 1 XLR MIC 2 | XLR CH1 XLR CH2 | XLR MIC | XLR MIC | CH1 | XLR MIC 1 | XLR MIC 2 |
| CH1 CH2 | XLR MIC 1 | |||||
| XLR MIC 1 XLR LINE 2 | XLR CH1 XLR CH2 | XLR MIC | XLR LINE | CH1 | XLR MIC 1 | XLR LINE 2 |
| CH1 CH2 | XLR MIC 1 | |||||
Using the Front Microphone
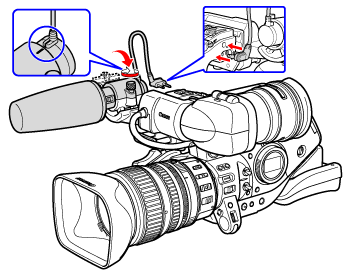
1. Align the mark on the microphone with the mark on the microphone holder and tighten the lock screw.
Plug the microphone cable to the camcorder's FRONT MIC terminals.
Caution
To use an external microphone with a diameter too small for the microphone holder to close securely, attach first the supplied adjustment band to the microphone holder and then insert the microphone.
2. Set the ⋖ INPUT SELECT ⋗ switch to ⋖ FRONT MIC ⋗.
When stereo recording, set both channels to ⋖ FRONT ⋗ . When monaural recording, see the table above to select the channel.
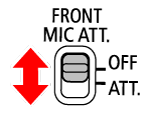
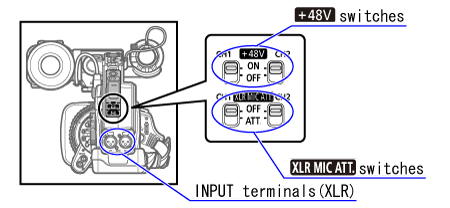
3. If necessary, turn on the microphone attenuator (20 dB) by setting the corresponding ⋖ FRONT MIC ATT. ⋗ switch to ATT.
You can select the microphone setting with the STEREO/MONO switch on the microphone itself. In the MONO position, the same monaural audio signal will be recorded on channels 1 and 2.

Using the XLR Microphone
1. Connect a microphone to one of the XLR terminals.
To supply a microphone with phantom power, set the corresponding +48V switch to ON. Make sure to connect the microphone first, before turning the phantom power on. Keep the microphone connected when turning off the phantom power.
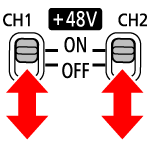
2. Set the ⋖ XLR REC CH SELECT ⋗ switch to ⋖ CH1 ⋗ or ⋖ CH1
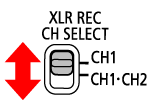
3. Set the ⋖ INPUT SELECT ⋗ switch to ⋖ XLR MIC ⋗ .
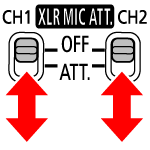
4. If necessary, turn on the microphone attenuator (20 dB) by setting the corresponding ⋖ XLR MIC ATT. ⋗ switch to ATT.
Caution
When connecting a microphone that does not support phantom power, make sure to set the ⋖+48V ⋗ switch to OFF. Otherwise the microphone may be damaged.