

Issue
Cause and solution
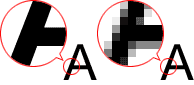
Check 1 : Increase the scanning resolution if the image is jagged.
The data in the image you have scanned is a collection of dots carrying information about brightness and color. The density of these dots is called "resolution", and resolution will determine the amount of detail your image contains. The unit of resolution is dots per inch (dpi). Dpi is the number of dots per inch (2.5 cm).
The higher the resolution (value), the more detail in your image; the lower the resolution (value), the less detail.
How to Set the Resolution
⋖ Windows ⋗
You can set the resolution in the following screens.
Resolution on the 

Output Resolution in Output Settings on the Advanced Mode tab
⋖ Mac OS X⋗
You can set the resolution in Resolution on the 

Appropriate Resolution Settings
Set the resolution according to the use of the scanned image.
| Item Type | Use | Color Mode | Appropriate Resolution |
| Color photo | Copying (Printing) | Color | 300 dpi |
| Creating a postcard | Color | 300 dpi | |
| Saving to a computer | Color | 300 dpi | |
| Using on a website or attaching to e-mail | Color | 150 dpi | |
| Black and white photo | Saving to a computer | Grayscale | 300 dpi |
| Using on a website or attaching to e-mail | Grayscale | 150 dpi | |
| Text document (document or magazine) | Copying | Color, Grayscale, or Black and White | 300 dpi |
| Attaching to e-mail | Color, Grayscale, or Black and White | 150 dpi | |
| Scanning text using OCR | Color or Grayscale | 300 dpi |
Caution
If you double the resolution, the data size of the scanned image quadruples. If the file is too large, the processing speed will slow down significantly, and you will experience inconvenience such as lack of memory. Set the minimum required resolution according to the use of the image.
Caution
When you will be printing the scanned image by enlarging it, scan by setting a higher resolution than the recommended one above.
Cause and solution
Check 2 : Set the display size to 100 %.
Some applications do not display images clearly if the display size is too small.
Cause and solution
Check 3 : Update the calibration data. (Windows)
Perform calibration by scanning after setting Execute at Every Scan in Calibration Settings to ON on the Scanner tab in the Preferences dialog box of ScanGear (scanner driver). Calibration may take time depending on your computer.
Cause and solution
Check 4 : If moire (stripe pattern) appears, take the following measures and scan again.
- Set Select Source to Magazine and set Color Mode to Color
- Select the Reduce moire checkbox in Image Processing Settings
⋖ Windows ⋗
⋖ Mac OS X ⋗
- Select Magazine for Image Adjustment
- Select the Descreen checkbox
Caution
If moire appears when you scan a digital print photo, take the above measures and scan again.
Cause and solution
Check 5 : Check the monitor's color depth. (Windows)
Cause and solution
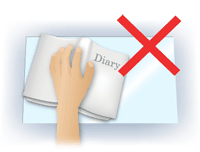
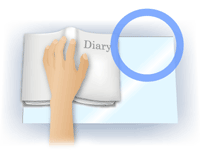
Check 6 : Clean the platen and document cover.
Cause and solution
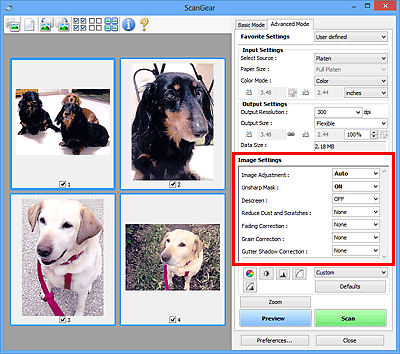
Check 7 : If the document is in poor condition (dirty, faded, etc.), then set Reduce Dust and Scratches, Fading Correction, Grain Correction, etc. in Image Settings on the Advanced Mode tab of ScanGear.
Caution
Caution
Image Settings allows you to set the following items:
Image Adjustment
When Image Adjustment is set, the brightness of the specified portion of the image is optimized. Images can be adjusted according to the automatically detected document type or the specified document type. The result of the adjustment will be reflected in the entire image.
Image Adjustment will not be applied.
Applies Image Adjustment by automatically detecting the document type. It is recommended that you normally select this setting.
Applies Image Adjustment suitable for photos.
Applies Image Adjustment suitable for magazines.
Applies Image Adjustment suitable for text documents.
Caution
Caution
Reduce Show-through
Use this function to reduce show-through in duplex documents or lighten the base color in recycled paper and other colored paper when scanning.
Show-through will not be reduced.
Select this to reduce show-through in duplex documents or lighten the base color. It is recommended that you normally select this setting.
Caution
Reduce Show-through can be set when Recommended is selected on the Color Settings tab of the Preferences dialog box and Document or Magazine is selected for Image Adjustment.
Unsharp Mask
Emphasizes the outline of the subjects to sharpen the image when scanning photos.
Unsharp Mask will not be applied.
Emphasizes the outline of the subjects to sharpen the image. It is recommended that you normally select this setting.
Descreen
Printed photos and pictures are displayed as a collection of fine dots. "Moire" is a phenomenon where uneven gradation or a stripe pattern appears when such photos or pictures printed with fine dots are scanned. Descreen is the function for reducing this moire effect.
Moire will not be reduced.
Reduces moire. It is recommended that you normally select this setting.
Caution
Even if Descreen is set to ON, some moire effects may remain if Unsharp Mask is set to ON. In that case, set Unsharp Mask to OFF.
Reduce Dust and Scratches
Scanned photos may contain white dots caused by dust or scratches. Use this function to reduce such noise.
Dust and scratches will not be reduced.
Select this to reduce small dust particles and scratches. Large ones may remain.
It is recommended that you normally select this setting.
Select this to reduce large dust particles and scratches; however, evidence of the reduction process may remain or delicate parts of the image may be removed.
Caution
This function may not be effective for some types of photos.
Caution
It is recommended that you select None when scanning printed materials.
Fading Correction
Use this function to correct photos and film that have faded with time or have a colorcast. "Colorcast" is a phenomenon where a specific color affects the entire picture due to the weather or ambient strong colors.
Fading correction will not be applied.
Select this to correct a small amount of fading and colorcast.
It is recommended that you normally select this setting.
Select this to correct a large amount of fading and colorcast. This can affect the tone of the image.
Caution
Grain Correction
Use this function to reduce graininess (roughness) in photos taken with high-speed or sensitized film.
Graininess will not be reduced.
Select this when the photo is slightly grainy.
It is recommended that you normally select this setting.
Select this when the photo is very grainy. This can affect the gradation and sharpness of the image.
Caution
Grain Correction may not be effective if the scan area is too small.
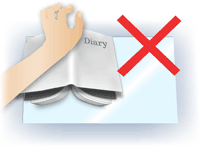
Gutter Shadow Correction
Use this function to correct shadows that appear between pages when scanning open booklets.
When you set the Gutter Shadow Correction setting in the preview image, the result will be reflected. Preview the effects before scanning, as results vary depending on the type of document and how it is pressed.
Unclear or blurred text/lines caused by curved pages are not corrected.
Gutter shadow will not be corrected.
Select this when the effect level is too strong with the medium setting.
It is recommended that you normally select this setting.
Select this when the effect level is too weak with the medium setting.
Caution
Caution
Cause and solution
Check 8 : If the color tone of images is different from the original document, take the following measures and scan again.
⋖ Windows ⋗
⋖ Mac OS X ⋗