Although it might seem daunting at first, the
Speedlite is actually one of the easiest tools to operate straight out of the box.
I call it “sun in a can”, simply because it allows me to place the light exactly where I want it, when I want it, opening up a whole new world of creative possibilities.
Just like learning how to use your camera for the first time, it requires a little bit of practice and a touch of perseverance but the reward when you finally grasp it are well worth it.
Here are my top tips to get you started.
Tip #1: Do not fear
Using flash should never be a frightening experience, in fact these days the communication between the camera and your flash (ETTL or Evaluative Through the Lens) is so advanced you can often just switch it on and it will give you good results straight up. Great results however, take just a little bit of extra know-how and exploration.
Tip #2: Understand natural light
My suggestion is always to first get a basic understanding of working with natural light before progressing to using flash. Often you will either be trying to emulate, substitute or supplement natural light with your flash. Learn to understand and see lighting directions such as front, side, rear and 45 degree light. This is of great value when deciding on where to place your flash when using it off camera.
Tip #3: Imagine the sun
Whenever I use flash, I find it helps me predict what effect it will have on my image by visualising each Speedlite as portable sunlight that is placed in the ideal position for my desired effect.
 Single Speedlite placed high at camera right to recreate light coming through a small window near the roof of this underground bakery.
Tip #4: Know when to use flash
Flash can be used in a number of practical and creative ways.
- As a main source of light to illuminate your subject when there is very little or no available ambient light, such as low lit indoor events and functions or night time photography.
- To fill in the shadows when the contrast range of a photograph is too great. Also know as "fill flash".
- On a grey overcast (low contrast) day, to add direction and contrast to the lighting, making your subject pop!
- On dark foreground subjects against a sunset background to help balance the exposure levels
- Creatively to light the whole scene creating highlights and shadows where desired (using multiple flashes off camera)
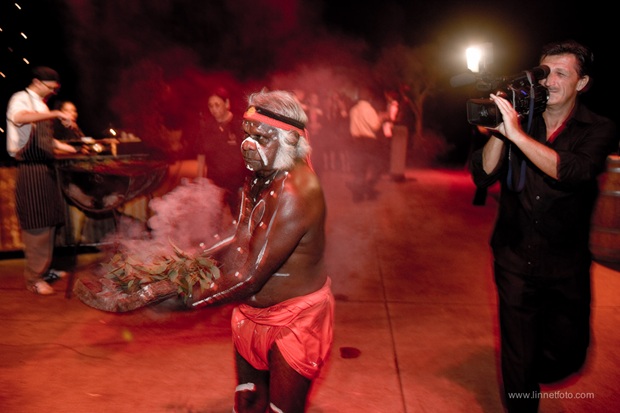
 Single on camera Speedlite in ETTL mode (+/- 0) to balance the subjects with the brighter background.
Tip #5: Know your camera's maximum sync speed
This is the fastest shutter speed at which the flash would synchronise with the camera. Generally for
DSLR cameras it is between 1/160sec and 1/250 sec. The newer breed of mirrorless cameras are able to sync at much faster shutter speeds (often up to 1/2000sec) for that very reason there’s no mirror to pop out of the way.
- All shutter speeds slower than your maximum sync speed are okay to use with flash
- For syncronizing at faster shutter shutter speeds High Speed Sync mode is available
High Speed Sync
This flash mode allows you to synchronise the flash at faster shutter speeds, but with a trade off. The best way to describe the difference is that during normal sync, when the mirror is up and out of the way and the shutter fully open, the flash discharges during that exposure. With high speed sync, the exposure happens during the flash. In other words the flash starts firing just before the exposure adding to the existing light for when the exposure happens. As a result you get considerably less power output and greater drain on the batteries. This is best used for fill flash in bright contrasting environments.
Slow Speed Sync
Because the flash burst happens so fast it can often be used to freeze movement when using slower shutter speeds to bring in more of the available light or create movement effects. Try using flash at slower shutter speeds like 1/30th, 1/15th or even slower to get something like this:
 Shot at a slower shutter speed (1/30 sec) to capture the existing background lights and colour with single on-camera Speedlite in ETTL mode. Aperture was set at f2.8.
Tip #6: Trust in ETTL
The lens flash metering uses your cameras internal light meter to measure the required flash output based on your selected aperture. This is aided by other information being relayed to the flash at the same time, such as the distance of the subject to the camera (from lens focusing information) for greater exposure accuracy. Turning the flash on and selecting the ETTL mode is basically all you need to do to get started.
- Use the Flash Exposure Compensation dial (on the flash unit or from the camera on certain models) to adjust the brightness of the flash (+/- 3 EV)
- Flash will automatically adjust in power based on the aperture that you select.
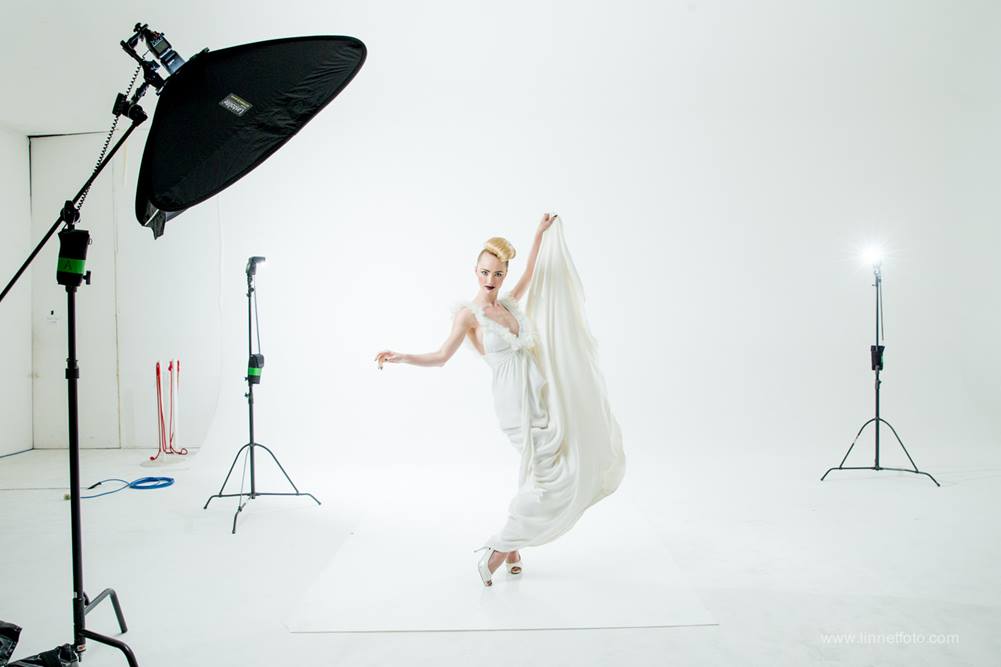 Three Speedlites set in a studio style lighting configuration. All lights are in full ETTL.
Flash Compensation
To measure the correct exposure through the viewfinder the camera measures the light reflecting back off the subject, which means that there are instances (i.e. a bride wearing a bright white highly reflective dress) where the exposure can be fooled. Just like the exposure compensation feature on your camera, the flash has one of it’s own, allowing you to increase or decrease the output of the flash to match the required exposure.
- Have a look at your shot and don’t be afraid to make a judgment call as to whether more or less flash is required
- Try reducing the power of your flash by ⅓ EV intervals for more natural looking results when balancing flash with available light
- For highly reflective subjects (i.e. bridal dress, metallic objects, snow) try +1 to +1⅔ EV
Tip #7: Use your camera settings
Use your Aperture to Control the Flash
As a rule: the power output of the flash is adjusted to match the selected aperture on the lens.
- In ETTL mode your Speedlite automatically adjusts in power based on the Aperture that you select. As you change your apertures during a shoot the Speedlite will make these adjustments each time you take a shot
- Shooting at wider Apertures such as f1.4 or f2.8 would require much less light from the flash than f11 or f16, increasing the effective distance of the flash and allowing you to shoot for longer on a single set of batteries
Your shutter controls the background
Adjusting your shutter speed in a flash exposure does not affect the brightness of your flash. Instead it allows you to control the brightness of your background or environment, which is not being lit by the flash itself.
- Referred to as "balancing flash with ambient"
- Can only be equal to or slower than the maximum sync speed of your camera ( < 1/200="" sec). High speed sync is required for faster shutter speeds
- In AV/TV shooting modes, your camera’s Exposure Compensation (not the flash compensation) allows you to adjust the ambient exposure.
Tip #8: Increase the power of your flash with your ISO
The more you increase your ISO the more powerful your flash becomes. With today's incredible high ISO performance, the Speedlite has become a very serious lighting tool.
- Increasing the ISO will also affect the overall brightness of the exposure
Tip #9: Play with flash zoom
Certain Speedlites gives you the ability to zoom your flash giving wider or more focused concentration of light, covering focal lengths of 20-200mm, or 14mm with the slide out wide angle diffuser.
- Mounted on top of the camera, the flash zoom will automatically adjust based on the focal length of the lens
- For off camera flash experiment with manually zooming the Speedlite to create spotlight effects or more dramatic lighting
Tip #10: Think about light bounce and diffuse
The big advantage of having a swivel head on an on camera Speedlite is that it allows you to bounce the light into walls and ceilings or into a reflector, umbrella or soft box, changing the characteristics of the light.
- Bounce of walls to create directional light or emulate window light
- Bounce into ceiling for more even light distribution and flatter lighting. Also great for Fill Flash.
- The larger the light source, the softer the light. Bouncing light of a larger object increases the effective size of the light source, making it softer and more complementary for portrait / people photography.
- Try tilting the flash head up 45-80 degrees (depending on how much top bounce is required) and pop out the white bounce card for softer more evenly lit photograph. More effective indoors where ceiling bounce is possible.
- The slide out wide angle diffuser can also be used to slightly reduce the harshness of direct on camera flash.
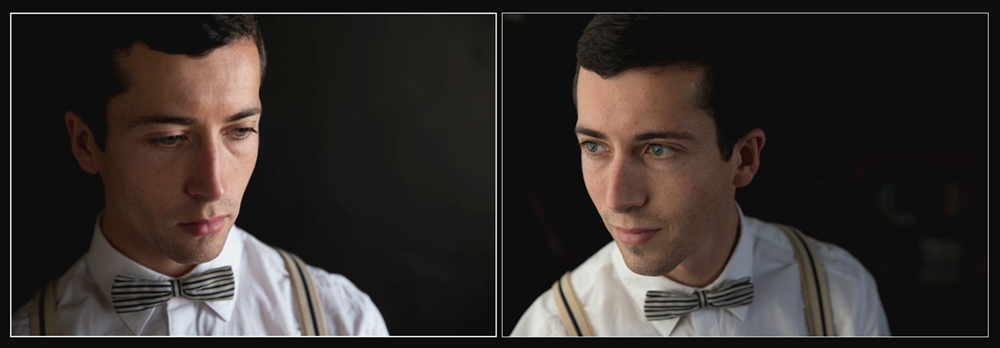 Left shot only using window light. Right shot using a single Speedlite bounced into a wall to emulate effects of window light.
Daniel Linnet
Left shot only using window light. Right shot using a single Speedlite bounced into a wall to emulate effects of window light.
Daniel Linnet is a Sydney based commercial and fine art photographer and educator, specialising in People, Automotive and the Environmental photography. A Master of Photography with the Australian Institute of Professional Photography, Daniel also founded and runs Sydney Photographic Workshops.


