
- An Astrophotographer’s Guide To Taking Incredible Photos Of The Night Sky
-

Hello!
We've noticed that you are in .
Visit Canon .
Keen to level up your astrophotography? Based in Wanaka in New Zealand, Astrophotographer Larryn Rae chats us through all things astrophotography, sharing his top tips for capturing stunning shots of the night sky. He’s got you covered for everything from gear recommendations to composition tricks. But that's not all – we’ve put together the ultimate location guide for you to discover the best locations around Australia to practice your astrophotography skills. So grab your camera and prepare to witness the magic of the cosmos through Larryn Rae's lens. It's time to shoot for the stars!
Watch Larryn’s Full Astrophotography Tutorial Here
Larryn first ignited his passion for photography at the age of 12, when he first picked up a camera. Like many aspiring photographers, he started out capturing moments with friends and the scenery around him. As he upgraded his equipment, Larryn's focus shifted towards capturing the beauty of landscapes, gravitating towards sunsets and sunrises. This passion eventually drove him to take up a Photography Diploma, to better understand the technical aspects of photography.
Taking his photography journey to the next level, Larryn embarked on an epic year-long backpacking adventure around the world. During this trip, he experimented with different forms of photography. Little did he know that it would be on this very trip that Larryn would venture into astrophotography for the first time!
“One night in Bulgaria while ‘woofing’, I found myself on the side of a mountain in the tiny village of Krushevo under some incredible clear skies. I decided to try my hand at this thing called “Astro”! Having only ever seen some star trail images online, this seemed like the obvious place to start. From the instant that first frame appeared on the back of my LCD screen, I was hooked! In truth, I was clueless, but the alure of the night sky was just a pure joy of uninhibited experimentation. I would take several long exposures, each longer than the one before up until I was shooting for 3 hours!

Photo by Larryn Rae
I returned to New Zealand and graduated from Film School, then accelerated my learning through Astro workshops. I added theory, practice and ultimately gained an expert knowledge of Astrophotography. This gave me the understanding to truly capture the night sky, and the Milky Way in particular. Hooked!”
“From that moment on I have never looked back. This passion has grown, allowing me to pursue and capture incredible images of the night sky, both in New Zealand and around the world.”
“The camera I feel works best for the shots I take is the incredible Canon EOS R5. It’s a full-frame body, with a sensor optimised for low light capture – in fact its low light performance is incredible. I ideally want something 30 MP or higher for the high-resolution images I hope to capture. To compliment the body, I am also looking for the fastest lenses possible, which enable me to capture as much light as possible in the dark sky locations I shoot in. These lenses range between 14mm and 85mm and usually have a f-stop of 1.4.
The EOS R5 is definitely the camera I would recommend, but if you are on a tighter budget then the next best option would be the Canon EOS R6 Mark II. This model also has great low light performance and colour capture for astrophotography.”
Visit our guide for more recommendations on camera gear and settings for Astrophotography.
“Preparation really is everything with Astrophotography.
Every shoot always begins with consideration to my comfort, warmth and safety. For this reason, the clothing I choose for every adventure is specific to the location and terrain I will be shooting in. In the long hours and cold temperatures I usually shoot in, having a solid layering system is absolutely necessary. As is having enough food and water to sustain me throughout the night.
I always carry a PLB (Personal Locator Beacon). I will always check this is in my bag before I head off to the location. I cannot stress enough how important this piece of equipment is. I learned the hard way, leaving behind on a few occasions! I always make sure my camera has a new formatted card in and a fresh battery ready to go. I also make sure my lenses are clean and ready to shoot before arriving to location.
I will then pack my bag with the specific Camera(s) and Lens(es) for the Astro shot I am wanting to achieve. More often than not, I carry a second body and various lenses to account for unexpected events such as an aurora or in case I want to capture a timelapse star trail at the same time. Maximising my time on any location is always my intention.
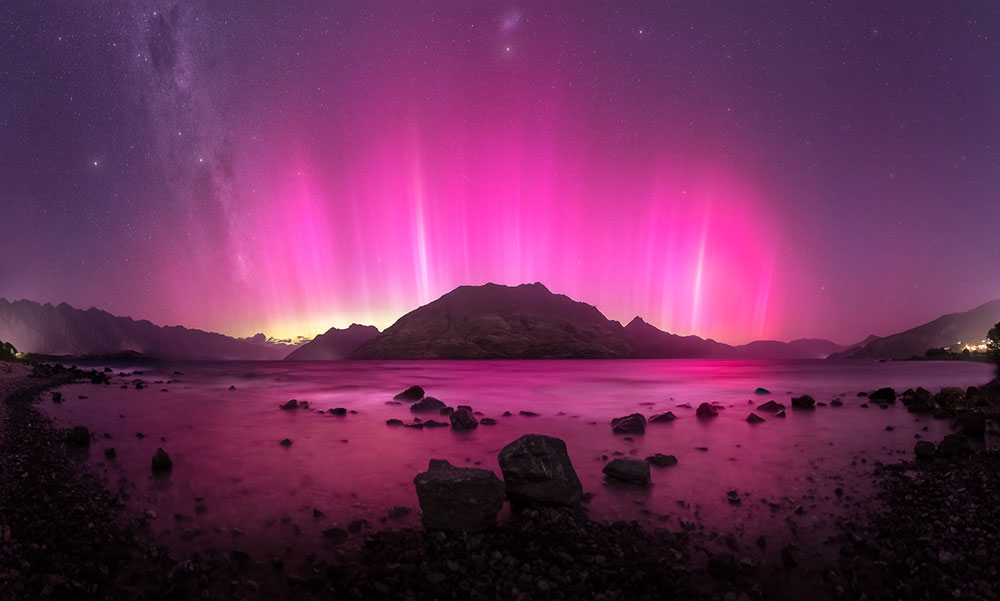
Photo by Larryn Rae
Shot at 8 secs | f/2.8 | ISO 3200 x19 Images
Some of the gear essentials for astrophotography that never leave my bag are: spare batteries, shutter release cable, lens cloths, lens warmers, power banks (for phone and camera) and SD cards.
Around 90% of the images that I capture are planned and thought out in advance. I usually create a list of locations that I am aiming to shoot within the yearly Milky Way calendar. With the inconsistent weather conditions here in New Zealand, some of these locations have taken up to five years to capture, which means understanding weather patterns is key to success.
When planning a shot, I am checking various websites and apps to give me the most accurate information possible and even though one alone is never perfect, the average of many gives you confidence of success. Some of these include: YR, Windy, Metservice, Mountain Forecast and Photopills.
I am usually looking to shoot in the dark phase of the moon cycle at dark sky locations far away from the blinding lights of the city. You usually get around 12-13 days a month where the skies are dark enough to shoot without the moon interfering.
When I have decided on my location for the night and when possible, I am generally aiming to arrive before it gets dark so I can scout the location, get the lay of the land and find an interesting foreground composition. Trying to find an interesting composition in the dark is often a lot more difficult.”
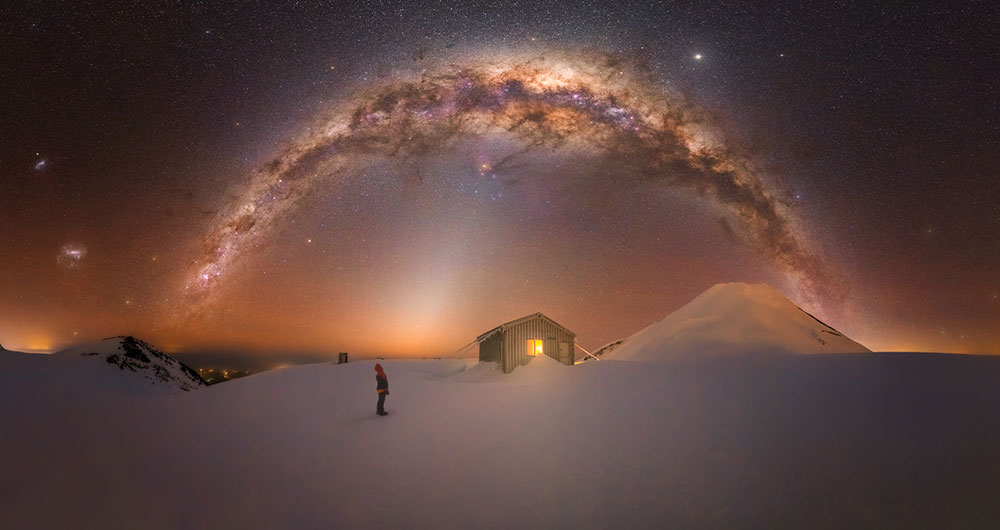
Photo by Larryn Rae
Shot at 10 secs | f/2 | ISO 12800 x35 Images
“Setting up for astrophotography is key to a successful shoot. I follow a methodical routine when setting up on location:
Ensuring it is solid and sturdy. I usually add weight for extra stability. This is the foundation for obtaining the sharpest images possible as I am usually doing longer exposures with my Star-Tracker.
Which I align it to the southern celestial pole. A Star-Tracker is a portable tracking camera mount specifically designed for star photography. The device ‘tracks’ the motion of the stars to allow you to take long exposure images without star trailing. A Star-Tracker works by moving in sync with the earth’s rotation, which in practical terms means it follows the star’s movement in the night sky, allowing you to extend your shutter speed, which simply isn’t possible using conventional methods.
By being able to shoot longer exposures, you are then able to drop your ISO down and increase your f-stop, which in turn will help produce even cleaner more detailed images.”
“When it comes to my post processing workflow, I typically only use 3 programs:
1. Lightroom
2. Photoshop
3. Autopano Giga (panorama stitching)
The first thing I always do is import my images into Lightroom. I typically start by enabling Profile Corrections and CA removal followed by Noise Reduction, +15 for Luminance and +50 for Colour. The next thing I do is set my Colour Balance, you can do this easily by increasing Saturation and Vibrance to 100 and then toggling the Temperature & Tint sliders until you have found a happy medium balance. Then reduce the Saturation and Vibrance sliders to where you feel suits the image. Then I will work on the Exposure and Contrast adjustments using the Light & Dark, Highlight & Shadow sliders.
I usually do all my ‘global adjustments’ here and once I am happy with the ‘look’ of the image, I will then import the image into Photoshop where I will make various ‘local adjustments’ which include removing any unwanted distractions and fine-tuning colour and contrast levels.
If I am editing panoramas, I will follow the same steps in Lightroom before exporting to Autopano Giga, which then stitches all the images together. Once stitched, I then take the image into Photoshop where I again make all my ‘local adjustments’ and final adjustments.
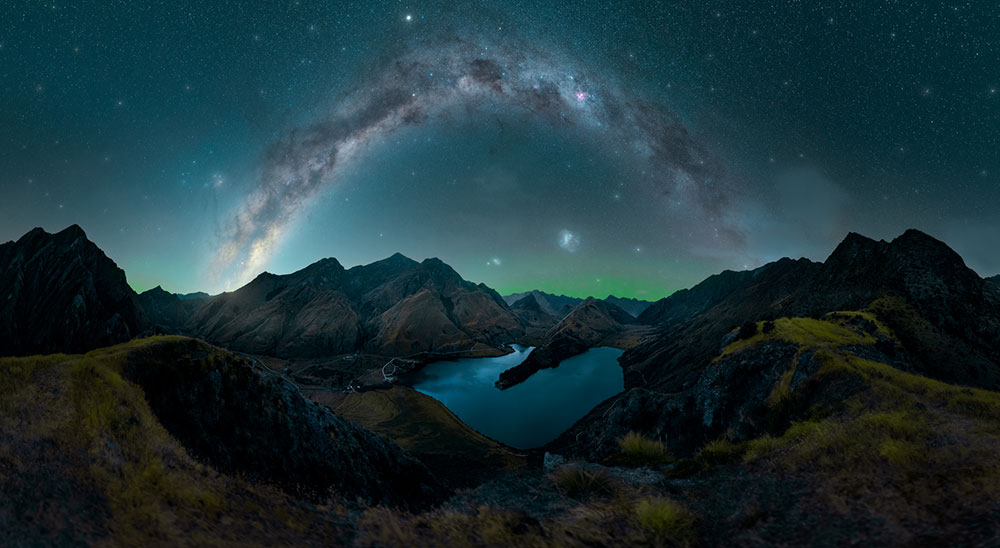
Photo by Larryn Rae
Shot at 30 secs | f/2.8 | ISO 3200 x107 Images
Then I import that final image back into Lightroom, which is where my image library is kept and any exporting for web or print is usually done from here.
I recommend all these software programs above, but as Autopano Giga has now been discontinued, I would recommend Pt Gui if you are wanting to capture panoramas, especially the large multi-row ones which are often needed to capture the Milky Way.”
We asked our community for the best locations in each Australian state to shoot Astrophotography. Here were the top picks as decided by you.
Limited light pollution in this stunning national park allows for crystal-clear views of the Milky Way and other celestial wonders.
Beautiful landscapes to capture astrophotography including the Three Sisters and canyons.
Known for Australia's highest peak, offering diverse terrains and beautiful alpine scenery for astrophotography. The high elevation and remote location make it an ideal spot for capturing breathtaking starry landscapes.
With low light pollution, Grampians National Park includes incredible rock formations and waterfalls making it the perfect place to capture astro shots.
Featuring stunning beaches, towering cliffs, and iconic landmarks like the Twelve Apostles the Great Ocean Road is a clear pick for astrophotography. With these contrasting elements this location makes for some compelling compositions under the starry sky.
Away from all the light pollution of the cities, Cobbold Gorge offers a secluded and pristine environment for astrophotography.
You can capture the beauty of the Milky Way arching over mountain ranges, valleys, and amazing panoramic views.

Image by Katie
Shot on the Canon EOS 6D Mark II | 15 secs | f/2.8 | ISO1600 | 26mm
Offers a unique experience for astrophotography with its beautiful beaches and bays. The island's secluded nature and dark skies provide an opportunity to capture the stars reflecting in the surrounding ocean.
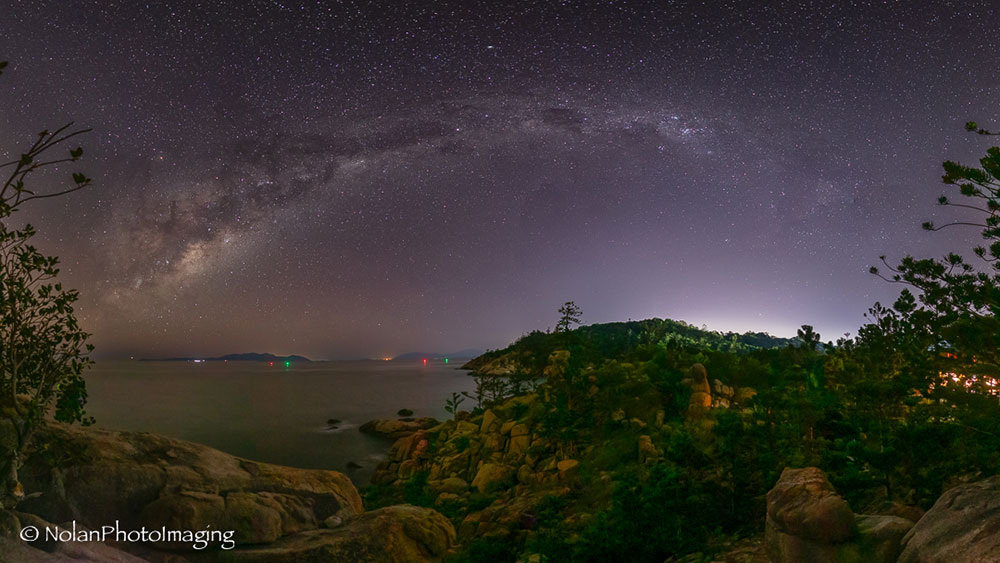
Image by Gary Nolan
Shot on the Canon EOS 5D and EF 24mm f1.4 Prime Lens | 25 secs | f/2.8 | ISO 3200 x9 Images Panorama
Combined with rugged coastlines, forests and vineyards, this location offers the perfect atmosphere for capturing star photography.
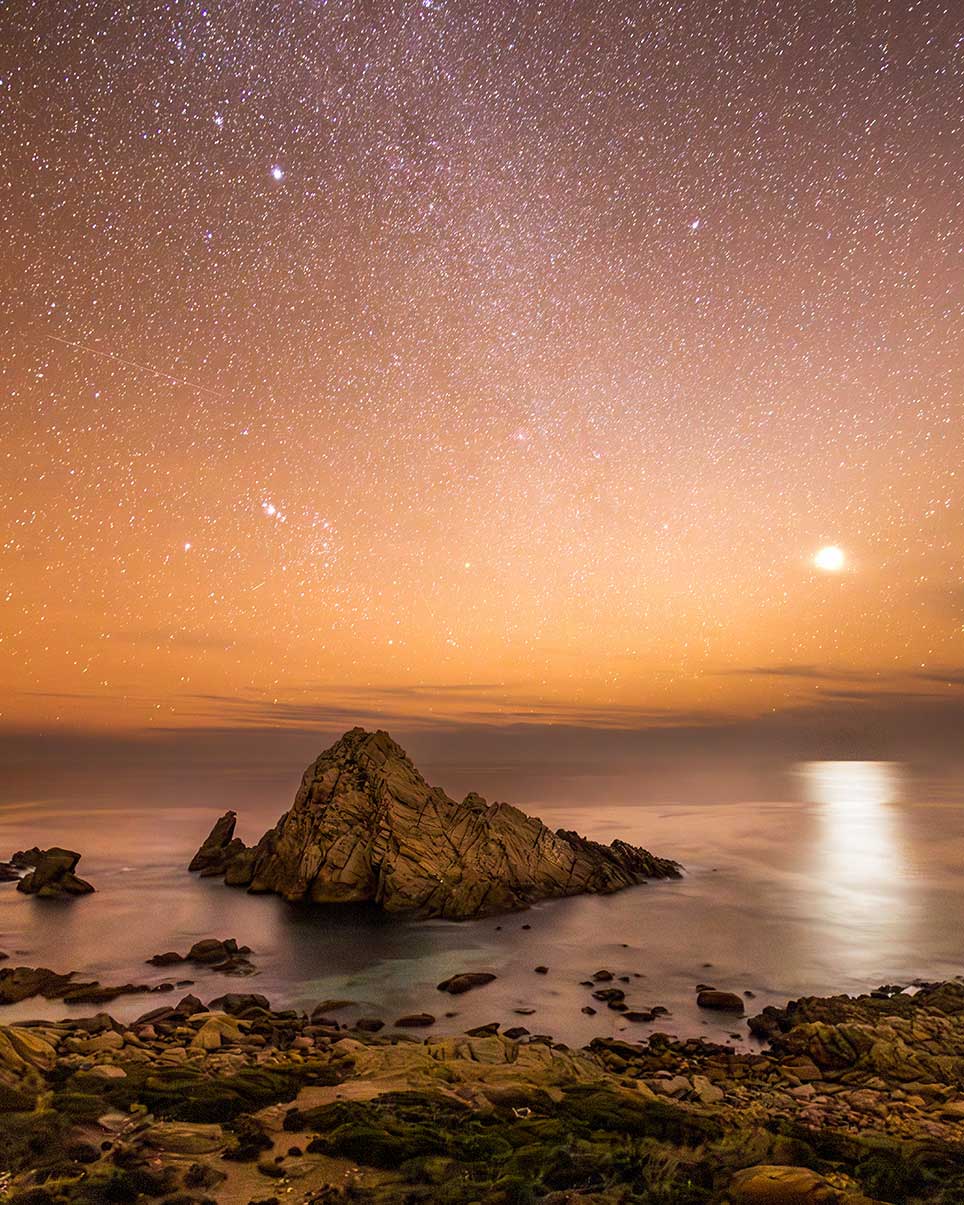
Image by Sean Scott
Shot on the Canon EOS R5 and RF 15-35mm Lens | 30 secs | f/2.8 | ISO 3200
The Pinnacles Desert in Nambung National Park has unique limestone formations rising from the desert floor, that becomes even more captivating under a clear night's sky unaffected by light pollution.
Includes dramatic gorges, ancient rock formations, and pristine rivers, providing you with the opportunity to capture those unique and stunning shots of the Milky Way.
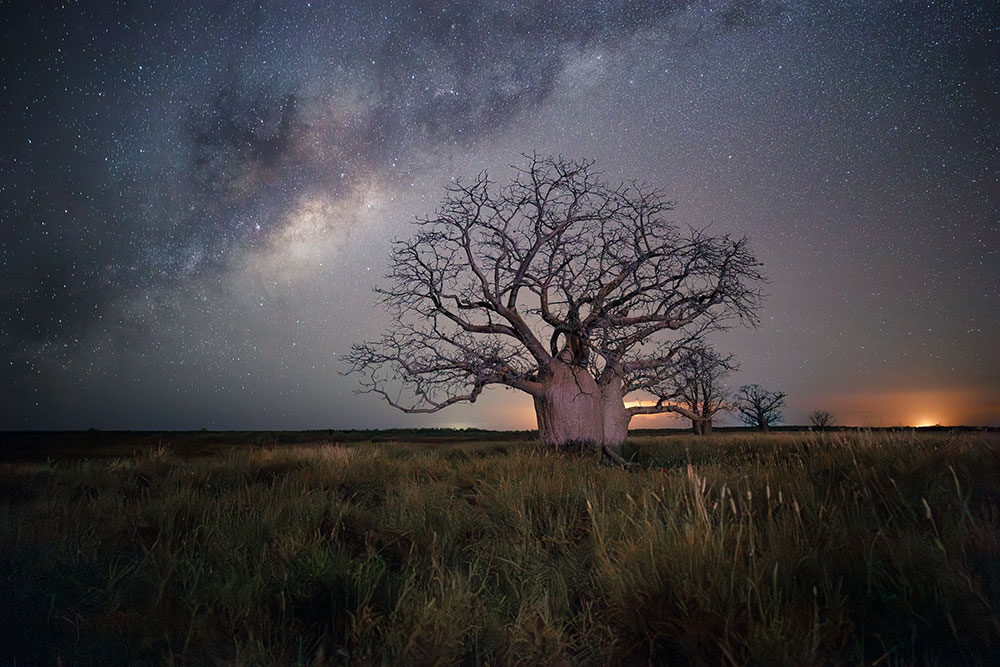
Image by Cassie Chivers
Shot on the Canon EOS 5D Mark IV and EF 16-35mm f2.8L III USM | 25 secs | f/2.8 | ISO 6400 | 20mm
The pristine lakes and forests enhance the beauty of the night sky and help provide a breathtaking backdrop for astrophotography.
With a beautiful coastline, including the iconic Wineglass Bay, Freycinet National Park offers a remarkable setting for astrophotography. The crystal-clear waters, pink granite peaks, and stunning beaches create a nice contrast against the starry night sky enabling you to capture those breathtaking Astro shots.
Located in the vast outback, you can be sure to capture amazing star photography with its unique rock formations, dark night skies and the iconic Uluru (Ayers Rock) and Kata Tjuta (The Olgas).
You can capture the stars against this National Park’s natural attractions which include stunning waterfalls, rainforests, and magnetic termite mounds making for the perfect features to capture in your Astro shoot!
We hope you’ve enjoyed this in-depth guide on how to level up your astrophotography which included helpful tips from professional astrophotographer, Larryn Rae. To wrap up, we asked Larryn if there was one piece of advice he had for getting into astrophotography what it would be -
“My biggest piece of advice for anyone from beginner to advanced, is to simply just get out and shoot! There is a famous saying that I carry with me everywhere that goes “you miss 100% of the shots you don’t take”. This mantra drives me to pursue new images and also pushes me to endure the often long cold nights in search of that single magical moment.”
Larryn Rae is a professional Astrophotographer based in Wanaka, New Zealand. Click the below links to check out his incredible work!
Instagram: https://www.instagram.com/shadowandshadenz/
Facebook: https://www.facebook.com/shadowandshadenz
Website: https://www.shadowandshade.co.nz/

Canon Ambassador, Alisha Lovrich shares her journey into sports photography as a female photographer.

Photographer and videographer, Denys Black, get's hands on with our first APS-C sensor mirrorless camera - the EOS R7.

Andy Taylor, one of Australia’s foremost cinematographers and news cameramen talks tools of the trade for cinematographers; recommended camera settings for news and documentary shooting; tips for working with Netflix; and, five pieces of career advice to help aspiring videographers.