
- How to Create a Signature Look: Build Your Own Photo & Video Presets
-

Hello!
We've noticed that you are in .
Visit Canon .
In photography and videography, a signature look is more than just an aesthetic choice – it's a storytelling tool that defines your creative brand. Your unique colour palette, tones, and mood become part of your visual identity, helping you convey emotion and narrative consistently across your work. Custom presets and LUTs (Look-Up Tables) are essential tools in this process, allowing you to apply your signature look quickly and consistently – saving time while enhancing production quality. Pairing these with the right gear, like the Canon EOS R6 Mark II, EF 16–35mm f/2.8, or RF 24–70mm f/2.8, gives you a powerful, flexible foundation for building a distinctive style that stands out.
Before you even open Lightroom or Premiere Pro, take a moment to define your creative intent. Define the mood or feeling you want your work to evoke. Consider how lens choice, lighting, and Canon camera profiles can shape this upfront. What kind of emotional response do you want your work to evoke? Are you aiming for nostalgia, tension, serenity, or bold drama? The look and feel of your visuals should be an extension of your storytelling goals.
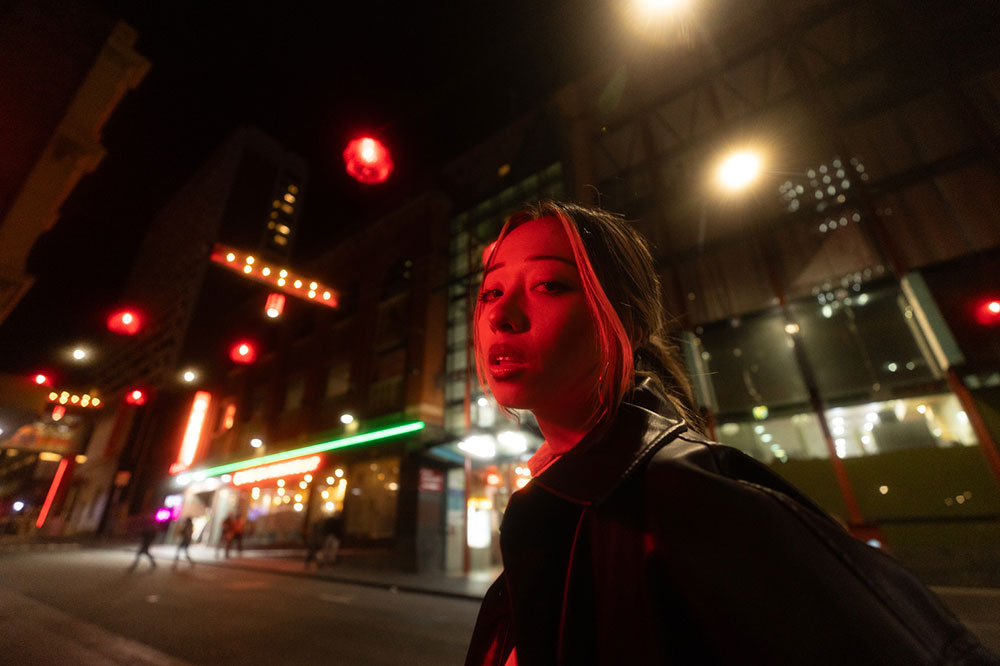
For Mitch, the goal is clear: he wants every image to feel cinematic – like it could be a still from a movie. His style leans into dark, moody tones with a heavy emphasis on contrast – think glowing reds against cool blues, rich blacks, and film-inspired gradients that give each frame weight and atmosphere. But this visual identity doesn’t start in post – it’s baked in from the beginning through lens choice, lighting, and Canon’s signature camera profiles.
Ask yourself:
• What mood should your visuals convey – nostalgic, vibrant, mysterious?
• What kind of stories are you trying to tell?
• Will your style be clean and minimal, or bold and dramatic?
These questions are your creative compass, helping you make decisions before the edit even begins.
Gear Insight:
Mitch builds his style from the ground up using the Canon EOS R6 Mark II – a hybrid powerhouse that delivers both cinematic video and sharp, detailed stills. Its 24.2MP full-frame sensor offers exceptional low-light performance and dynamic range, which is key when working with darker tones and deep shadows. Canon’s renowned colour science ensures skin tones stay natural and lifelike, even in stylised colour environments – a crucial piece when maintaining visual coherence across projects.
Go-to Lenses:
• Canon EF 16-35mm f/2.8L: This wide-angle lens is a favourite for setting the scene. It’s perfect for dramatic environmental portraits, architecture, or those wide, cinematic establishing shots that pull viewers into your world.
• Canon RF 24-70mm f/2.8L: This versatile zoom covers a huge range of focal lengths, making it ideal for everything from interviews and street-style shots to more controlled, stylised scenes. Its sharpness and reliable autofocus make it a strong backbone for any shoot.
Shooting in RAW and LOG is crucial as it provides the most dynamic range and highest quality, allowing for extensive post-processing flexibility. To get the most from your colour grading process:
• Always shoot in RAW (photo) and C-Log (video). These formats retain maximum dynamic range, giving you full control over highlights, shadows, and tones in post.
• Use lighting setups that support your final grade. Mitch prefers practical lighting—like neon signs or street lamps—to embed colour and atmosphere into his footage organically.
• When shooting portraits, consider lens compression and bokeh. A wider aperture (e.g. f/1.4–f/2.8) creates a dreamy background blur that enhances stylised looks.
Gear Tip: The R6 Mark II paired with fast RF lenses handles low-light environments exceptionally well - great for moody styles like Mitch’s.
Creating your own Lightroom preset starts with defining a consistent visual style - something that reflects your aesthetic and can be easily applied across multiple images. Begin by selecting a photo that best represents your desired mood, then work through your edits step-by-step. Think of it as building a visual recipe: once you're happy with the final look, you can save those adjustments as a reusable preset.
The key adjustments typically fall into a few core categories:
• White Balance – sets the overall colour temperature
• Tone & Contrast – controls exposure, highlights, shadows, and black points
• Tone Curve – fine-tunes contrast and depth with precise control
• HSL & Colour Grading – adjusts specific hues and adds stylistic colour toning
• Calibration – subtly shifts colour response to create a more filmic or unique base
• Detail & Lens Corrections – ensures sharpness and optical accuracy
Once you’ve dialled in your edit, save it as a preset—give it a descriptive name, and optionally assign it to a folder for easy access. This is the foundation of a faster, more consistent editing workflow.
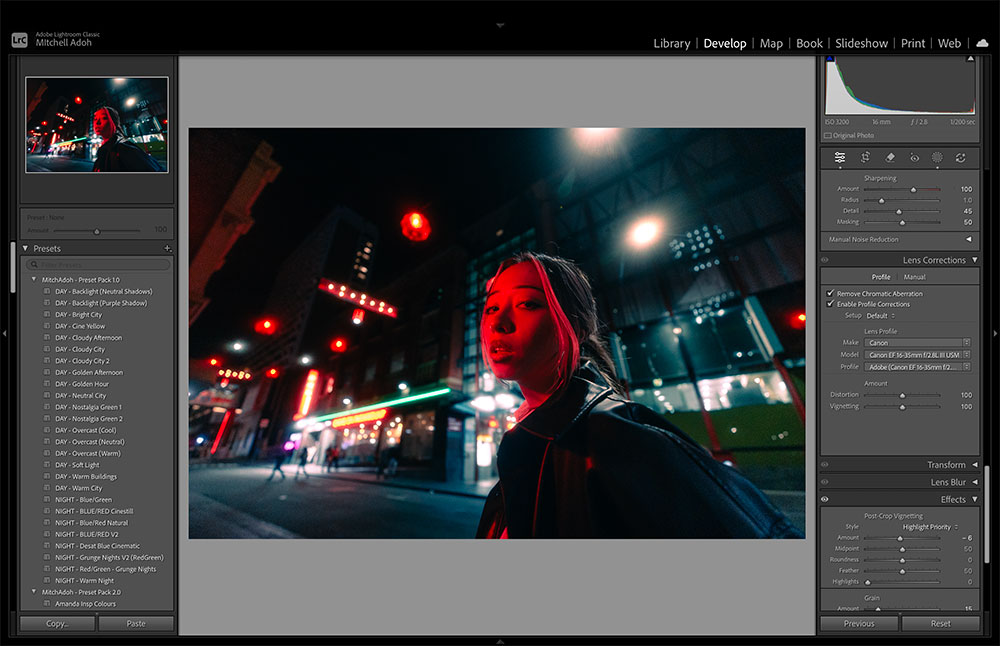
In Lightroom Classic, Mitch demonstrates how he builds his look step-by-step using these essential tools:
Key Adjustments:
• White Balance: Cooler tones (~3600K) to create a moody, night-time feel
• Contrast & Blacks: Lowered overall; shadows and blacks lifted for softness, then contrast re-added with tone curves
• Tone Curve: Adds depth by lifting mid-tones, slightly raising highlights, dropping shadows just above centre, and crushing blacks for a filmic effect
• HSL Panel: Desaturates greens and some blues, pushes reds toward cherry, shifts blues and greens toward teal for colour harmony
• Colour Grading Wheels: Builds rich red/teal contrast—shadows shifted teal, highlights amber or blue, mid-tones adjusted for balance
• Calibration Panel: Finishing touches with red primary at +25 hue/+20 saturation, blue primary at -6 hue/+10 saturation, subtle green tweaks
• Sharpening & Corrections: Sharpening at 100 (detail 45, masking 50), profile correction enabled, chromatic aberration removed, optional grain if needed
Save & Organise:
When satisfied, Mitch saves his work as a preset - naming it based on its characteristics, like "Night Mood" or "Red/Blue". This not only speeds up future workflows but also keeps his catalogue tidy and searchable.
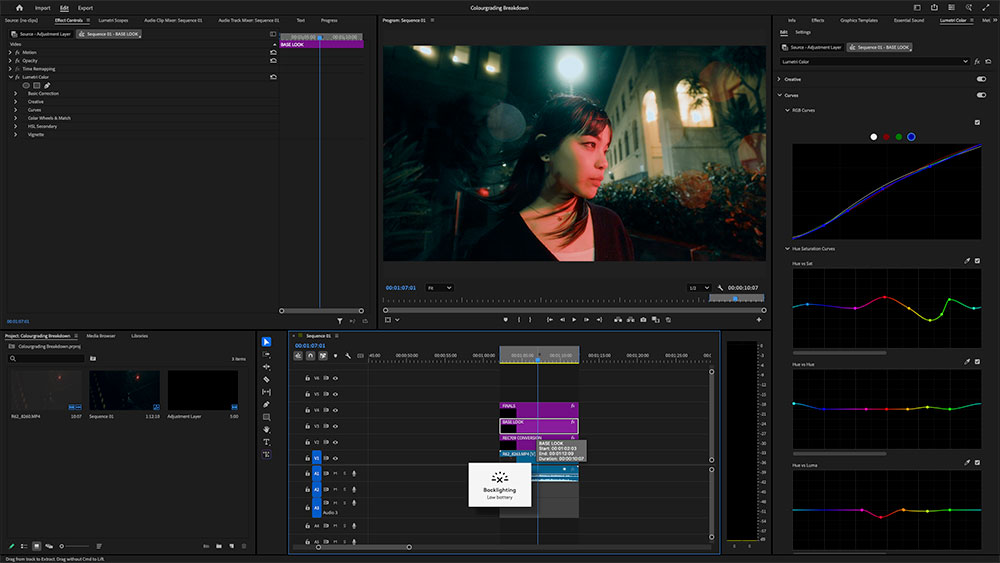
Mitch applies a similar approach in video - but with the additional complexity of footage and colour space. Apply colour grade adjustments and export as a LUT. He uses Canon C-Log3 specifically for its broad dynamic range and seamless integration with colour grading software.
Workflow Highlights:
1. Adjustment Layers: Mitch separates his grading into multiple layers; conversion, base grade, and final tweaks for better control.
2. Start with a Rec.709 Conversion LUT: Converts Canon C-Log3 footage to a viewable baseline
3. Basic Correction Panel: Adjust temperature, exposure, shadows, and highlights
4. Tone Curve & RGB Curves: Match the photo S-curve look by pushing reds and pulling shadows into teal
5. Colour Wheels: Add cinematic separation by pushing shadows towards teal, mids into blue, and highlights toward cooler tones
6. HSL Panel: Mitch balances saturation and hue to mirror his photo grade (e.g. red/yellow emphasis, green reduction)
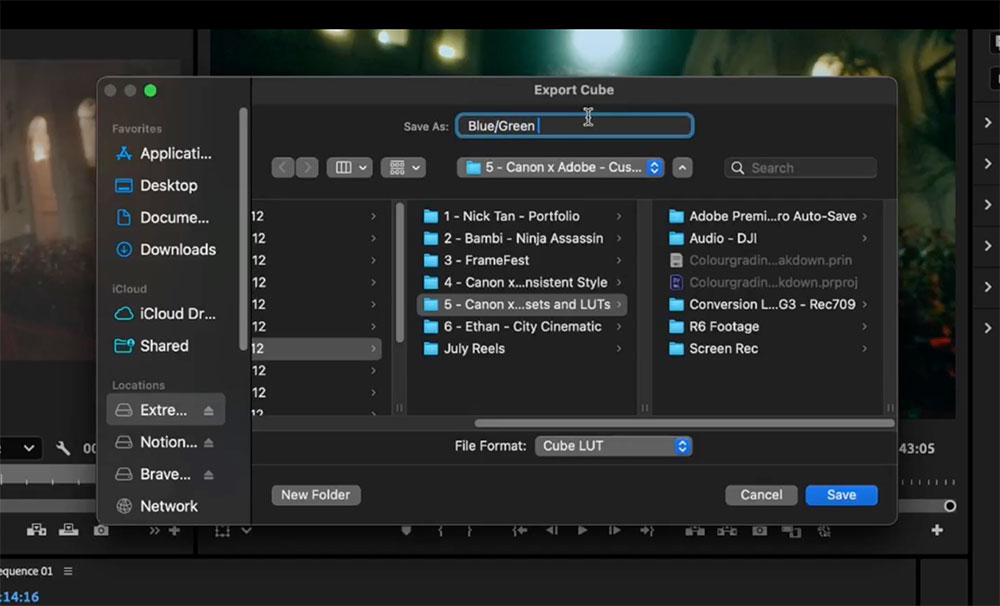
Exporting a LUT:
To export:
• Move all effects from the adjustment layers onto the video clip
• Right-click the Lumetri panel → Export .cube LUT
• Save with a clear, descriptive name like “Blue Green Nights”
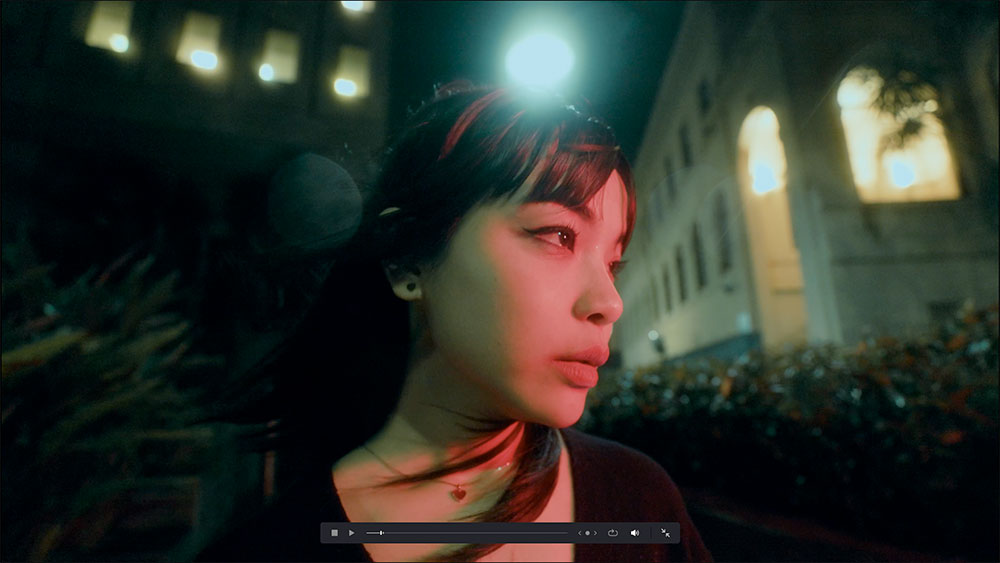
It’s important to use shared colour themes like orange/teal or filmic fades to keep your photo and video styles consistent. Canon’s reliable skin tones help unify stills and footage, creating a smooth, seamless visual story.
Mitch recommends:
• Using similar lighting conditions across both mediums
• Referencing colour palettes like teal-orange, red-green, or cinematic fades
• Leveraging Canon’s reliable colour science, which ensures uniform skin tones and white balance between RAW photos and LOG video
Tip: Consider building a shared mood board or style guide for your shoots to align tone and visual language.
Experiment with sunny, low-light, and indoor footage to see how Canon’s low-light performance and fast lenses (like f/1.4) affect your results. Mitch emphasises that good lighting is key - well-lit shots are easier and faster to edit, and Canon’s strengths in low light help retain detail and colour in darker scenes.
A preset or LUT isn’t truly “signature” until it works in multiple situations. Test your look:
• In bright daylight, where shadows are harsher and colours pop
• At night or indoors, where colour grading can make or break a shot
• Under mixed lighting, to understand how different hues interact
Saving, organising, and applying your signature look efficiently is key to a smooth editing workflow. Mitch recommends clear, descriptive naming like “Red/Blue” or “CineYellow” - and grouping presets by mood or colour to keep everything easy to find.
• Group presets by mood, colour, or subject (e.g. Moody Portraits, Cinematic Reds, Urban Nights)
• Use descriptive names so you can recall their purpose at a glance
• Store LUTs in easily accessible folders within your project structure
Bonus Creative Touches:
• Add subtle grain for a nostalgic vibe
• Apply custom aspect ratios (like 2.35:1) for a filmic feel
• Use overlays or light leaks sparingly to elevate your final render
Creating a signature look is a journey of exploration and refinement. By leveraging Canon’s advanced technology and following practical steps, you can develop a distinctive visual style that resonates with your audience. Remember, trial and error is your friend; experiment, learn, and let your creativity flourish.
As Mitch advises, focus on good lighting, shoot in RAW and Log, and most importantly, have fun with the process. Your signature look is not just a reflection of your technical skills but also a testament to your artistic vision.
“Trial and error is your best teacher. Focus on great lighting, shoot in RAW and LOG, and most importantly—have fun with the process.”
Whether you’re just starting out or refining your existing style, creating custom presets and LUTs can transform your workflow, and your creative confidence.
Recommended Gear
• Canon EOS R6 Mark II – perfect hybrid camera for creators
• Canon EF 16-35mm f/2.8L – wide-angle storytelling lens
• Canon RF 24-70mm f/2.8L – flexible all-rounder for portraits and lifestyle work

How to Edit Your First Video in Premiere Pro (Beginner Guide)

From shooting to editing, Tim shares his complete Canon-to-Adobe workflow for creators. Learn file organisation, colour grading, and multi-device editing tips using Adobe Creative Cloud.

Post-Production Workflow Tips With Pro Photographer Tom Noske