
- How to Shoot Extreme Panoramics
-

Hello!
We've noticed that you are in .
Visit Canon .
Article and images by Queensland Canon Photographer, Greg Sullavan.
I think capturing a great landscape is one of the most difficult images to shoot. We have all seen amazing photographs and thought to ourselves, "why doesn't mine look like that?". My answer to that is that everyone always shoots from eye level, or on a tripod. I love the challenge of photographing the same subject that one million other photographers have shot before, but in a way that no one else has seen it. Using a different technique such as the 'Extreme Panoramic' will enable you to create a striking image that will grab the attention of the viewer. It will become an important technique in your toolbox of photography techniques that is both fun to shoot and edit after!
Panoramic photography is a way of photographing a subject in a scene, wider than the normal field of view. For example, if you a trying to shoot an open field with a standard wide angle lens, you might only fit 25% of the composition in a single frame. However, shooting with a panoramic technique that uses multiple images, you could shoot 180 degrees and even greater.
There are many different ways to shoot a panoramic photograph and stitch them together in post-production. The technique, which I call ‘extreme’, is unique because we warp the perspective of a wide lens as the feature rather than the flaw. For example, if you stand in front of a subject with a wide lens, the closest point appears larger than the background. I recommend the widest lens at the widest zoom setting for the best results. The sample photographs in this article are shot on a Canon 5SDR and EF11-24F4L lens. This combination was chosen to achieve a more exaggerated ‘warp’ and retain a professional look in the final image.
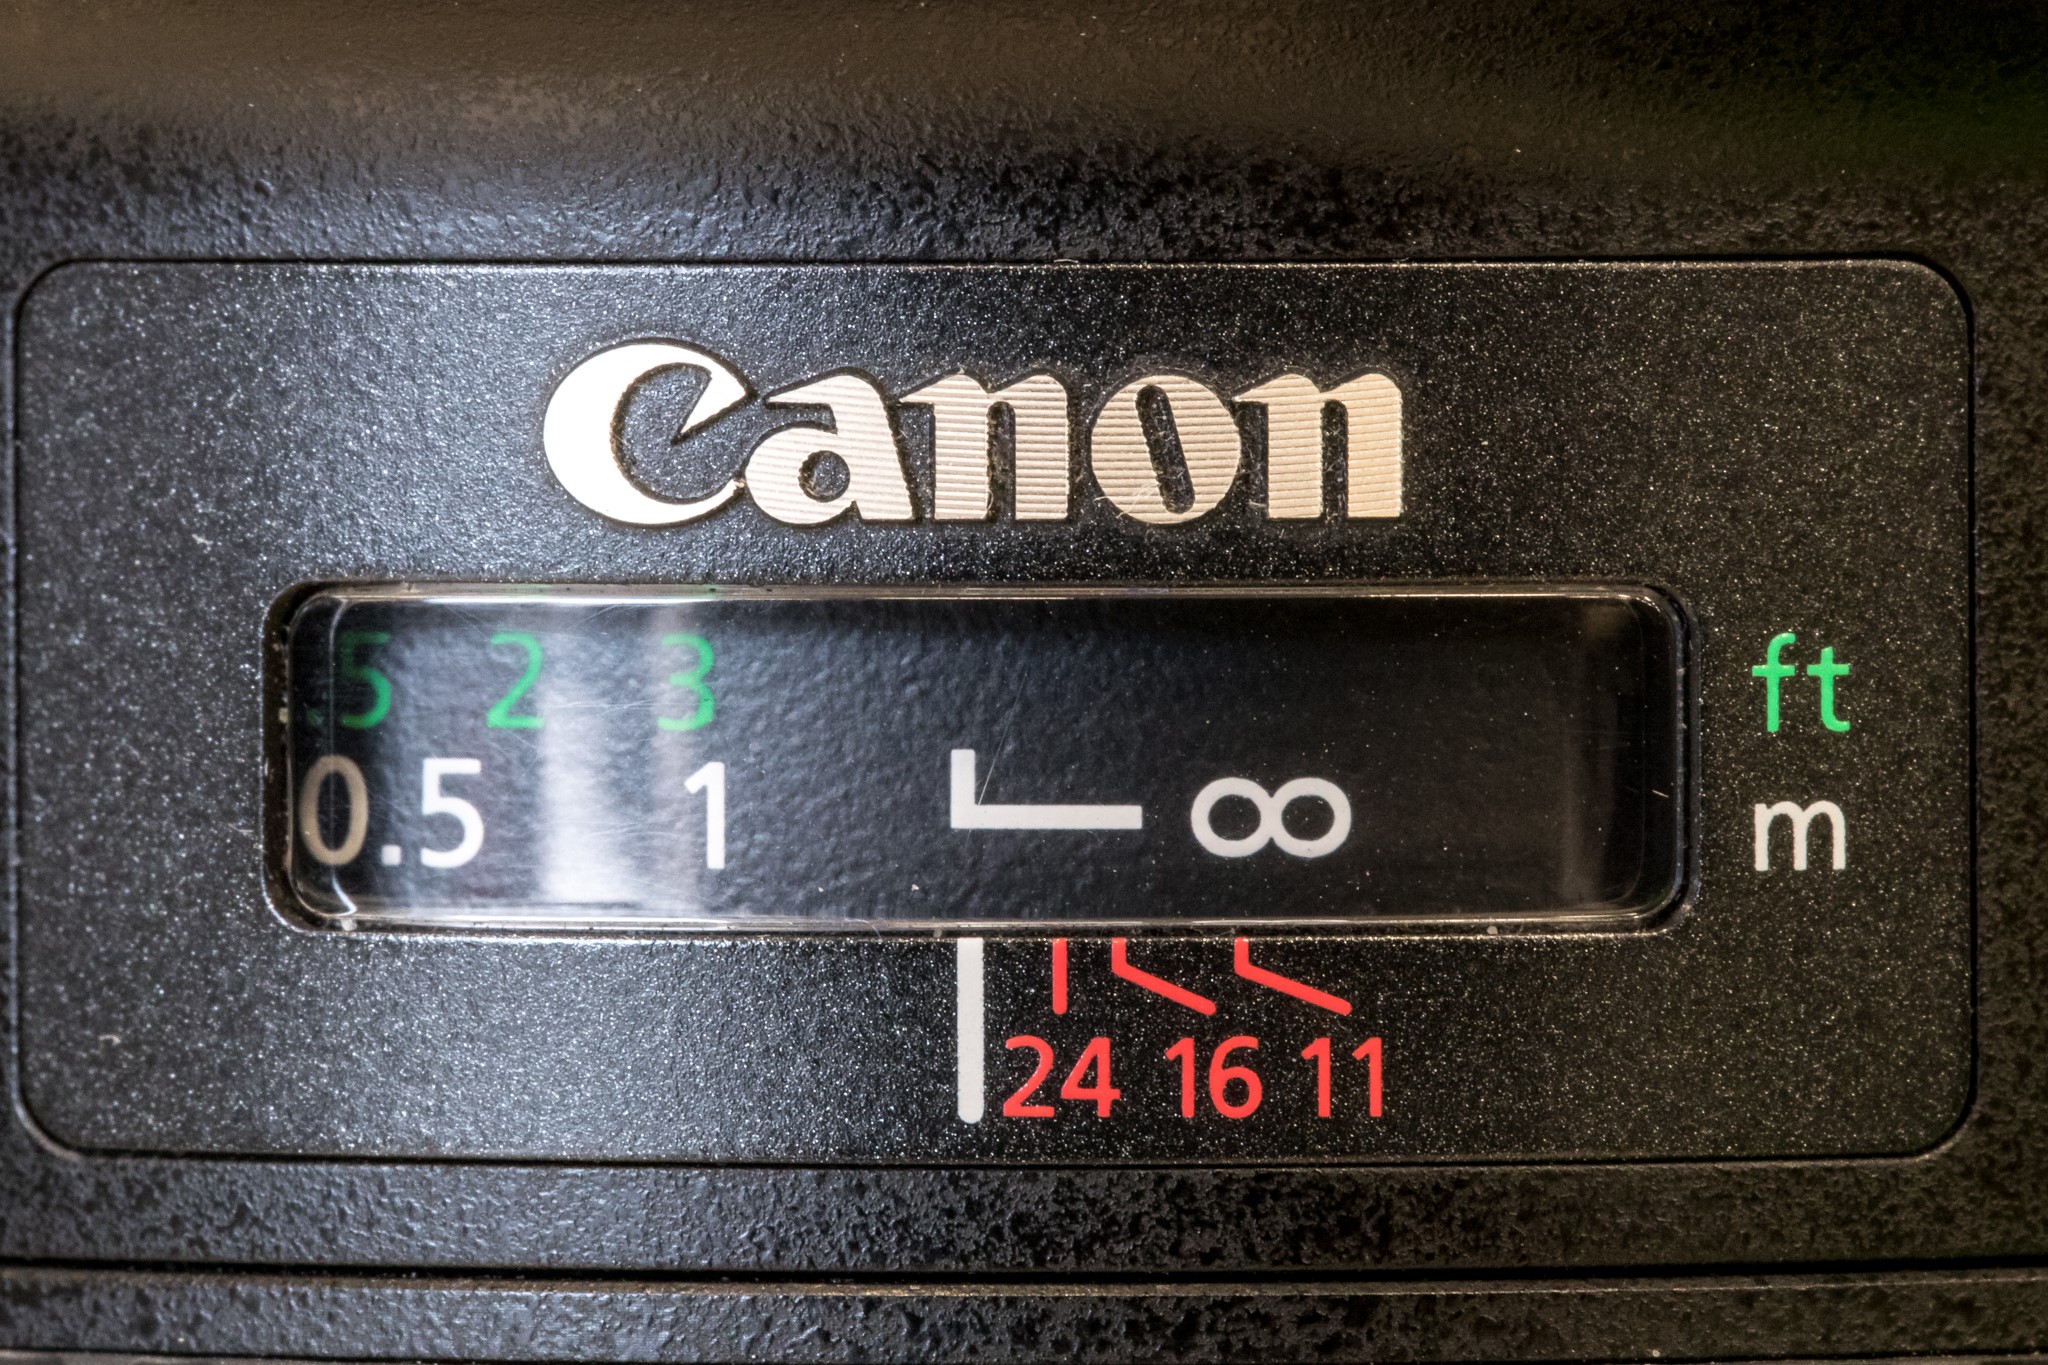
Exposure settings are manual with an aperture set to F11 or greatest for depth of field. Set the ISO and white balance independently rather than in auto to avoid variations across the sequence. If the shutter is slower than 1/200th of a second, a tripod would provide the best results. Set the lens to manual focus and twist the focus ring to ‘Infinity’. If your lens doesn’t have this option, simply focus the camera on a point in the distance and switch the lens to manual. This will prevent having to re-focus the camera for every shot. Finally, consider metering from an average point in the case of extreme light difference across the imaging range.
Once you find a scene that might suit this technique, look at the centerpiece of the composition and frame the image in your viewfinder. Without taking your eye away from the viewfinder, twist to the left to find a starting point. Then count in your mind the number of shots, overlapping about 30% before reaching the center point. Your goal is to balance the images on the left-hand side of the center with the same number of frames and similar finishing point on the right hand side of the center image. It is essential to keep the camera at the same level for a consistent sequence. If it helps, use your center focal point and line it up along the horizon line for each shot.

My extreme panoramics are usually between 8 – 12 photographs. Before shooting, I will usually do a couple of practice pivots to gauge out the scenery. The first shot is often beyond the 180-degree point so the panoramic will actually start behind me.
Take your time with the shot. If you are concerned that you won’t remember where the sequence starts and finishes, consider taking the first shot with your left hand pointing to the right inside the frame and your right hand pointing left in the last frame. Remember to re-shoot the first and final shot with out your hand in it!
If you are hand holding your camera, take your time so that none of the frames are blurry due to movement. Remember to overlap your images by about 30%. If it helps, look for a landmark to line your next shot up against. Once you have completed the sequence, check over the files, and reshoot just in case.
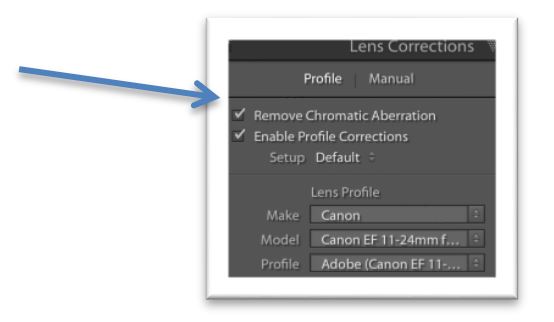
Now it’s time to import your files in to Lightroom. Once you have located your files in LR, edit the first image in the way that you would like the entire panoramic to look. For example, adjust your highlights, shadows, clarity etc. in the same way you would like the final panoramic image to resemble. The one thing that I strongly advise here is to ensure that under ‘Lens Correction’, you have selected ‘Enable Profile Correction’. This will assist in removing optical errors in the lens that will take away from the stitched result.
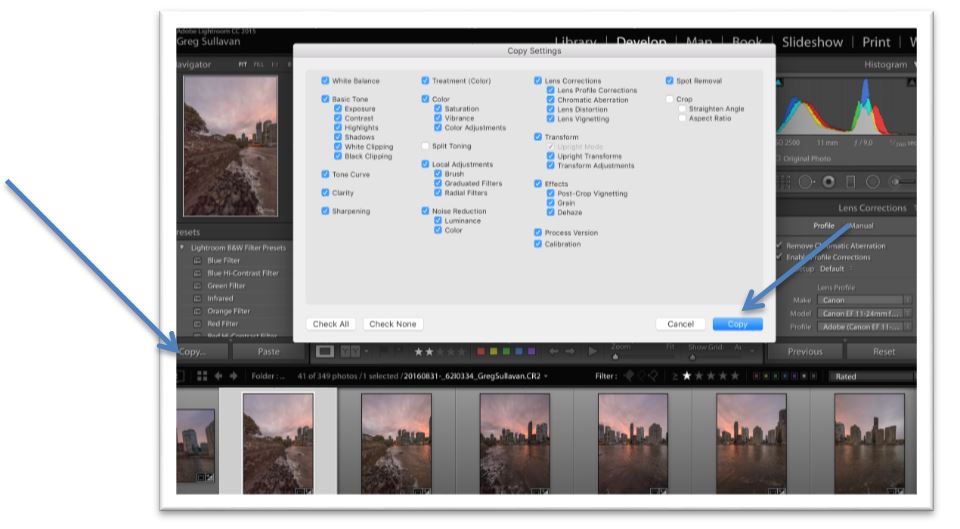
After you have completed your adjustments on the first image in Lightroom's ‘Develop’ tab, select ‘Copy’ from the left hand side of the screen. You will then have a menu pop-up which you will choose the elements from the edit that you would like to ‘Paste’ over the remaining images in the sequence.
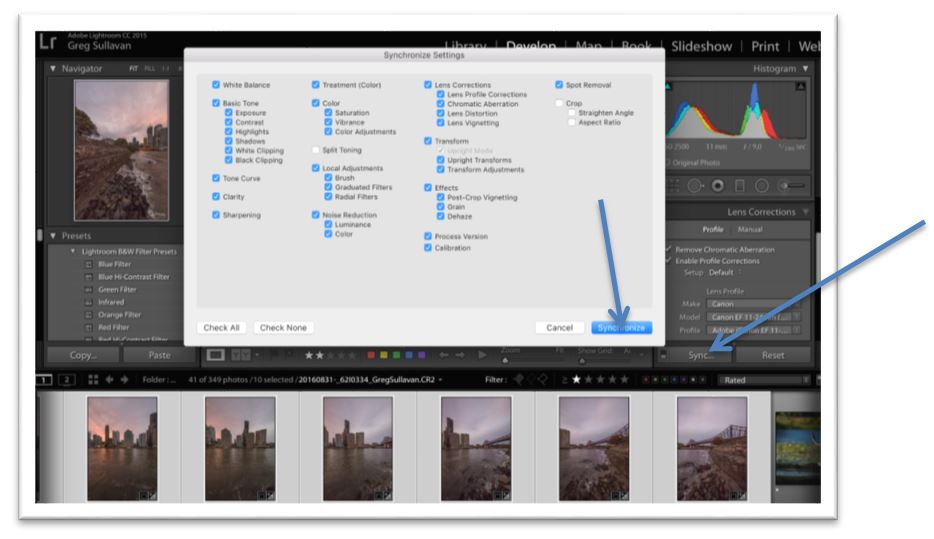
Now select all of the files in the sequence and select ‘Sync’ from the right hand side of the screen. Another pop-up menu will appear, which you select ‘Synchronize’. This will paste all of your editing changes from the original file on to the rest of the sequence. You might just want to review the changes in case one side of the panoramic is brighter or darker than the others. This is probably caused by position of the sun in the sky when the images were shot. Tweak anything that stands out and remember this is an extreme technique so it might not be perfect the first time!
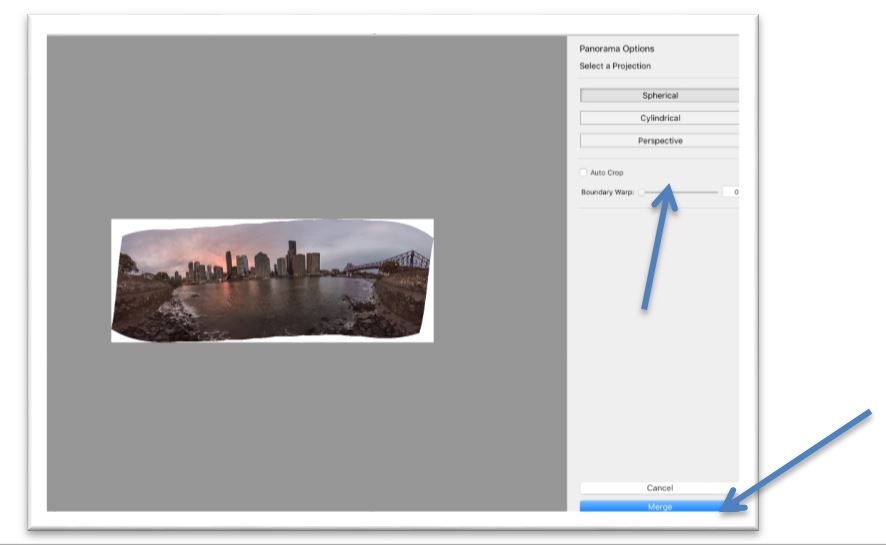
Now that all of the files in the sequence are edited and still selected, it’s time to merge the panoramic. Select the menu option ‘Photo’, scroll down to ‘Photo Merge’ and choose 'Panorama'. The program will take a few moments to stich the file together to show you a ‘Preview’ screen. It’s normal that white spaces might show up at the top and the bottom.
There are three stitching options on the right hand side of the panel. By default, the software is set to 'Spherical', which will consistently work better for this technique than 'Cylindrical' and 'Perspective'. It's great fun to try these other options, however for this demonstration we will be using 'Spherical'. You can process the file ‘as is’, although there are other options here, such as 'Auto crop' and 'Boundary warp'. I use the 'Boundary warp' tool, which does a tremendous job in spreading the image to the full border of the panoramic. Simply slide the Boundary warp slider to the far right and Merge the file to create the panoramic.
The final merge could take a few minutes depending on the speed of your computer. The file will be saved at the end of the sequence as a high-resolution .dng, which will ‘remember’ the adjustments you made to the individual images. You can then work the file further to add a graduated filter to the sky or export to another editing application. The ‘Extreme’ panoramic is a wonderful way to add a new technique to your photographic repertoire. It can transform the ordinary into the extraordinary, and give your landscapes a new twist!
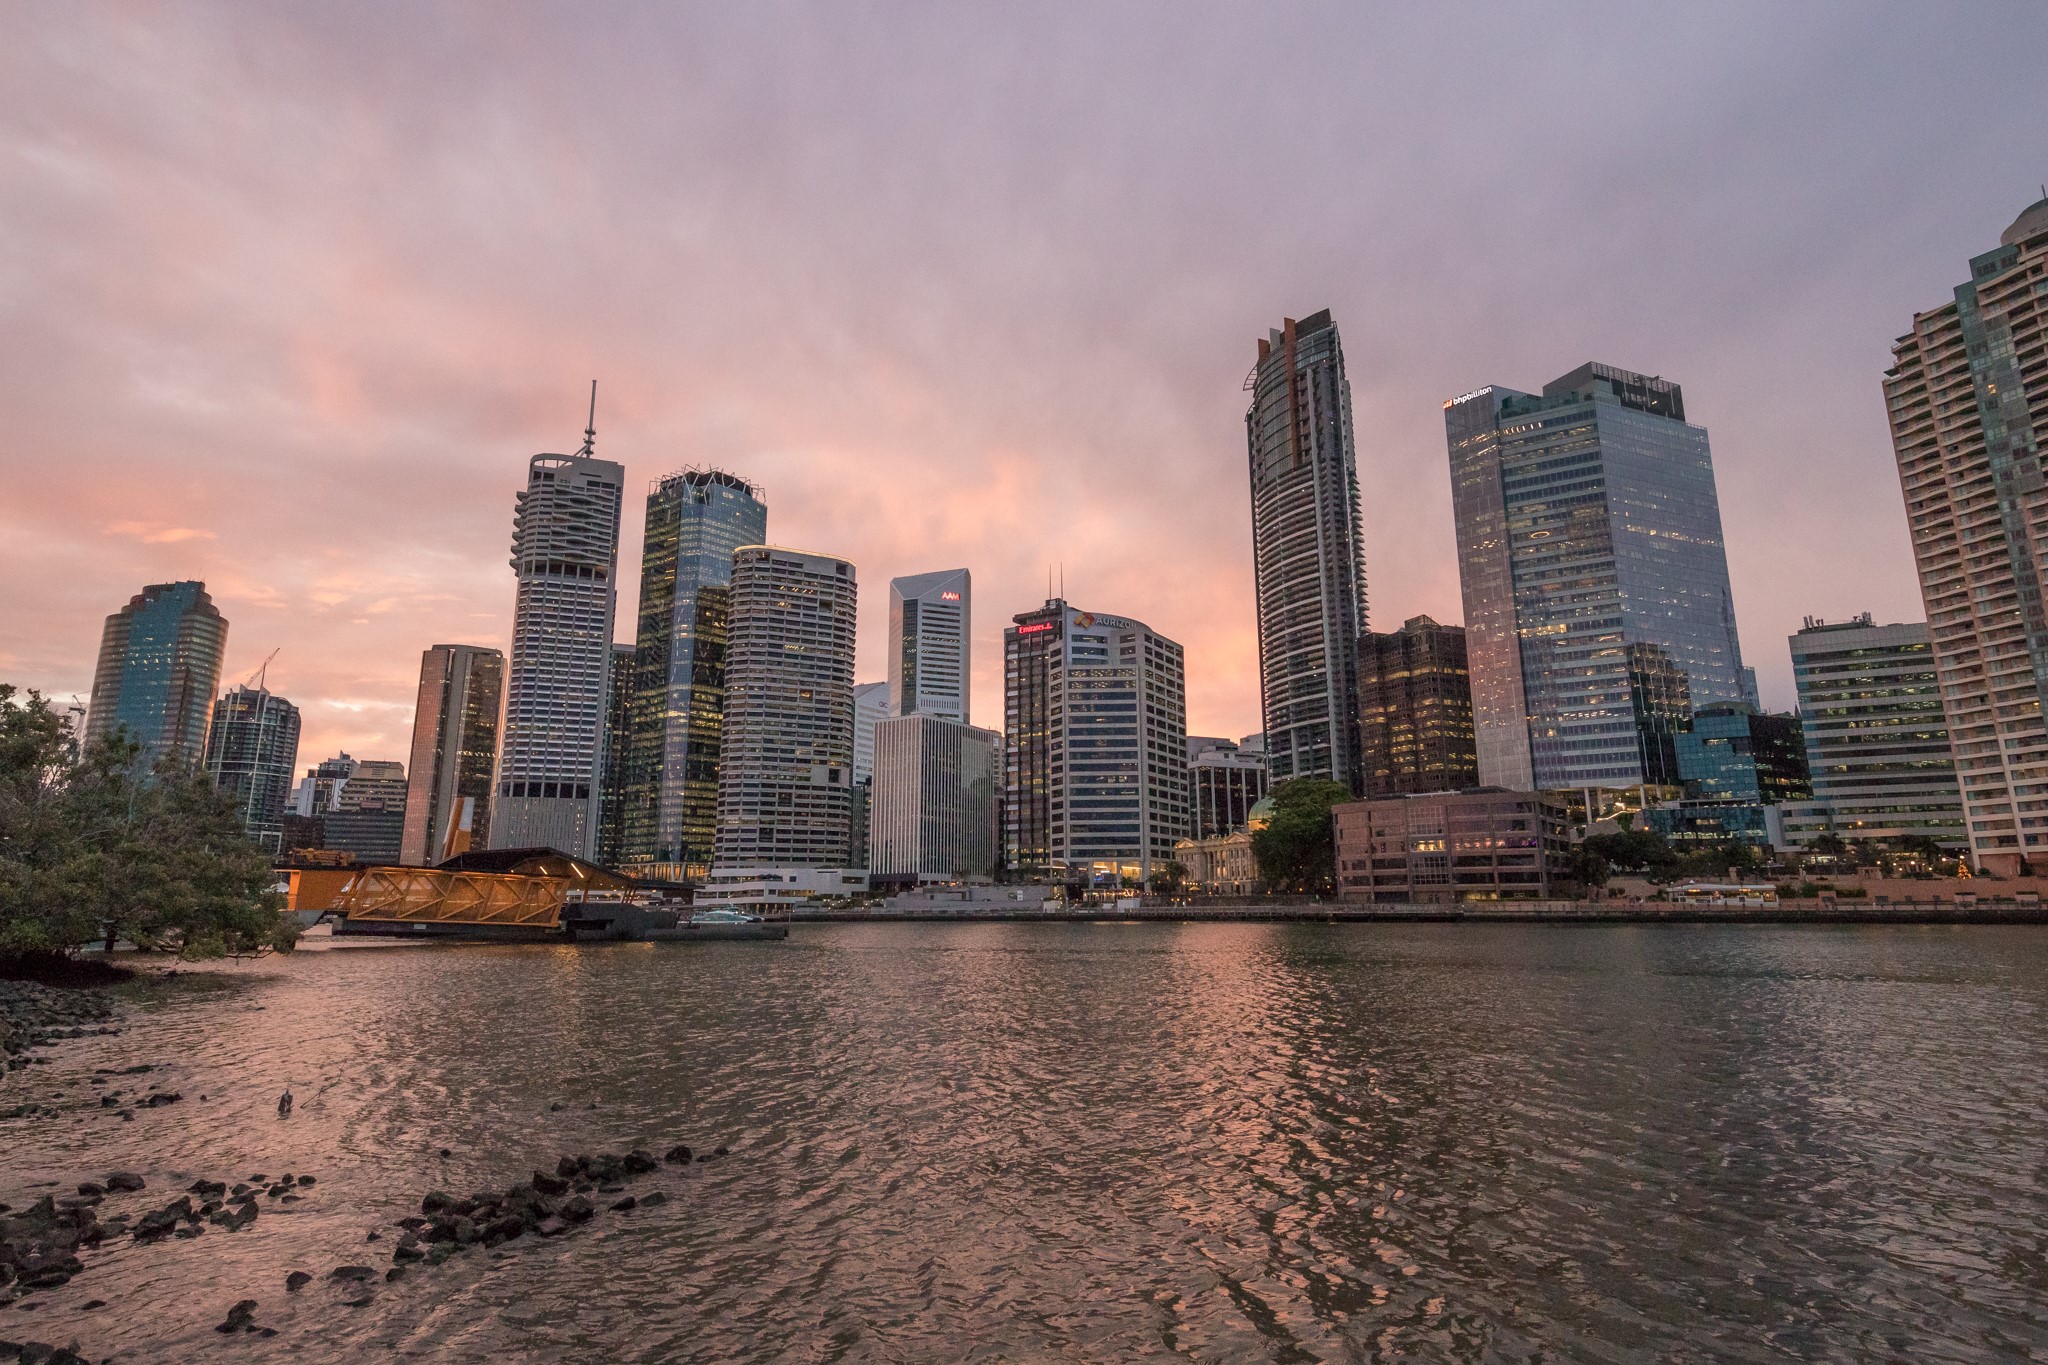
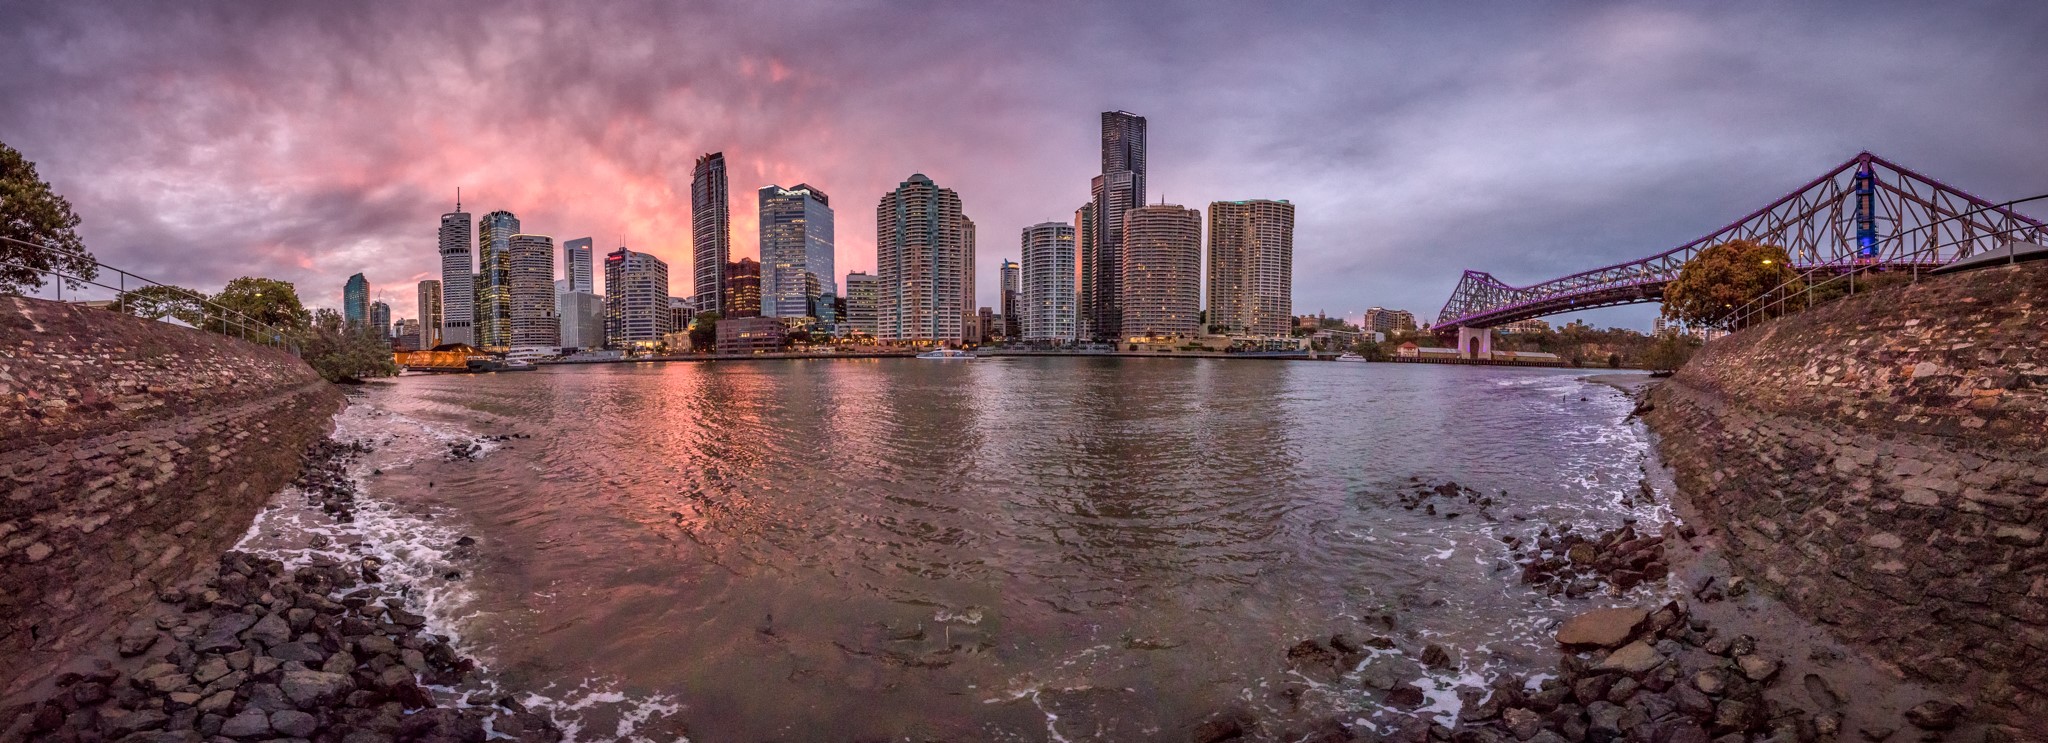
Original view shot with Canon 5DSR and Canon EF 11-24F 4L compared to the completed ‘Extreme Panoramic’.
Below, you'll be able to see the Final version of my 'Extreme Panoramic':
To post your final image to social media while in Lightroom, select 'File and Export' from the menu options, to bring up the export dialogue box. My recommendation is to resize the file to 2048 pixels in length and 100 pixels per inch. File settings for image format is JPEG, sRGB for colour space and quality at 100. This will look great on any mobile device, laptop and computer monitor. Once you upload your images, don't forget to tag #canoncollective so we can see your final results.

Discover more photography tips and tutorial.

Capture the awe-inspiring landscapes of the Canadian Rockies with these indispensable tips from photographer, Tony Irving.

Lifestyle and Landscape Photographer Alex Spurway test-drives the new EOS 6D Mark II.

Learn the basics in 46 seconds.