
- How to Shoot Your First Timelapse Video
-

Hello!
We've noticed that you are in .
Visit Canon .
Master the art of timelapse photography with this step-by-step video tutorial. Whether you’re a budding filmmaker or a keen enthusiast looking for new ways to make your videos more dynamic, this is everything you need to know about shooting timelapse movies.
A timelapse movie is essentially a series of photographs that have been stitched together to create a video where time appears to pass more quickly. Timelapses may be made up of hundreds or even thousands of individual images—the more photos there are in the sequence, the longer the timelapse video will be.
‘Normal’ video footage is typically created by shooting at 24 frames per second (or 24 fps), which plays back in a way that resembles what we normally see in real-time with our own eyes. With timelapse videos however, we can manipulate the passing of time by shooting each frame at a much slower frequency, such as one photo every few seconds, minutes or even hours. When we put these photos together and play the footage back at normal speed, it appears as though time is ‘lapsing’ much faster.
This allows us to capture events that usually take hours, days, weeks or even months and play them back in mere seconds or minutes, as if we have pressed fast-forward on reality itself.
Examples of timelapse videos could be a flower that appears to blossom in a matter of seconds instead of a whole day. Or a dramatic sunset that seems to start and finish in a single minute instead of a whole evening.
“There are no limits to the ways in which you can use timelapse sequences, making this technique an invaluable tool for creative visual storytellers.”
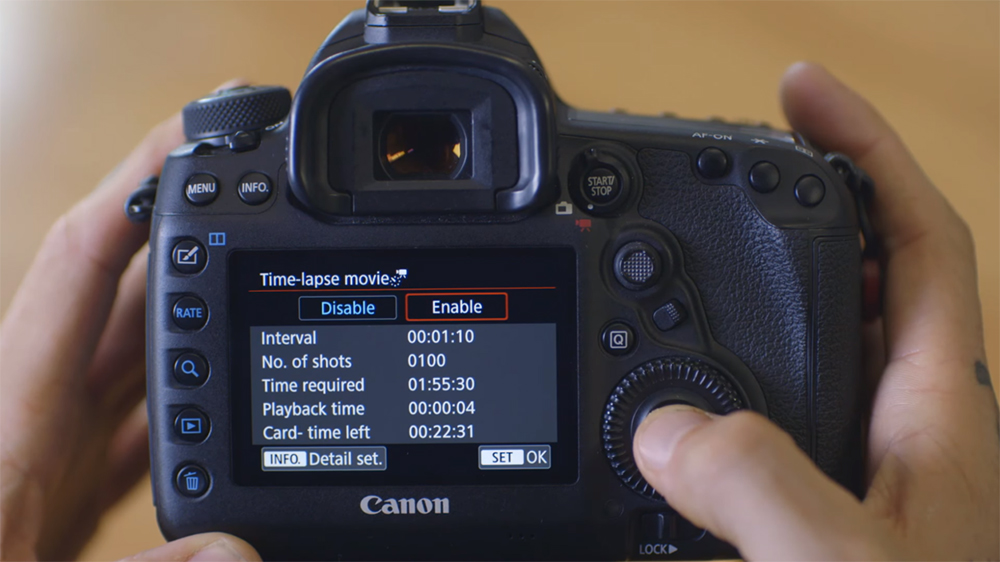
1. Switch your camera to Timelapse Movie mode by hitting the Menu button and and finding Timelapse Movie mode in the red menu.
2. Hit the Info button while you are in the Timelapse Movie mode menu to access the settings for your Interval time and Number of Shots.
3. Select an Interval number to determine the frequency that you want your camera to take each shot, e.g. once every second or minute. Your interval times will vary depending on your subject. For slower moving subjects, such as drifting clouds or blossoming flowers, you will need more time between shots (e.g. one shot every 20 or 30 seconds). For faster moving subjects, such as fast moving traffic and busy cityscapes, you will need a shorter interval (e.g. one shot every 2 or 3 seconds).
4. Dial in your No. of Shots to tell your camera how many shots you would like in total. Based on the Interval number and No. of Shots you dial in, your camera will then automatically tell you how much footage you will end up with and how long you will need to shoot in order to get it.
There are no hard and fast rules and each scene or project will call for different settings. However, as a general rule of thumb, it’s worth remembering that most online content plays at around 24 or 25 frames per second (fps), so you’ll need around 25 images for every second of video footage.
Use the following numbers as a rough reference for your shot number and final video length:
• 750 photos = 30 seconds of timelapse footage
• 1,500 photos = 1 minute of timelapse footage
• 4,500 photos = 3 minutes of timelapse footage
5. Compose your shot and hit the shutter button. When shooting timelapses, it’s recommended to place your camera on a tripod to maintain your composition for the duration of the shoot. Once you’re happy with your settings and composition, it’s time to hit the shutter button and let your camera work its magic.
Camera – Many Canon DSLR and Mirrorless cameras have a built-in Timelapse Movie mode. However, if your camera does not have a the function built-in then you can still create a timelapse by plugging an external intervalometer into your camera to use as a remote shutter release and adjust your settings.
Tripod – Using a sturdy tripod will ensure your camera and composition remains constant for each and every shot. This is impossible to do when shooting hundreds or even thousands of handheld shots.
Lenses – A wide-angle lens, such as the EF-S 10-22mm f/3.5-4.5 USM, will allow you to capture more movement in larger scenes such as cityscapes. To record the tiny movements of a blossoming flower, you may prefer to use a macro lens to get up close. Prime lenses with large apertures, such as the EF 35mm f1.4L II, can also be advantageous when working in low light conditions like sunrises and sunsets, or when shooting the night’s sky.
Use Slower Shutter Speeds – A slower shutter speed such as 1/50 or 1/60 will give you smoother timelapses and help you capture motion in a more fluid way.
Be Patient – To create a short 30-second timelapse sequence you would need to take roughly 720 images, which would take almost an hour to record at an interval setting of one shot every five seconds. Keep this in mind and be sure to take warm clothes, a flask of coffee and something to keep you entertained while you wait for your timelapse to complete.
Monitor Your Your Battery Power – Timelapses take significantly longer to create than ‘normal’ videos, so it’s important to be sure your camera has enough battery power to last the duration of your shoot.
Keep an Eye on Your ‘Card-Time Left’ Number – In your camera’s Timelapse Movie mode menu you will be able to see a ‘Card-Time Left’ number, which shows how much space your memory card has in terms of time. This is important to monitor as you don’t want to set up an hour-long timelapse shoot only to find your memory card runs out of space halfway through.
Shoot in Manual Mode – Shooting in automatic or semi-automatic modes (such as aperture priority or shutter speed priority) can help speed things up when you’re starting out. However, even the tiniest of adjustments to your exposure when you’re shooting hundreds of even thousands of frames can result in flicker when playing back your timelapses. By shooting in Manual mode you can dial in the perfect setting and maintain it throughout the sequence, eliminating flicker in the process.
Learn more about videography with this tutorial series.

Andy Taylor, one of Australia’s foremost cinematographers and news cameramen talks tools of the trade for cinematographers; recommended camera settings for news and documentary shooting; tips for working with Netflix; and, five pieces of career advice to help aspiring videographers.

In this step-by-step video tutorial, discover a helpful introduction to editing video.

In this insightful video guide, we give advice on the best camera settings for shooting quality video.