

If printed ruled lines are misaligned or print results are otherwise unsatisfactory, adjust the print head position.
You need to prepare: a sheet of A4 or Letter-sized supplied paper or Canon Matte Photo Paper MP-101
Caution
Replace the ink tank whose ink is low.
See [ Replacing an Ink Tank ]
- Aligning the Print Head without a computer
(1) Make sure that the power is turned on, and load a sheet of A4 or Letter-sized supplied paper or Canon Matte Photo Paper MP-101 in the Rear Tray. Load it with the printing side (whiter side) facing you in the Rear Tray.
(2) Open the Paper Output Tray gently, and extend the Output Tray Extension to open.
If the Inner Cover is open, close it.
(3) Hold down the RESUME/CANCEL button until the Power lamp flashes green four times, then release it immediately.
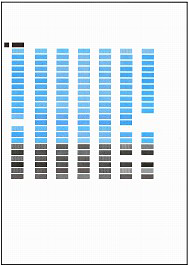
The print head alignment pattern will be printed and the printer will adjust the print head position automatically.
Do not perform any other operations until the printer completes the printing of the print head alignment pattern.
Automatic Print Head Alignment

1. Make sure that the power is turned on.
2. Load a sheet of A4 or Letter-sized supplied paper or Canon Matte Photo Paper MP-101 in the Rear Tray.
Load it with the printing side (whiter side) facing you in the Rear Tray.
Caution
3. Open the Paper Output Tray gently, and extend the Output Tray Extension to open.
Caution
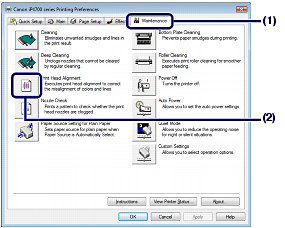
4. Open the printer driver setup window.
5. Adjust the print head position.
(1) Click the Maintenance tab.
(2) Click Print Head Alignment.
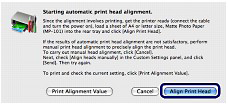
(3) Confirm the displayed message, and click Align Print Head.
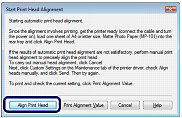
The print head alignment pattern will be printed and the printer will adjust the print head position automatically.
Do not perform any other operations until the printer completes the printing of the print head alignment pattern. This takes about 5 minutes to complete.
Caution

1. Make sure that the power is turned on.
2. Load a sheet of A4 or Letter-sized supplied paper or Canon Matte Photo Paper MP-101 in the Rear Tray.
Load it with the printing side (whiter side) facing you in the Rear Tray.
Caution
3. Open the Paper Output Tray gently, and extend the Output Tray Extension to open.
Caution
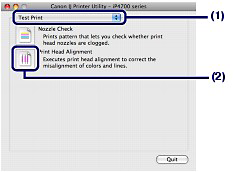
4. Open the Canon IJ Printer Utility.
5. Adjust the print head position.
(1) Select Test Print in the pop-up menu.
(2) Click Print Head Alignment.
(3) Confirm the displayed message, and click Align Print Head.
The print head alignment pattern will be printed and the printer will adjust the print head position automatically.
Do not perform any other operations until the printer completes the printing of the print head alignment pattern. This takes about 5 minutes to complete.
Caution
Manual Print Head Alignment
This section describes how to align the Print Head manually.
If the results of Automatic Print Head Alignment are not satisfactory, follow the procedure below to perform Manual Print Head Alignment to precisely align the Print Head.
Caution
1. Make sure that the printer is turned on.
2. Load three sheets of A4 or Letter-sized plain paper in the Cassette.
3. Open the Paper Output Tray and extend the Output Tray Extension.
4. Print the pattern.
(1) Open the printer properties dialog box.
(2) Click the Maintenance tab, then Custom Settings.
(3) Select the Align heads manually check box, then click Send.
(4) Confirm the displayed message and click OK.
(5) In the Maintenance sheet click Print Head Alignment.
(6) Confirm the displayed message and click Align Print Head.
Caution
Caution
(7) After the pattern is printed, click Yes.
The dialog for entering a print head alignment value is displayed.
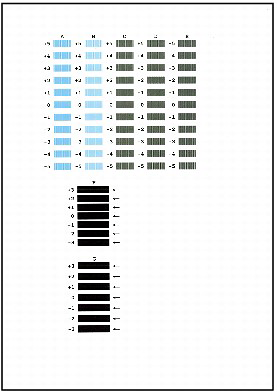
5. Look at the first printout and adjust the print head position.
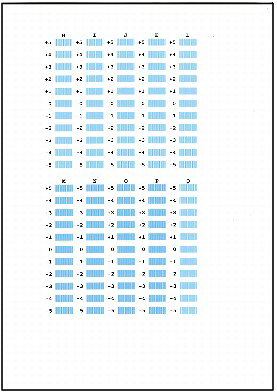
(1) Check the printed patterns and select the number of the pattern in column A that has the least noticeable vertical streaks.
Caution
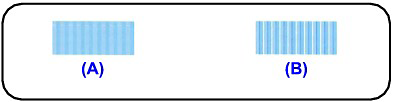
(A) Less noticeable vertical white streaks
(B) More noticeable vertical white streaks
2. Repeat the procedure until you finish inputting the pattern number for column G, then click OK.
For column F and G, pick the setting that produces the least noticeable horizontal streaks.
Caution
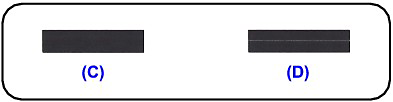
(C) Less noticeable horizontal white streaks
(D) More noticeable horizontal white streaks
3. Confirm the displayed message and click OK.
The second pattern is printed.
Caution
6. Look at the second printout and adjust the print head position.
(1) Check the printed patterns and select the number of the pattern in column H that has the least noticeable vertical streaks.
Caution
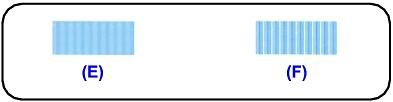
(E) Less noticeable vertical white streaks
(F) More noticeable vertical white streaks
(2) Repeat the procedure until you finish inputting the pattern number for column Q, then click OK.
(3) Confirm the displayed message and click OK.
The third pattern is printed.
Caution
7. Look at the third printout and adjust the print head position.
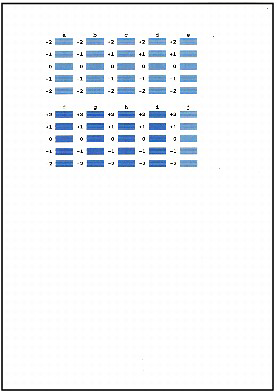
(1) Check the printed patterns and select the number of the pattern in column a that has the least noticeable horizontal streaks.
Caution
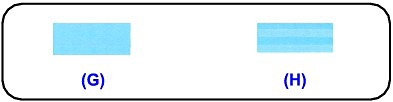
(G) Less noticeable horizontal white streaks
(H) More noticeable horizontal white streaks
(2) Repeat the procedure until you finish inputting the pattern number for column j, then click OK.
(3) Confirm the displayed message and click OK.
1. Make sure that the printer is turned on.
2. Load three sheets of A4 or Letter-sized plain paper in the Cassette.
3. Open the Paper Output Tray and extend the Output Tray Extension.
4. Print the pattern.
(1) Open the Canon IJ Printer Utility dialog box.
(2) Select Custom Settings in the pop-up menu.
(3) Select the Align heads manually check box, then click Send.
(4) Confirm the displayed message and click OK.
(5) Select Test Print in the pop-up menu.
(6) Click Print Head Alignment.
(7) Confirm the displayed message and click Align Print Head.
The dialog for entering a print head alignment value is displayed.
Caution
Caution
5. Look at the first printout and adjust the print head position.
(1) Check the printed patterns and select the number of the pattern in column A that has the least noticeable vertical streaks.
Caution
(A) Less noticeable vertical white streaks
(B) More noticeable vertical white streaks
2. Repeat the procedure until you finish inputting the pattern number for column G, then click Send.
For column F and G, pick the setting that produces the least noticeable horizontal streaks.
Caution
(C) Less noticeable horizontal white streaks
(D) More noticeable horizontal white streaks
(3) Confirm the displayed message and click OK.
The second pattern is printed.
Caution
6. Look at the second printout and adjust the print head position.
(1) Check the printed patterns and select the number of the pattern in column H that has the least noticeable vertical streaks.
Caution
(E) Less noticeable vertical white streaks
(F) More noticeable vertical white streaks
(2) Repeat the procedure until you finish inputting the pattern number for column Q, then click Send.
(3) Confirm the displayed message and click OK.
The third pattern is printed.
Caution
7. Look at the third printout and adjust the print head position.
(1) Check the printed patterns and select the number of the pattern in column a that has the least noticeable horizontal streaks.
Caution
(G) Less noticeable horizontal white streaks
(H) More noticeable horizontal white streaks
(2) Repeat the procedure until you finish inputting the pattern number for column j, then click Send.