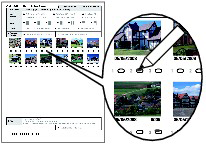
Preview each photo from the memory card on the LCD, to select and print the desired photo.
This section describes the procedure to print borderless photos on 4" x 6" / 10 x 15 cm photo paper.
For the operation, see the notes and operation procedure described in the reference page.

You need to prepare:
A memory card with saved photos. See "Before Inserting the Memory Card".
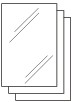
Paper for photo printing. See "Media Types You Can Use".
1. Prepare for printing.
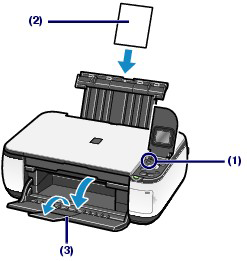
(1) Turn on the power.
The copy mode screen will appear on the LCD.
If the memory card is inserted in the machine, the card mode screen will appear.
(2) Load paper.
See "Loading Paper ".
Here we load 4" x 6" / 10 x 15 cm photo paper in the Rear Tray.
(3) Open the Paper Output Tray gently, and open the Output Tray Extension.
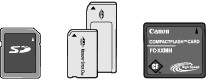
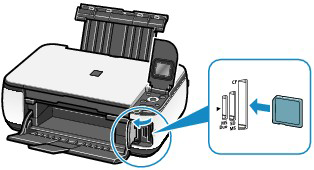
2. Insert a memory card WITH THE LABELED SIDE FACING TO THE LEFT into the Card Slot.
For the types of memory card compatible with the machine and locations to insert them, see "Before Inserting the Memory Card".
The card mode screen will appear.
Caution
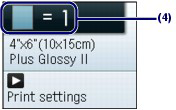
3. Select photos to print.
(1) Use the 

Caution

(2) Use the 

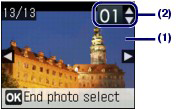
(3) Repeat the procedures of (1) and (2) to specify the number of copies for each photo.
Up to 2000 photos can be specified in total.
(4) Press the OK button.
The print confirmation screen will appear.
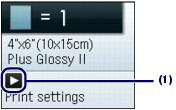
4. Start printing.
(1) Press the
The print settings screen will appear.
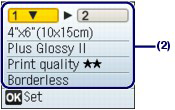
(2) Confirm the page size, media type, print quality, and layout, etc.
Here we confirm that 4"x6" (10x15cm) is selected for the page size, the type of loaded photo paper for the media type, and Borderless is selected for the layout.
To change the settings, use the
See Changing the Settings.
Caution
If Auto photo fix ON is selected, with Prioritize Exif info selected in AutoPhotoFix setting under Device settings on the top menu screen, the settings specified when shooting can be adjusted in prior. We recommend you to normally select Do not prioritize Exif info.
(3) Press the OK button.
The screen will return to the print confirmation screen.
(4) Confirm the number of sheets to be used for printing the selected photos.
(5) Press the Color button or the OK button.
The machine starts printing photos.
Caution
Changing the Settings
You can use the
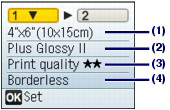
(1) Page size
Select the page size of the paper to print: 4"x6" (10x15cm), A4, etc.
(2) Media type
Select the media type of the paper to print: Plus Glossy II, Plain paper, etc.
Caution
If you do not select media type correctly, the machine may not print with the proper print quality.
(3) Print quality
Adjust the print quality 

(4) Layout
Select layout of photo print, such as Borderless, Borderless half side, or Bordered x2, etc.
Caution
Caution
Using Photo Index Sheet to print
Thumbnails of photos on the memory card are printed on A4 or Letter-sized paper (this printed sheet is called Photo Index Sheet). You can select photos, number of copies, page size, etc. on this sheet, and print them.
Select Photo Index Sheet on the Top menu screen and Photo Index Sheet print.