

Solution
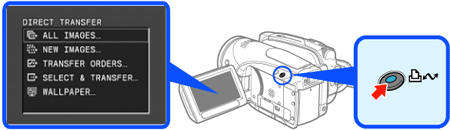
With the supplied USB cable and the Digital Video Software, you can transfer still images to a computer simply by pressing 
The first time you connect the camcorder to the computer, you need to install the software and set the auto-launch setting.
From the second time on, you will only need to connect the camcorder to the computer to transfer images.
1. Install the supplied Digital Video Software.
Refer to the installation guide (separate leaflet included with the CD-ROM).
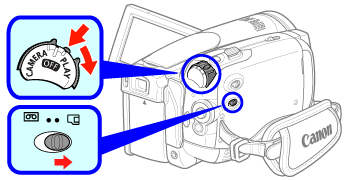
2. Set the camcorder to ⋖ PLAY ⋗ mode.
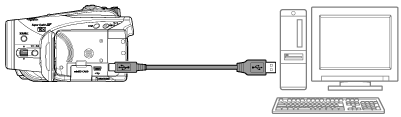
3. Connect the camcorder to the computer using the USB connection shown in the previous section PC Connection Diagrams.
See Connecting the Camcorder to a Computer in the Digital Video
Software instruction manual (electronic version on PDF file).
4. Set the auto-launch setting.
5. Select a transfer option and press


Caution
Doing so may result in permanent data loss.
- Do not open the memory card slot cover and do not remove the memory card.
- Do not disconnect the USB cable.
- Do not turn off the camcorder or the computer.
- Do not change the position of the / switch or the operating mode.