

Solution
Setting the IP Address (IP v. 4)Setting the IP Address Using the Printer's Control Panel
Setting the IP Address Using the ARP/PING Commands
Setting the IP Address Using NetSpot Device Installer
Setting the IP Address (IP v. 4)
There are the following three methods for setting the IP address.
Caution
When setting the IP Address using the ARP/PING command or NetSpot Device Installer
Before setting the IP address
Caution
If you changed the IP address after installing the printer driver
Setting the IP Address Using the Printer's Control Panel
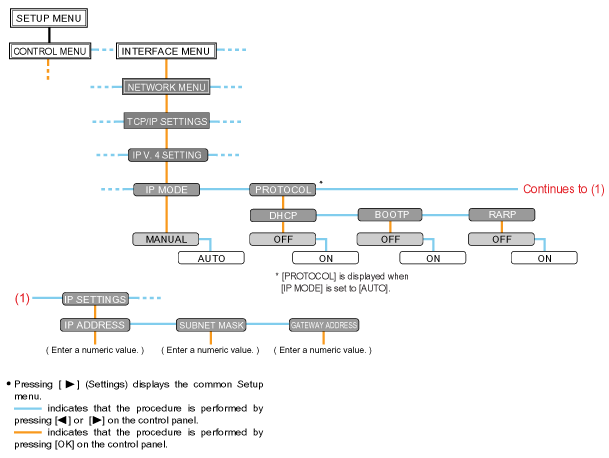
To set the IP address using the printer's control panel, use the following menu hierarchies.
Caution
After setting the IP address
To go back up the hierarchy
 ].
].About the control panel
1. Press [ 


* You can set the IP address when the printer is either online (the Online indicator is on) or offline (the Online indicator is off).
2. Select [NETWORK MENU] using [
3. Select [TCP/IP SETTINGS] using [
4. Select [IP V. 4 SETTING] using [
5. Select the method for setting the IP address.
(1): Select [IP MODE] using [
(2): Select a method for setting the IP address using [
| [AUTO]: | When setting the IP address using any one of DHCP, BOOTP, or RARP, select this option. |
| [MANUAL]: | When specifying the IP address to the printer directly, select this option. |
6. Set the IP address.

6-A-1. Select [PROTOCOL] using [
6-A-2. Select [ON] for the option to be used when setting the IP address.
| [DHCP]: | Obtains an IP address using DHCP. (The DHCP server needs to be running.) |
| [BOOTP]: | Obtains an IP address using BOOTP. (The BOOTP daemon needs to be running.) |
| [RARP]: | Obtains an IP address using RARP. (The RARP daemon needs to be running.) |
Caution
When using DHCP, BOOTP, or RARP
When using DHCP
- Specifying the DNS Dynamic Update function (For details on the procedure for specifying the DNS Dynamic Update function, see "e-Manual" (HTML manual) in the CD-ROM supplied with the printer.)
- Specifying the settings so that the same IP address is always assigned when the printer starts up
6-A-3. Set the IP address, the subnet mask, and the gateway address manually as needed.
When setting them manually, go back up the hierarchy by pressing [
* Even if you are using any one of DHCP, BOOTP, or RARP, specify the IP address, subnet mask, and gateway address. If you cannot obtain information from the servers of DHCP, BOOTP, and RARP, the values specified manually are used.
Caution
When using DHCP, BOOTP, or RARP
(If the values were specified previously, they overwrite the obtained ones.)
6-A-4. Proceed to Step 7.
6-B-1. Select [IP SETTINGS] using [
6-B-2. Specify [IP ADDRESS], [SUBNET MASK], and [GATEWAY ADDRESS].
Caution
How to enter values in [IP ADDRESS], [SUBNET MASK], and [GATEWAY ADDRESS].
1. Press [
(The numbers in the field blinks, allowing you to enter the value.)
2. Enter the value. (Pressing [ 
3. After entering values in all the fields, press [OK] to confirm the setting.
6-B-3. Proceed to Step 7.
7. Perform a hard reset or restart the printer.
After performing a hard reset or restarting the printer, the settings are effective.
Caution
For details on a hard reset
Setting the IP Address Using the ARP/PING Commands
Caution
If your computer and the printer are connected via the router
1. Run Command Prompt.
Caution
If you are using Windows
- From the [Start] menu, select [All Programs] or [Programs] → [Accessories] → [Command Prompt].
If you are using UNIX
2. Enter "arp -s ⋖IP address⋗ ⋖MAC address⋗", then press the [ENTER] key on your keyboard.
| <IP address>: | Enter the IP address to assign to the printer. Specify the address with four numbers (from 0 to 255) separated with a period (.). |
| <MAC address>: | Enter the MAC address of the printer. When entering the number, separate the number every two digits with a hyphen (-) (a colon (:) for UNIX). |
Caution
If you are using IBM-AIX
3. Enter the following command, then press the [ENTER] key on your keyboard.
| <IP address>: | Enter the same IP address as the one entered in Step 2. |
* Enter a lowercase "L" for "-l."
→ The IP address is set for the printer.
* The subnet mask and gateway address are set to [0.0.0.0].
4. Enter "exit", then press the [ENTER] key on your keyboard.
→ Command Prompt closes.
Setting the IP Address Using NetSpot Device Installer
For details on other procedures for starting and using NetSpot Device Installer, see the following.
For details on the procedure for viewing "Printer Driver Installation Guide", see "e-Manual" (HTML manual) in the CD-ROM supplied with the printer.
Help is displayed by clicking [Help] in the [Help] menu.
Caution
If Windows Firewall is enabled
For an operating system other than Windows