

Solution
Getting StartedSaving Images to a Memory Card
Saving Images to an External Hard Disk (Version 2.0 or later firmware)
The function to copy images is for transferring images to a computer or other devices. Even if you copy images to a card and insert the card into the camera/ camcorder, the camera/camcorder cannot display those images.
Caution
Caution
Getting Started
You can use the Connect Station’s remote control to perform operations while using a TV as a monitor.
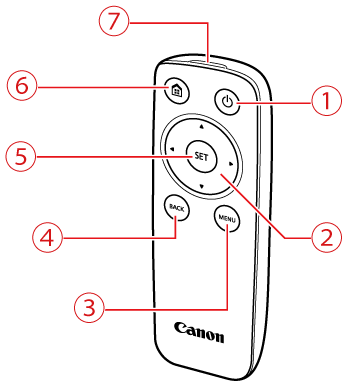
 | Power button | Turn on the power or put Connect Station into the standby state. |
 | Cross keys | |
 | Menu button | Menu screen appears. |
 | Back button | Previous screen reappears. |
 | Set button | Selected item takes effect. |
 | Home button | Home screen appears. |
 | Remote control transmitter | |
Saving Images to a Memory Card
To save images to a memory card, specify images by a shooting month, and copy them to a card at once. You can also select images one by one from the displayed images.
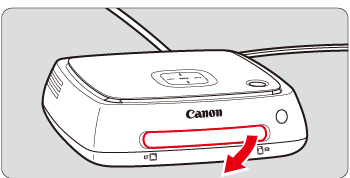
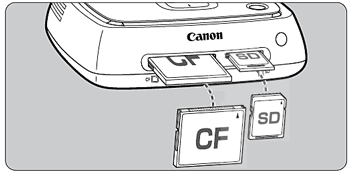
1. Remove the card slot cover in advance.
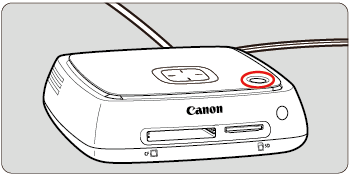
2. Press the power button on Connect Station with its power off, the power lamp will light up in orange. The light will turn green when Connect Station starts. (It takes approx. one minute before Connect Station starts.)
| Connect Station Status | Power Lamp Indicator |
| Power off |  (Lamp off) (Lamp off) |
| Standby |  Orange (lamp on) Orange (lamp on) |
| Power on |  Green (lamp on) Green (lamp on) |
Caution
3. Insert the card into the memory card slot.
Caution
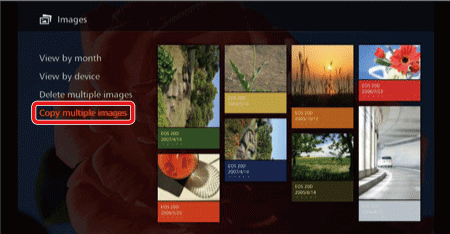
4.Select [Images] on the Home screen and press the [SET] button.

5.Select [Copy multiple images] and press the [SET] button.
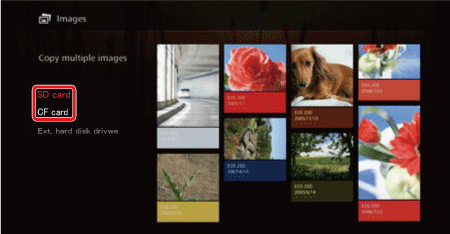
6.When you select [Copy multiple images], the card selection screen will appear first. Press the [ 

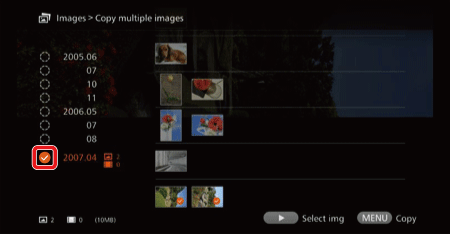
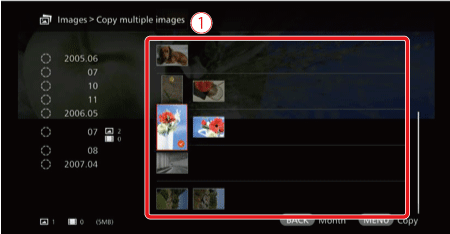
7.Sort the target images by a shooting month and append [ 
Select a shooting month in the left-side area and press the [SET] button to append [
Caution
Press the [ 

8.After selecting images for copying, press [MENU], select [YES] and press the [SET] button to save images to a memory card.

This completes the steps for selecting desired images from Connect Station and saving them to a memory card.
Saving Images to an External Hard Disk (Version 2.0 or later firmware)
To save images to an external hard disk, specify images by a shooting month, and copy them to an external hard disk at once. You can also select images one by one from the displayed images.
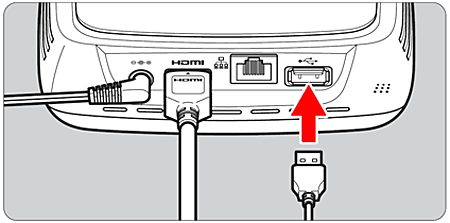
1.Connect the USB terminal on Connect Station to an external hard disk.
2.If you press the power button on Connect Station with its power off, the power lamp will light up in orange. The light will turn green when Connect Station starts. (It takes approx. one minute before Connect Station starts.)
| Connect Station Status | Power Lamp Indicator |
| Power off | (Lamp off) |
| Standby | Orange (lamp on) |
| Power on | Green (lamp on) |
Caution
3.Select [Images] on the Home screen and press the [SET] button.
4.Select [Copy multiple images] and press the [SET] button.
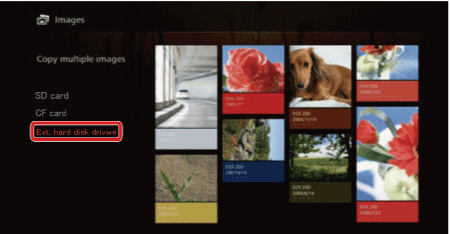
5.When you select [Copy multiple images], the external hard disk selection screen will appear first. Press the [
6.Sort the target images by a shooting month and append [
Select a shooting month in the left-side area and press the [SET] button to append [
Caution
Press the [
7.After selecting images for copying, press [MENU], select [YES] and press the [SET] button to save images to an external hard disk.

This completes the steps for selecting desired images from Connect Station and saving them to an external hard disk.