Solution
Choose the number of images per sheet. Your specified quantity of prints will be printed in the configured layout.
Caution
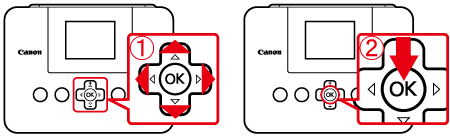
To select items that are displayed on the printer's [LCD monitor], press the

Left, Right, Up, or Down buttons. To confirm the selected items,

press the ⋖OK⋗ button.
Caution
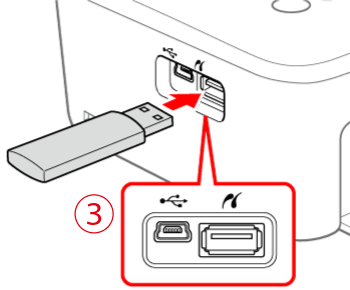
Before printing images from a memory card or a USB memory, check to make sure that the printer is not connected to a camera or a computer.
For memory cards that require an adapter, always insert the card into the adapter before inserting the adapter into the card slot. If you mistakenly insert the memory card into the card slot without an adapter, you may not be able to remove the card from the printer.
For instructions, refer to the memory card or adapter user manual.
Use a memory card formatted with the device you shot the photos with. Images on cards formatted with a computer may not be recognized.
Images may not be displayed or printed correctly depending on their size or if they have been edited on a computer.
When printing images take with a cell phone, the image may not be printed or displayed correctly depending on the cell phone settings at the time the image was captured.
JPEG images conforming to the Exif standard can be printed with SELPHY.
For computer or photo software instructions, refer to the relevant user manual.
In this section, an SD memory card is used as an example to explain the operations. You can print images by performing the same operations with a memory card other than an SD memory card or USB memory.
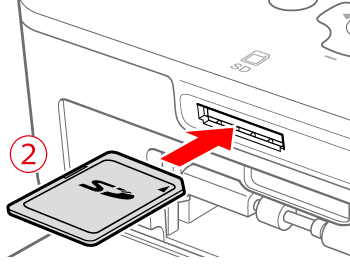
Insert the memory card with the label face-up.
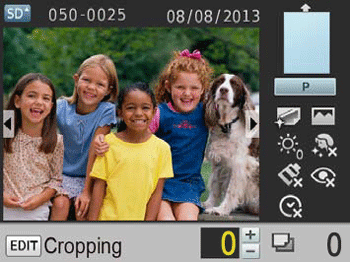
2. The following screen appears on the printer's [LCD monitor].
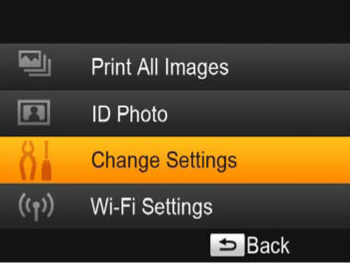
3. Press the MENU button ⋖ ⋗, and then select [Change Settings].
4. Select the [Page Layout] settings on this screen. ([4-up] is selected here.)
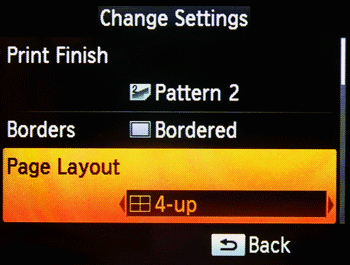
Select [Date] or [Borders] settings as needed, and then press the ⋖ ⋗ button.
Caution
Select one of the following [Page Layout] options.
(

) [1-up] (default)... One image per sheet
(

) [2-up]... Two images per sheet
(

) [4-up]... Four images per sheet
(

) [8-up]... Eight images per sheet (*With Color Ink / Label Set KC-18IL (8 Labels per Page), specify (
) [ 8-up].)
(

) [Index]... Many small, uniform size images per sheet. Carrying out [Print All Images] with [ Index] selected, allows you to print all images on the memory card as an index.
(

) [Shuffle]...Use the shuffle feature to have images arranged automatically in a variety of sizes. Groups of up to 8 or 20 images can be printed on a single sheet. Either L or postcard-size paper can be used for printing.
Caution
Turning off SELPHY will restore the default setting of (
) [1-up].
You can have SELPHY retain configured settings even after being turned off. With SELPHY off, hold down the ⋖

⋗, ⋖

⋗, ⋖

⋗, buttons, and then hold down the ⋖Power⋗ button until "SELPHY" is displayed. If you prefer SELPHY not to retain configured settings, repeat this procedure after turning SELPHY off. This procedure also determines whether SELPHY retains [Page Layout] settings when turned off.
The position of images cannot be specified.
5. Press the ⋖⋗ button to return to the image-selection screen.

6. The following screen appears.
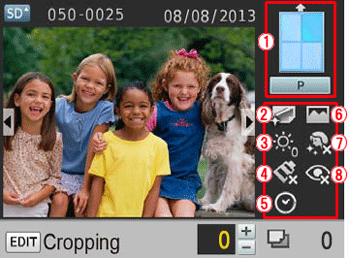
Check whether  the icon of the selected [Page Layout] option appears in the right side of the LCD monitor.
This icon appears as ( ) when [Borderless] is selected, and (
 ) when [Bordered] is selected.
Also, check the settings below as well.
 [Print Finish]
 [Brightness]
 [My Colors]
 [Date]
 [Image Optimize]
 [Smooth Skin]
 [Correct Red-Eye]
Caution
Icons displayed with (

) in the lower-right part indicate that the settings for those icons are set to [Off].
Depending on the configured layout, images may not be printed with the settings in [Date], [Image Optimize], [Correct Red-Eye], [Borders], [Smooth Skin], or [Brightness].
7. Specify the number of copies for printing.
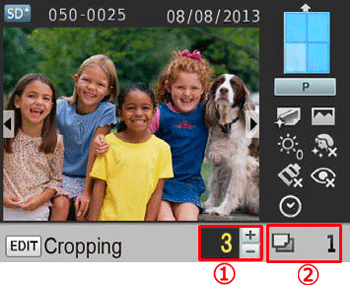
Number of copies of the displayed image (Select the image you want to print, and then press the ( ) buttons to specify the number of copies to make).
Total number of sheets to be printed (The number of sheets of paper needed for printing will be displayed.)
Press the ⋖⋗ button, and printing will start.
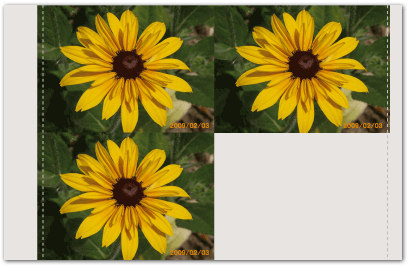
Example of a printed image:
The image below is a printed image on an [L size] sheet with the following settings.
[Page Layout]: [4-up]; Number of copies: 3; [Date]: [On]
Caution
The position of images cannot be specified.
It may take some time before printing begins.