

Issue
Cause and solution
Check 1: Make sure that the power plug is securely plugged in, then turn the machine on.
While the Power lamp is flashing blue, the machine is initializing. Wait until the Power lamp stops flashing and remains lit blue.
Caution
Cause and solution
Check 2: Check the status of ink tanks. Replace the ink tank if ink has run out.
You can check the ink status on the LCD or with ink lamps.
With the LCD on the Machine
(1) Make sure that the power is turned on, and press the HOME button.
(2) Press the left Function button.
Check if any symbol appears on the remaining ink volume screen.
Sufficient ink is left for printing if no symbol appears.

The ink with 
Caution
You can also check the ink status on a screen of the LCD displayed while printing.
With Ink Lamps
(1) Make sure that the power is turned on, and open the Paper Output Tray gently.
(2) Lift the Scanning Unit (Cover) until it stops.
(3) Check the ink lamps.
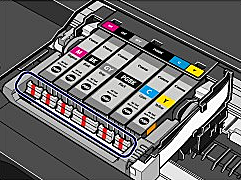
The ink tank is correctly installed and there is sufficient ink left for printing.
Flashing slowly (at around 3-second intervals)

Ink is low. You can continue printing for a while, but we recommend you to have a new ink tank available.
Flashing fast (at around 1-second intervals)

The ink tank is installed in the wrong position or it is empty. Make sure that the ink tank is installed in the correct position as indicated by the label on the Print Head Holder. If the position is correct but the lamp flashes, the ink tank is empty. Replace it with a new one.
The ink tank is not installed properly or the function for detecting the remaining ink level is disabled. If the ink tank is not installed properly, press the mark 
If the ink lamp is still off after reinstalling the ink tank, there has been an error and the machine cannot print. Check the error message displayed on the LCD.
When the ink tanks run out of ink, follow the procedure below to replace them.
Caution
Handling ink
To maintain optimal print quality, install ink tanks in the machine within the date indicated on the package box. And also use ink tanks within 6 months of first use. (We recommend you to put down the date when installing them.)
Caution
Color ink may be consumed even when printing a black-and-white document or when black-and-white printing is specified.
Every ink is also consumed in the standard cleaning and deep cleaning of the Print Head, which may be necessary to maintain the machine's performance. When an ink tank is out of ink, replace it immediately with a new one.
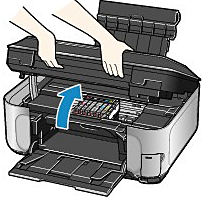
1. Make sure that the power is turned on, and open the Paper Output Tray gently.
2. Lift the Scanning Unit (Cover) until it stops.
The Print Head Holder moves to the replacement position.
Caution
Caution
Caution
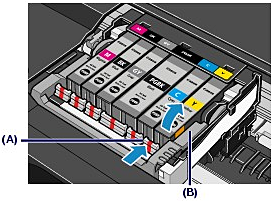
3. Replace the ink tank with the lamp flashing fast.
Push the tab (A) and lift the ink tank to remove.
Do not touch the Print Head Lock Lever (B).
Caution
Caution
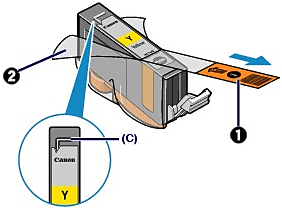
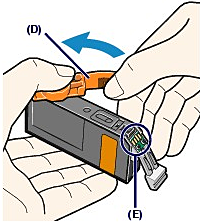
4. Prepare the new ink tank.
(1) Take the new ink tank out of its package, pull the orange tape (

Caution
(2) Hold the orange protective cap (D) as indicated in the figure below, then twist and remove it from the bottom of the ink tank.
Remove the protective cap while holding it to prevent the ink from staining your fingers.
Discard the protective cap once it is removed.
Caution
Caution
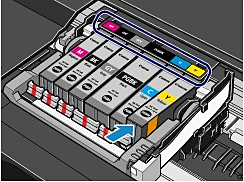
5. Install the new ink tank.
(1) Insert the front end of ink tank into the Print Head at a slant.
Make sure that the position of the ink tank matches the label.
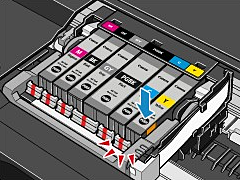
(2) Press the mark
Make sure that the ink lamp lights up red.
Caution
6. Close the Scanning Unit (Cover) gently.
Caution
Caution
Cause and solution
Check 3: Open the Scanning Unit (Cover) and check to see if the ink lamps are flashing red.
If there is still sufficient ink but its ink lamp is flashing red, an ink tank may not be installed in a right position. -⋗[ Replacing an Ink Tanks ]
Cause and solution
Check 4: Open the Scanning Unit (Cover) and make sure that the ink lamps light up red.
If the ink lamp is not lit, press the
Cause and solution
Check 5: Make sure that the machine is connected to your computer properly.
When the machine is connected to your computer with a USB cable, make sure that the USB cable is securely plugged into the machine and the computer, then check the following:
When you use the machine over LAN, make sure that the machine is connected to the network with a LAN cable or is set up correctly. For details, refer to your setup manual.
Cause and solution
Check 6: Restart your computer if you are printing from the computer.
If there are any unnecessary print jobs, delete them.
Cause and solution
Check 7: Make sure that the Inner Cover is closed.
If the Inner Cover is opened, close the Inner Cover and press the OK button on the machine.
Cause and solution
Check 8: Make sure that your machine's name is selected in the Print dialog box.
The machine will not print properly if you are using a driver for a different printer.
In Windows, make sure that your machine's name is selected in the Print dialog box.
On a Macintosh, make sure that your machine's name is selected in Printer in the Print dialog box.
Caution
Cause and solution
Check 9: Configure the printer port appropriately.(Windows)
Make sure that the printer port is configured appropriately in the printer driver.
1. Log on as a user account with administrator privilege.
2. Click Control Panel, then Printer under Hardware and Sound.
In Windows XP, click Control Panel, Printers and Other Hardware, then Printers and Faxes.
In Windows 2000, click Control Panel then Printers.
3. Right-click the Canon XXX Printer icon, then select Properties.
4. Click the Ports tab to confirm the port settings.
Make sure that a port named USBnnn (where "n" is a number) with Canon XXX Printer appearing in the Printer column is selected for Print to the following port(s).
If the setting is incorrect, reinstall the MP Drivers or change the printer port to the correct one.
Cause and solution
Check 10: Either Media Type or Page Size setting in the printer driver is inappropriate.
When using Fine Art Paper "Photo Rag" or non Canon genuine specialty paper, be sure to select the type of each media from Media Type and either Fine Art A4 or Fine Art Letter from Page Size or Paper size.
Confirm the settings following the procedure below, and try printing again.
1. Ensure that either Fine Art A4 or Fine Art Letter is selected in the application.
If the page size you want to use is not displayed, open the File menu of the application and select Print. Then ensure that the name of your machine is selected.
2. Ensure that the paper selected for Media Type in the Main tab (Windows) or the Print dialog box (Macintosh) in the printer driver matches the paper loaded in the machine.
3. Ensure that the Page Size setting in the Page Setup tab (Windows) or the Paper size setting in the Page Setup dialog box (Macintosh) in the printer driver is the same as the size set in step 1.