
- Photographing the Northern Lights: Tips from Neil Bloem
-

Hello!
We've noticed that you are in .
Visit Canon .
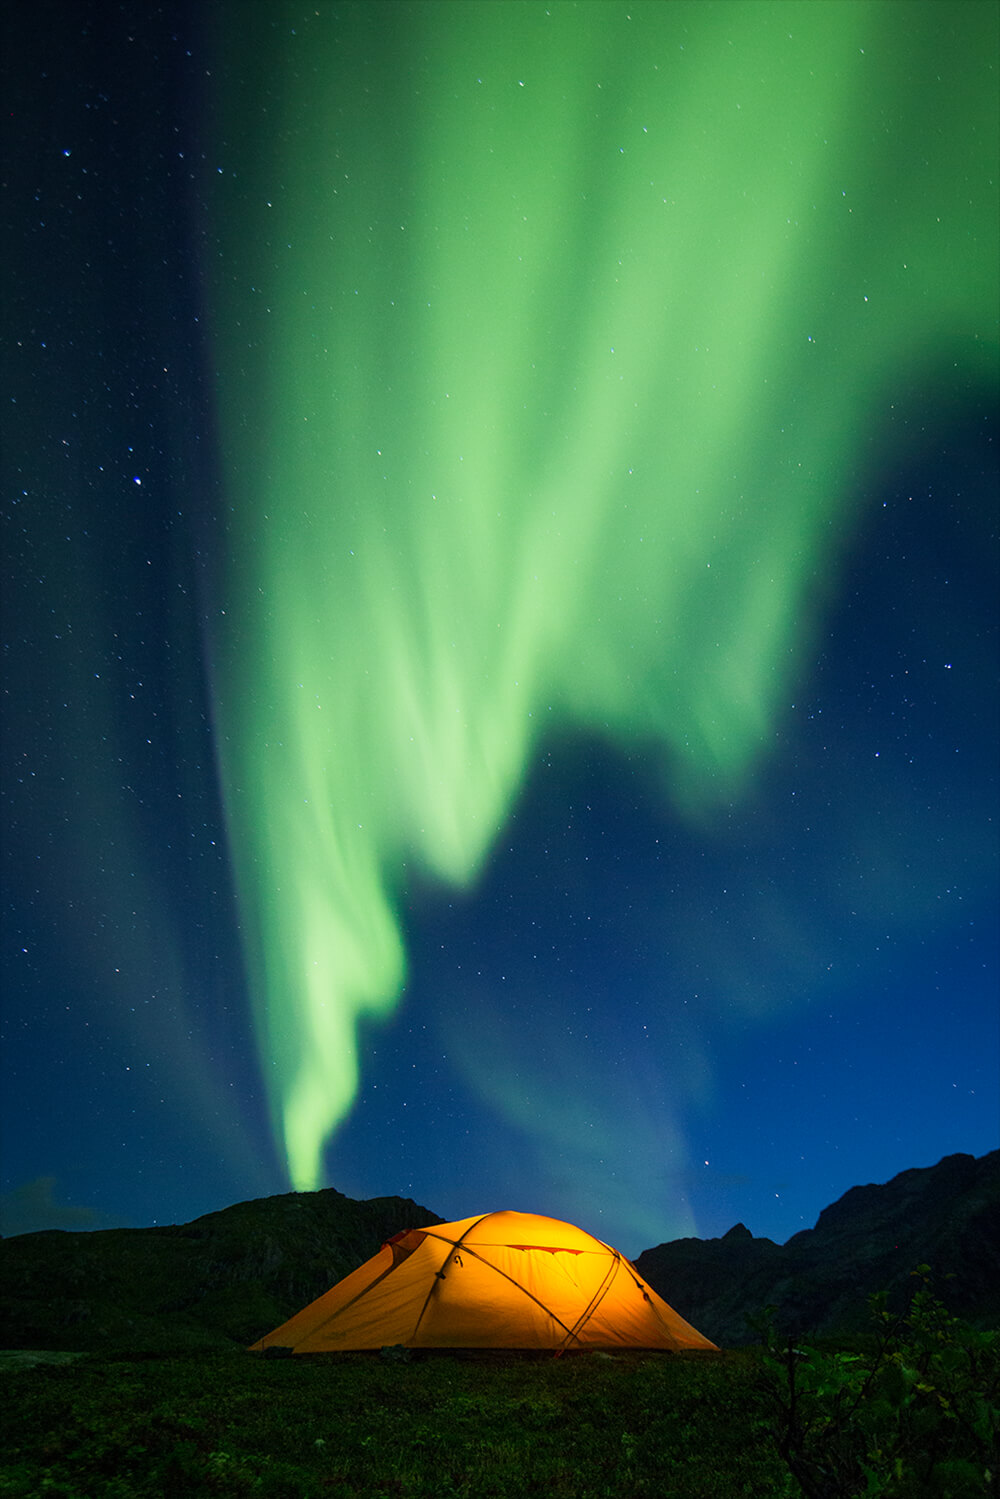
“The Northern Lights were the main reason for me wanting to live at the top of the world. I was hooked from the very first moment I saw them.”
Neil Bloem
In 2017, photographer Neil Bloem packed up his life in Melbourne and moved across the world to arctic Norway. Trading his busy city life for the solitude of Northern Norway’s mountains, he now spends his days photographing the spectacular light show known as the Aurora Borealis (or Northern Lights).
Here, Neil shares his advice on travelling in the Arctic Circle, and tips on where, when and how to photograph this eerily beautiful natural phenomenon.
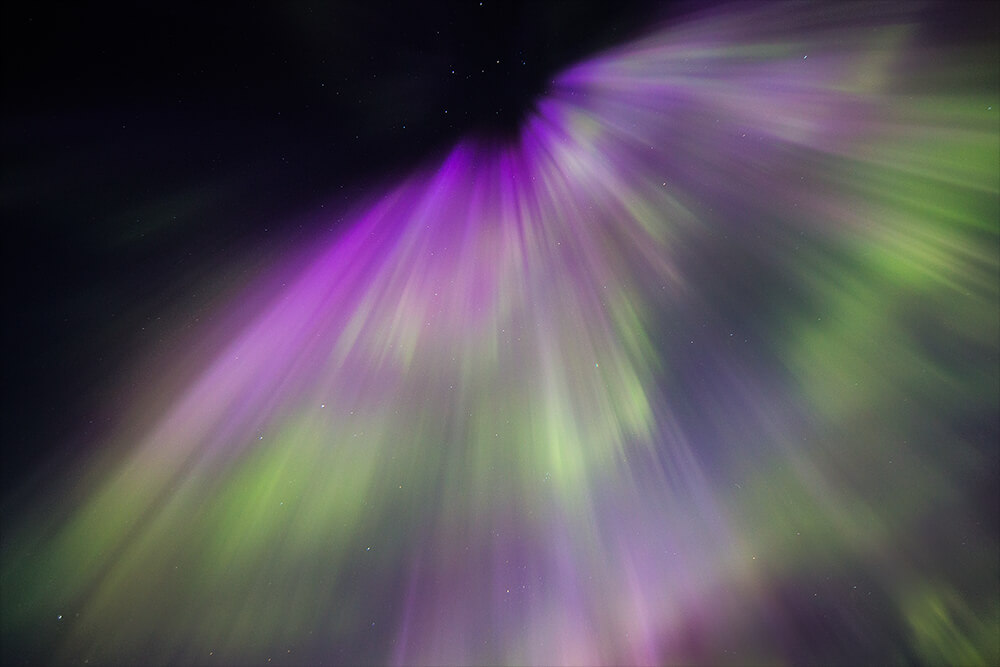
The Northern Lights, or Aurora Borealis, are charged particles that have been released from the Sun’s surface into outer space. Occasionally these particles line up with Earth and hit our magnetic field at great speeds, entering our atmosphere through the North and South Poles. These charged particles from the Sun interact with the oxygen and nitrogen in our atmosphere, creating the dancing lights and colours that we see in our night skies.
“Norway’s landscapes are a photographer’s dream, and the Northern Lights are unbelievably beautiful.”
Neil Bloem
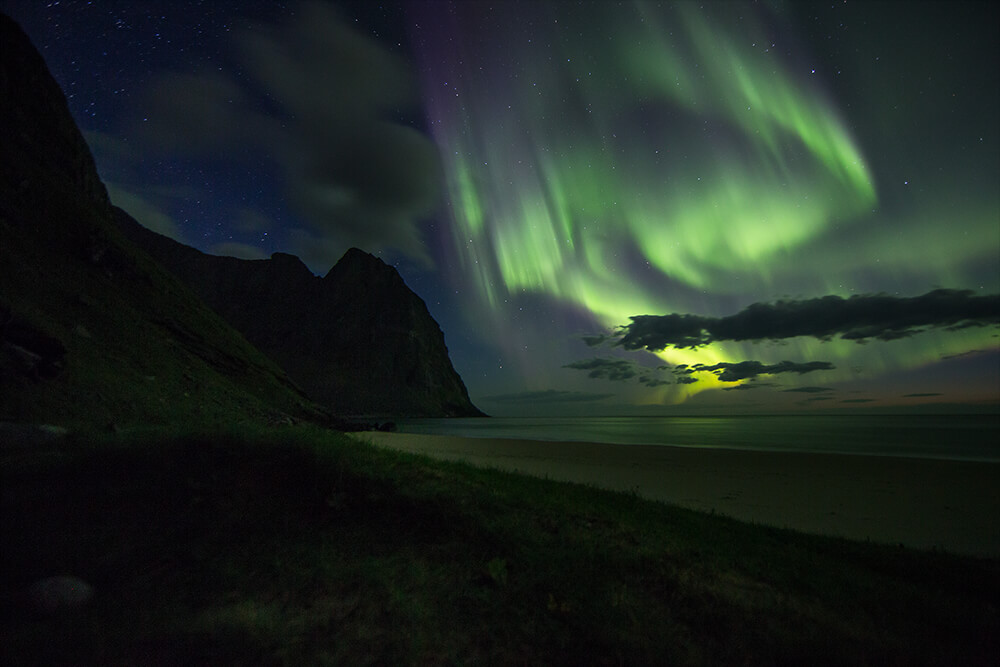
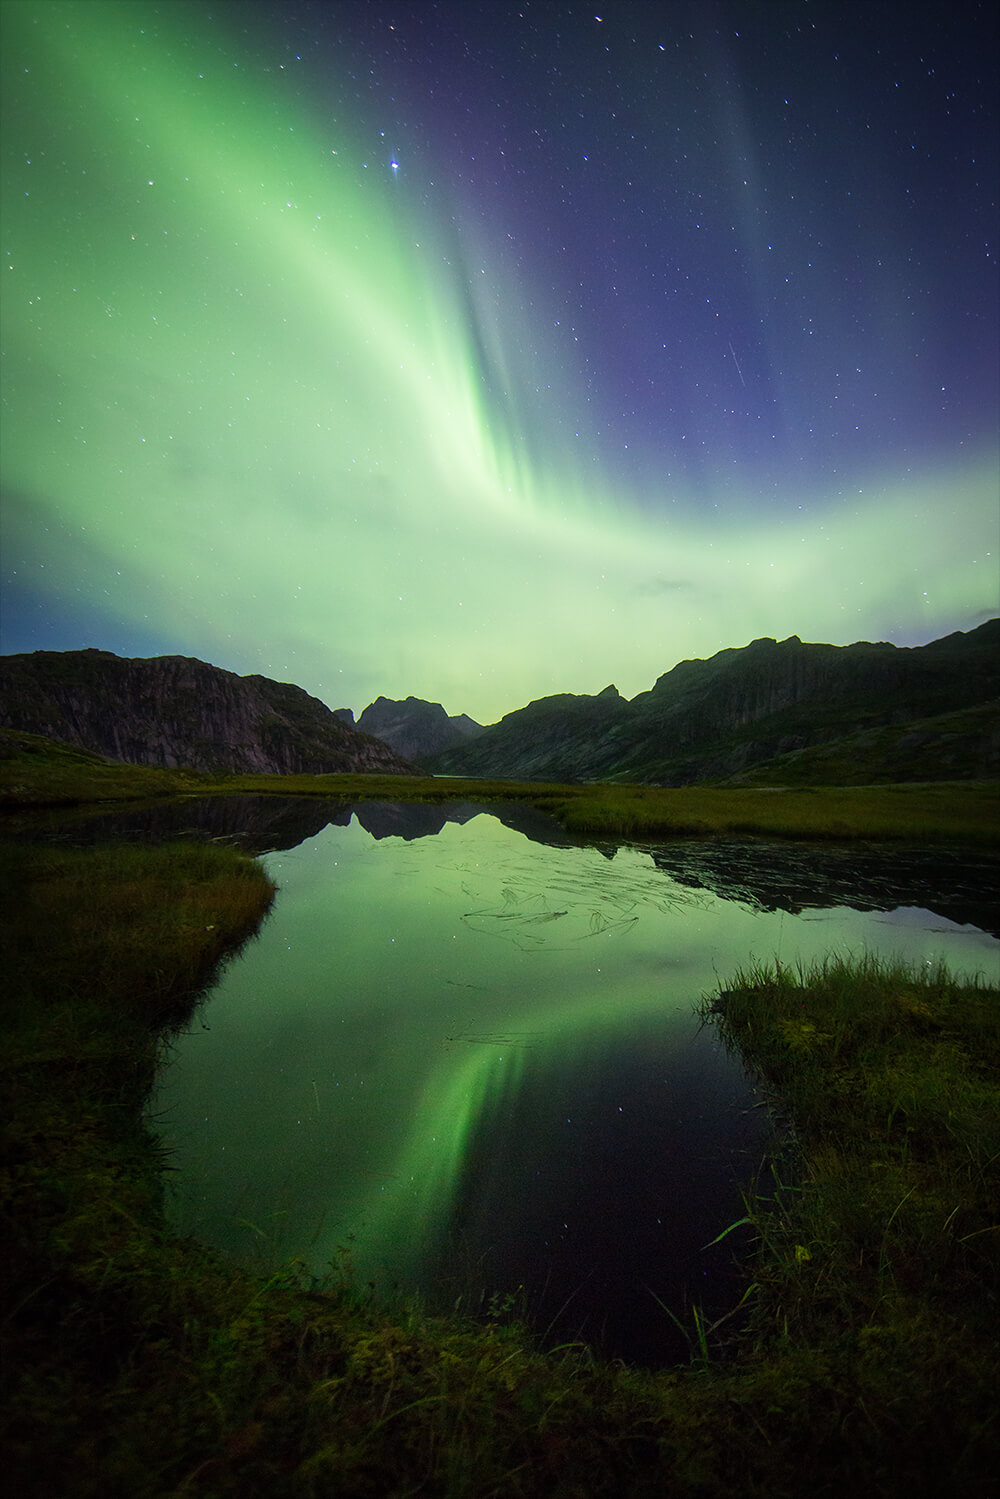
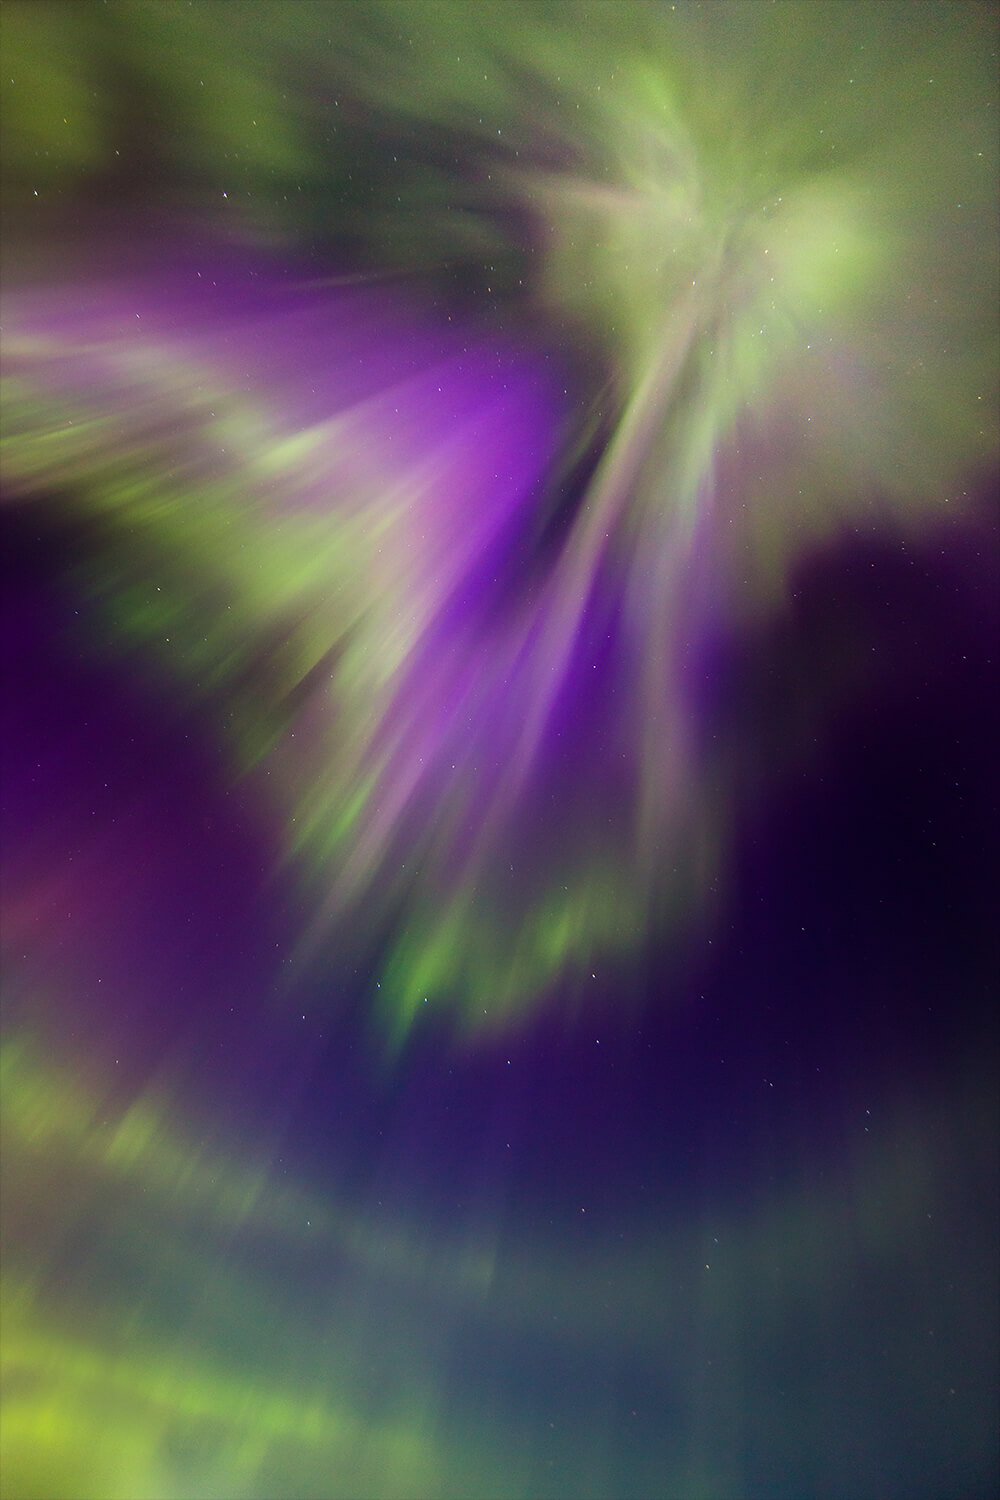
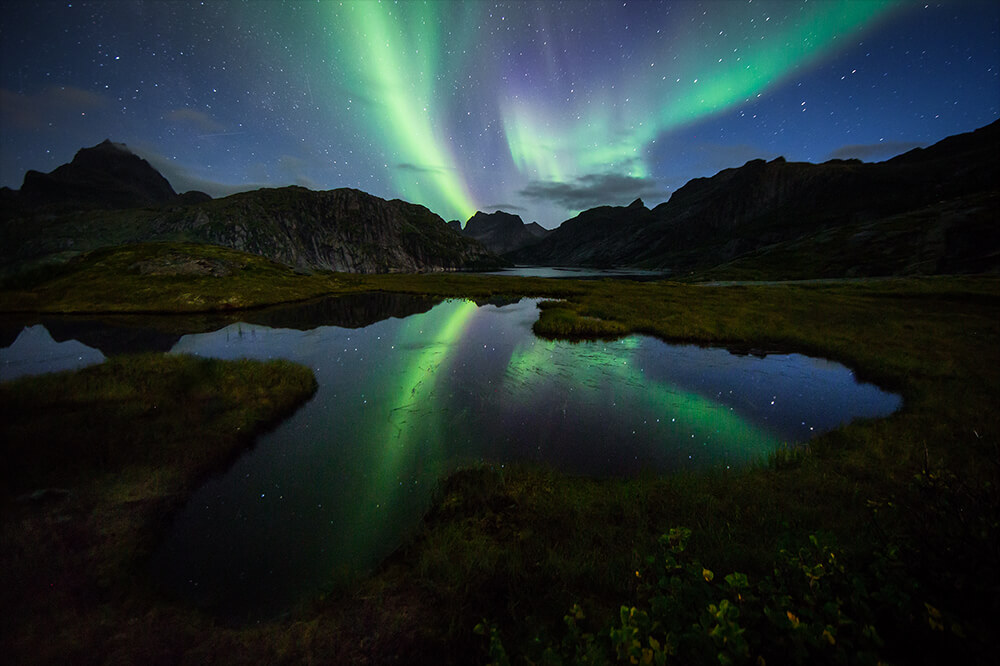
Auroral displays appear in many colours, although pale green and pink are the most common. Shades of red, yellow, green, blue, and violet have also been reported. The lights appear in many forms from patches and scattered clouds of light to streamers, arcs, rippling curtains and shooting rays that light up the sky with an eerie glow.
As long as you have darkness, it is possible to see the Northern Lights in Norway, Sweden, Finland, Russia, Greenland, Iceland, Alaska and Canada.
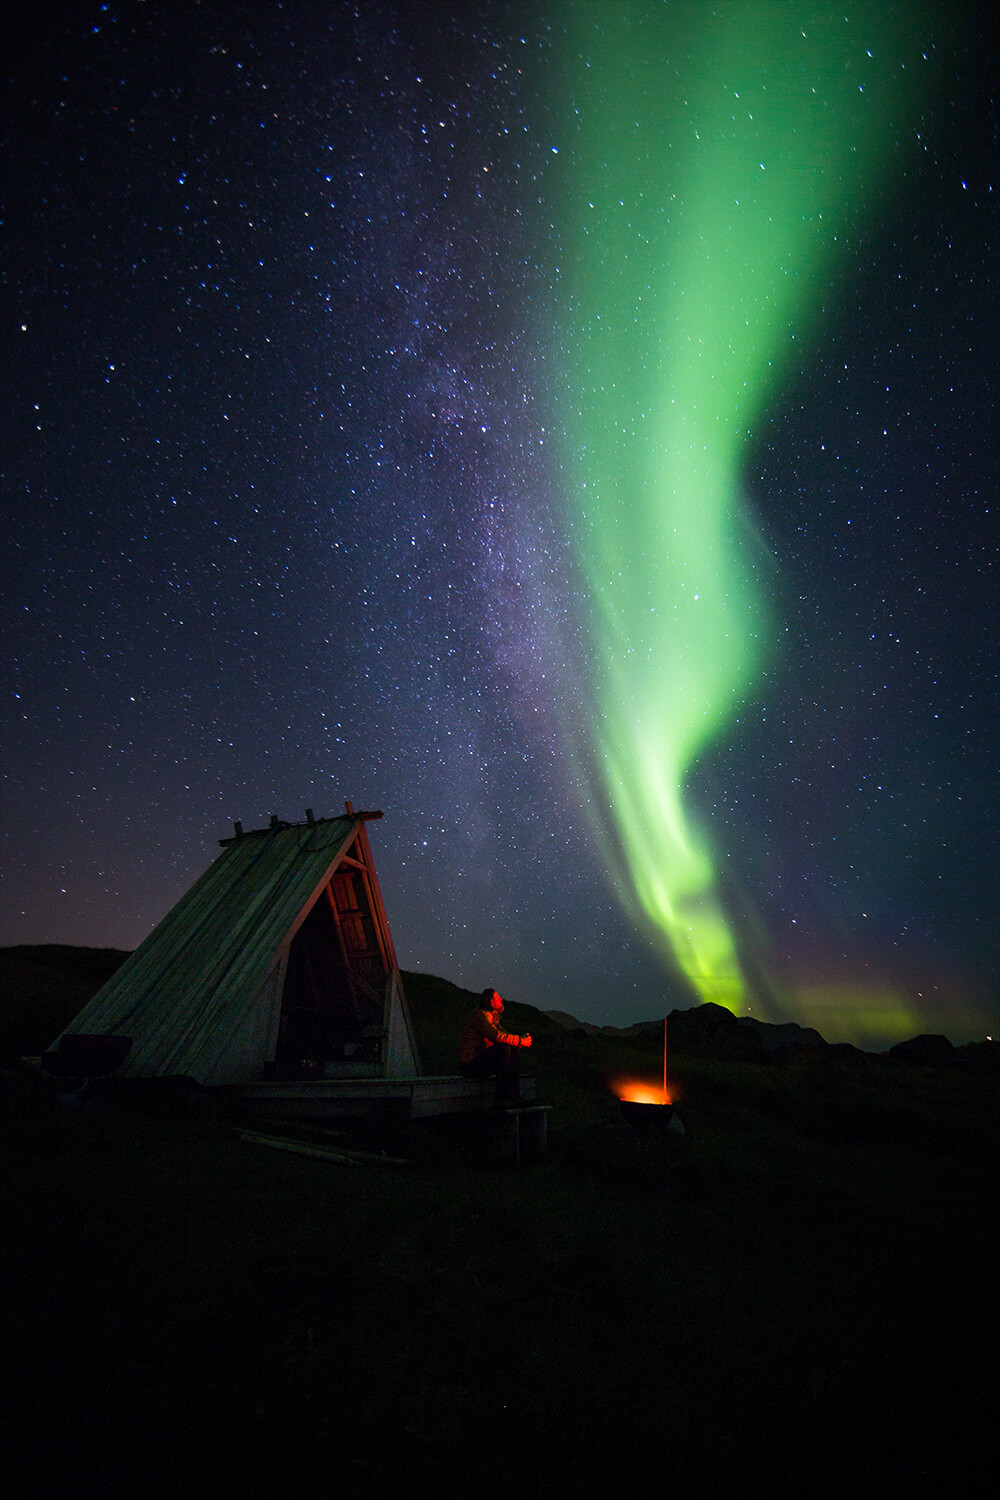
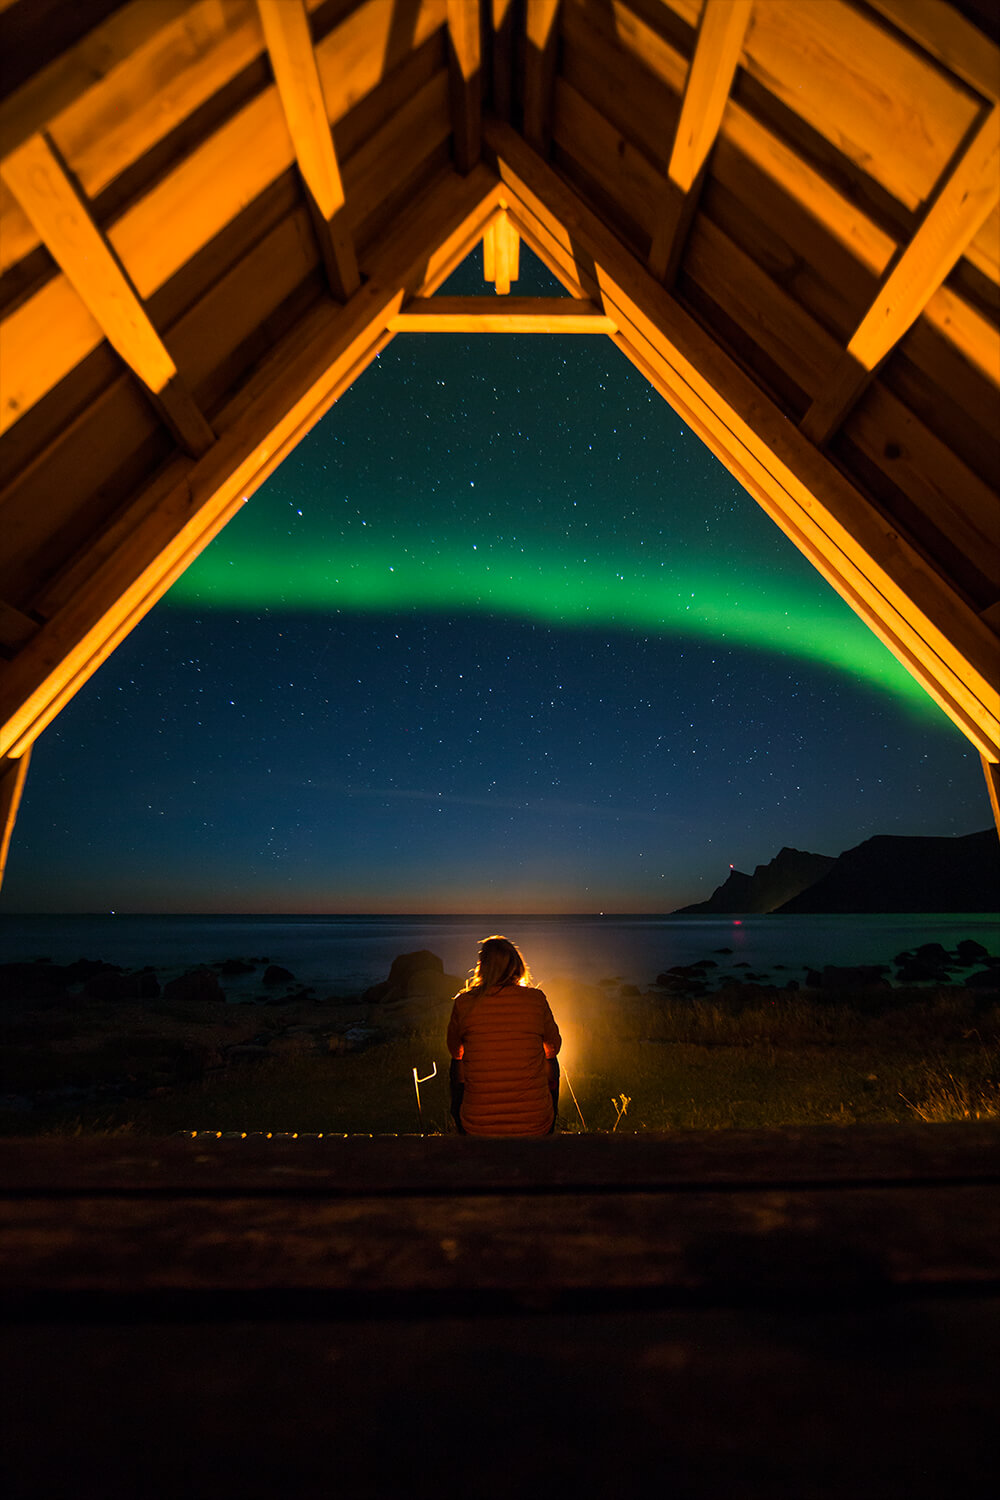
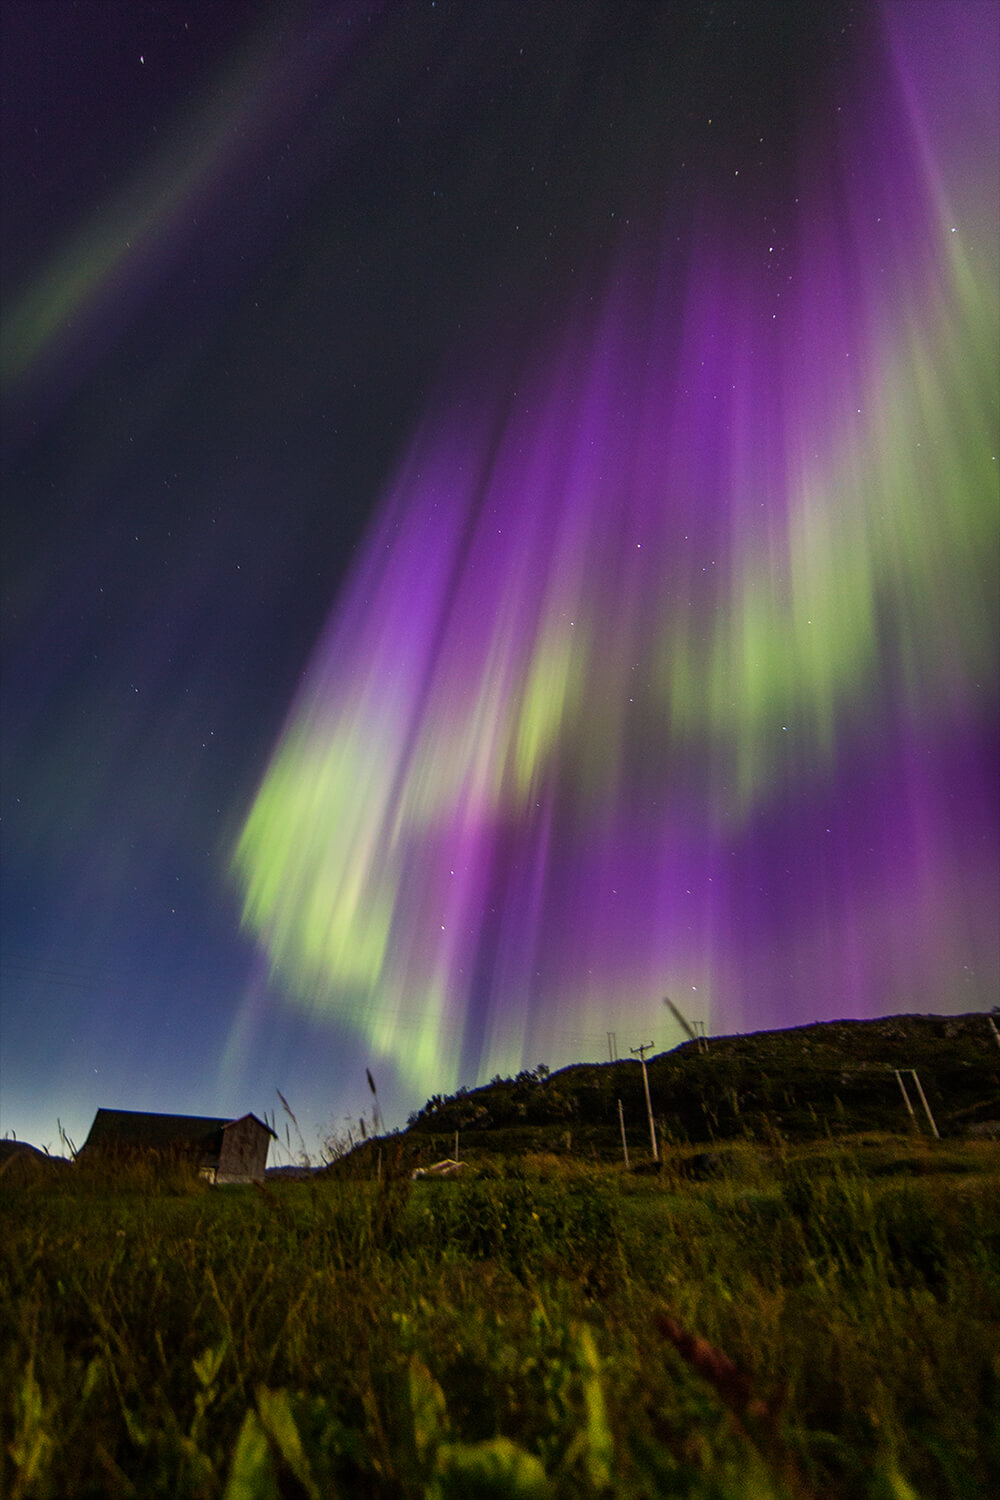
I’m currently living on the Lofoten Islands at the top of Norway, which is my favourite place to photograph the Auroras. The only downfall of this location as a Northern Lights photography destination is that the weather can often be bad, reducing your chances of seeing the Lights here in winter.
In the Arctic Circle we experience the Midnight Sun in summer, where the Sun doesn’t drop below the horizon, creating 24 hours of daylight. We also experience Polar Nights in winter, where the Sun doesn’t rise above the horizon, resulting in 24 hours of darkness.
From the end of August, it starts getting dark enough at night to view the Auroras. Personally, I prefer September and October for viewing the Northern Lights, as the temperatures are more comfortable for being outside all night.
“Most people come to Norway and other parts of the Arctic Circle around December. During this time of year you have 24 hours of darkness, giving you nearly all day to find and enjoy the Lights.”
Neil Bloem
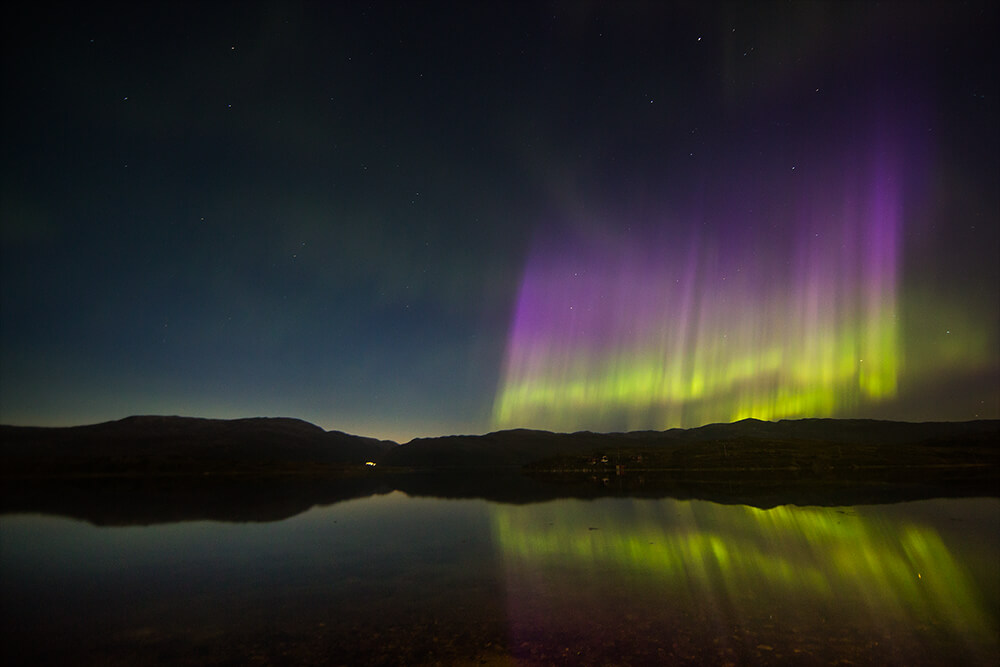
The weather is generally better coming out of the summer months, with clearer skies and lakes that haven’t frozen over yet, allowing you to take beautiful reflection photos in the water. There’s also no snow at this time of year, making locations easier to get to.
In mid-April it becomes too light at night to see the Northern Lights, as it shifts back to the Midnight Sun period.
Camera Body: Most DSLR cameras are capable of taking decent photos at night. I use the Canon 5D Mark III body with a 14mm f/2.8L lens.
Lenses: What will really help your night photography and shooting the Northern Lights is having a wide angle lens with a high aperture, such as f/1.8 or f/2.8. The higher the aperture, the wider the opening of your aperture will be, which will let in more light. If the whole sky is covered with Auroras then you will want to capture as much of the scene and landscape as possible in the frame. Using a wide angle lens of 20mm or below is ideal.
Tripod: Before taking your photos of the beauty in the sky, you’ll first need to set up your tripod. Unless you have a super power of holding a camera completely still for 20 seconds, a tripod is critical for night photography and capturing the dancing Northern Lights.
“It’s best to have full control over your equipment when shooting at night.”
Neil Bloem
Start by switching both your camera and lens to manual mode. Focusing manually at night is surprisingly easy and most lenses have an infinity symbol you can adjust to. You can also use your live view to zoom in on a subject in the distance—either a house light or someone standing far away with their phone lit up—and manually adjust your focus to make the light as sharp as possible.
ISO
Generally speaking, once you’ve got the ISO and aperture locked in, you will only need to adjust the shutter speed. Be aware that, depending on your camera, going over 1600 ISO will likely start bringing a bit of grain and noise into your photo.
Shutter Speed
Every night will be different, so if the Lights are faint in the sky you will want to have the lens wide open for a lot longer to bring in more light. But if the Lights are strong and moving quickly across the sky, then having a shorter shutter speed like 3 or 5 seconds will result in sharper photos. If you have a shutter speed of 20 seconds and there are dancing Auroras, your shots will just be a green blur.
Aperture
The higher your aperture, the more light will be able to let in. Keep your aperture open as wide as your lens will allow. Apertures of f/1.8 or f/2.8 are generally best for photographing the Northern Lights.
There are a few different ways to shoot the Northern Lights depending on what’s happening in the sky, but here are two quick guidelines to get started with:
Camera Settings for Photographing Faint Northern Lights
ISO – 1600 / Aperture – f/2.8 (or as high as your lens will go) Shutter Speed – 20/25 seconds
Camera Settings for Photographing Strong/Dancing Northern Lights
ISO – 1600 / Aperture – f/2.8 (or as high as your lens will go) Shutter Speed – 3/5 seconds
Learn more about the aperture, shutter speed and ISO with this tutorial.
Safety is a very big thing to keep in mind when going out searching for the Auroras. A lot of the time you’ll be quickly pulling your car over to the side of the road as the lights appear. Shooting on the road like this can be dangerous, especially because many of the roads are narrow and covered with ice and snow.
Make sure your car is safely and completely off the road. Wear reflective vests or jackets and move away from the road as far as possible. Having a head torch is important as well, as navigating your way in the darkness is very risky, especially in places you are unfamiliar with.
Being in such cold climates while shooting the Auroras, brings your gear some unexpected challenges and you need to take extra precautions. Your batteries will drain more quickly than usual in the freezing temperatures, so be sure to bring plenty of spares.
Avoiding condensation on and inside your camera is important too. When quickly moving from cold to warm, or warm to cold climates, you should place your camera in a ziplock bag or camera bag before changing temperatures. Leave the bag in its new environment for your equipment to slowly adjust.
Your tripod will most likely ice over as well, so always remember to handle your tripod with gloves.
It’s important to pack the right clothing to make sure you keep warm while exploring with your camera. Being warm, dry and comfortable will make your photography trip a whole lot better.
Layer up using wool thermals and socks, down jackets and windbreakers. Always avoid using cotton as it works the complete opposite way of what you want in cold climates. Wool beanies, hats, gloves and waterproof boots are also all essential.
Stacking on the right layers and making yourself comfortable out in the arctic cold will ensure you have a great night of shooting.
“I’ve dealt with frostbite a couple of times, and let me tell you: it’s not fun!”
Neil Bloem
Another part of making yourself comfortable in the cold is using hand warmers. Apart from doing the obvious of warming your hands, they’re great at keeping your spare batteries warm too, which makes them last longer. And sticking them in your boots and gloves is always a nice feeling when you’re out in -20 or below all night.
Use these tips and techniques and you’ll be taking great photos of the Northern Lights at the top of the world in no time!
Follow Neil on Instagram to see more of his Northern Lights photography.
Would you love to photograph the majestic Northern Lights? Enter Canon’s Christmas competition for a chance to win 1 of 30 life-changing trips exclusively crafted by Canon. Find out more and enter here!

Vivid Sydney is back for 2024! Local photographer, Elisa Eves & Canon Ambassador Wil Calabio share photography tips and best locations to help you capture the festival of light.

Bioluminescence is one of the most beautiful displays light from the natural world that you can witness.The iridescent blue light emitted from the algae when it is disturbed is mesmerising and almost otherworldly. Find out how to photograph this phenomena with tips from Canon Community Member, David Rogers.
